

 Tech Hub
Overview
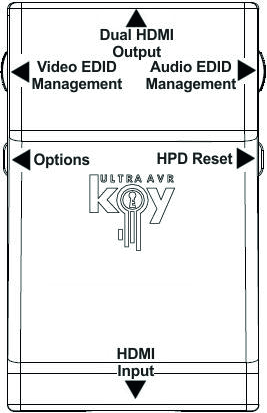
The HDfury team would like to thank you personally for purchasing the 4K AVR-Key!
HDfury AVR-Key is a 4K60 4:4:4 600MHz 18Gbps HDMI2.0b Level A Full HDMI Audio extractor device built for system integrators and advanced users that will please everyone else as well.
By supporting the max bandwidth and data transfer rate of the HDMI2.0b standard and by extracting and offering full HDMI audio via a self-generated 720p60 or 1080p60 blanked stream, AVR-Key is set to support and integrate any AVR from any HDMI revision into any HDMI setup including DV/HLG/HDR10+.
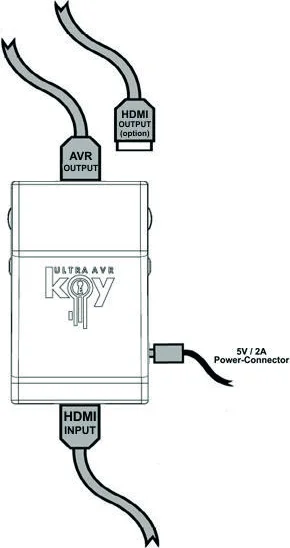
Connecting Cables
- Connect a HDMI input cable to the HDMI input.
- Connect a HDMI output cable to the AVR/Audio output.
- Connect the AVR-Key power supply.
- Connect any additional HDMI output cable for display pass thru (optional).
As shipped, the AVR-Key defaults to 720p60 for the AVR audio stream on the output port. Make sure that you are using 600MHz certified HDMI 4K cable if you plan to set up a 4K60 4:4:4 600MHz 18Gbps link in your setup.
Please note that AVR-Key does not require a display to be connected at the output, you can extract Full HDMI sound to feed your AVR, without necessarily having a display attached at AVR-Key output.
Power Status/LED
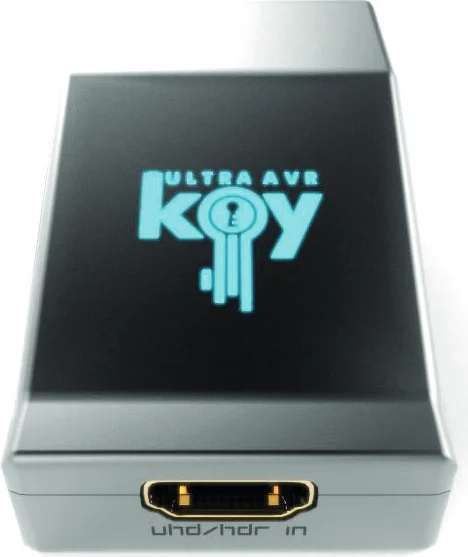
The AVR-Key logo will glow Blue when in use. When the AVR-Key first receives an HDMI signal the logo will quickly turn on, then off, and then on permanently to indicate that the HDCP handshake has been completed.
The status of the blue logo may be used for troubleshooting:
| Status | Description |
|---|---|
| [Logo OFF] | Insufficient power or no incoming signals. Use the AVR-Key power supply, make sure the source and sink devices are correctly connected and ON. |
| [Logo ON] | The AVR-Key is powered and receiving and decoding a HDMI signal. |
Reset HPD/Cycle HDCP
Reset HPD (Short Press) or Cycle HDCP (Long Press)
The 4K AVR-Key offers 2 functions per push button.
[Short Press] on Reset Button will generate Hot Plug Detection event. Soft reset.
[Long Press] (over 2sec) will cycle HDCP, either follow (goes out as it comes in) or HDCP 1.4 forced.
Note: You can also Reset the unit from the USB GUI for Windows PC or when you flash the AVR-Key firmware. Factory default value and default value after firmware flash for HDCP is Follow.
Audio EDID Mode Selection
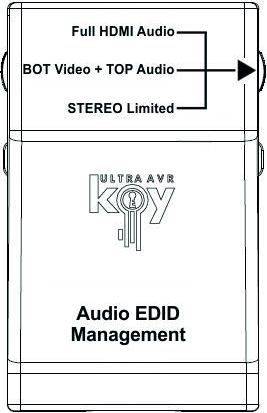
Audio EDID Mode slide switch has 3 positions.
Default/Factory setting is to the middle position to follow sink capabilities.
- Full HDMI Audio : In this mode, no matter the connected sink audio capabilities, AVR-Key will always present Full HDMI Audio capabilities to the source, including Atmos, DTS:X and all latest.
- BOT Video + TOP Audio : Default setting that will use Audio capabilities of the connected AVR and mix them with Video capabilities of the connected display (if any, see video options p.10)
- STEREO Limited : In this mode, no matter the connected sink audio capabilities, AVR-Key will always present L/R Audio capability to the source. It can be used as a testing mode to ensure sound in every setup/situation.
Note: You can also switch Audio EDID mode and any others control from the USB GUI for Windows PC or via the Android/iOS APP or IR using the optional GoBlue.
Audio slide will override the results even if nothing is connected to the TOP if audio slide is in the middle and nothing is connected to the TOP, then a default EDID is used according to the Video switch position.
Options Selection
Options Button allows you to cycle audio stream output resolution and turn LOGO Led ON/OFF.
- [Short Press] will cycle the output resolution of the audio stream between 720p60/1080p60
- [Long Press] (over 2sec) will cycle Logo LED: ON/OFF
Note: You can also change options and any others control from the USB GUI for Windows PC or via the Android/iOS APP or IR using the optional GoBlue.
Default setting is 720p60 for the Audio stream output resolution and Logo Led is ON by default.
Video EDID Mode Selection
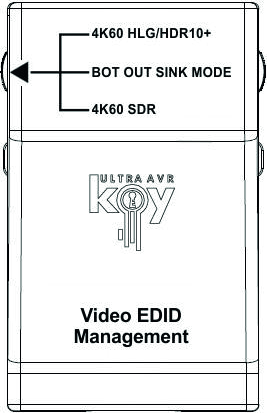
Video EDID Mode slide switch has 3 positions.
Default/Factory setting is to the middle position to follow sink capabilities.
- 4K60 600MHz HLG/HDR10+ : In this mode, no matter the connected sink video capabilities, AVR-Key will always present Full Video capabilities to the source, except for Dolby Vision that require the Video slide switch to be in the middle position.
- BOT OUT SINK EDID MODE : Default setting that will use Video capabilities from the connected display/sink and mix them with Audio capabilities defined by audio slide switch (if any, see audio options p.8) if nothing is connected to BOT, it will use 4K60 600MHz HLG/HDR10+ as default. If you have a Dolby Vision display, you must use this setting.
- 4K60 600MHz SDR : Special Video EDID mode to force some capable UHD BR players to output 4K BT2020 SDR instead of 4K BT2020 HDR.
Note: Video slide will override the results even if nothing is connected to BOT if video slide is in the middle and nothing is connected to the BOT then [4K60 600MHz HLG/HDR10+] will be used and any audio is normally handled by the Audio slide switch (see p.8).
Combo RST + OPT
Combo Hold RST + Press OPT
Not in use currently, saved for future use based on user’s feedback.
Backside Sticker
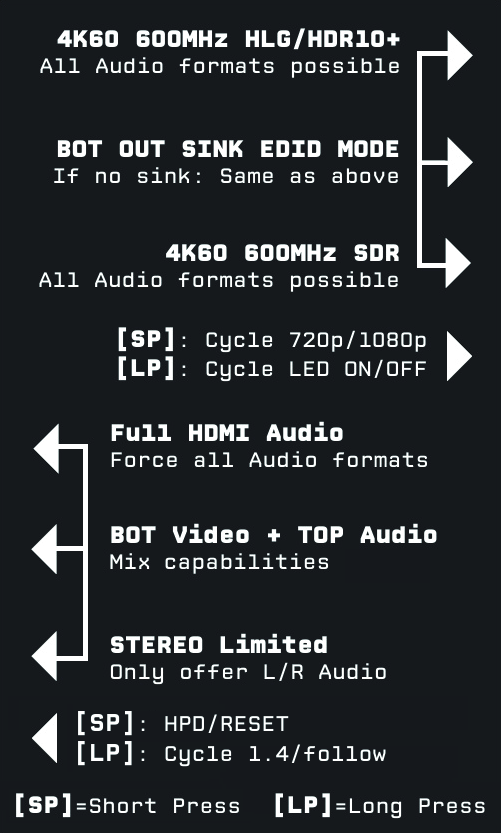
A sticker is available on the back of the unit to remind you the basic configuration options available from the physical button and slide switches.
Disclaimer: 3rd party and/or custom firmware providing extra features are not covered in this manual.
Selecting the Windows PC driver for USB GUI and Firmware Update
Make sure to install the right Silabs driver for Windows PC based on your Windows OS version and USB port version.
- Silabs Driver 4.0.0 for XP/VISTA/WIN7/WIN8/WIN10
- Silabs Driver 4.0.0 - ZIP - 9.18 Mo
- USB2.0: WIN XP / VISTA / WIN7 / WIN8 / WIN10
- USB3.0: WIN10 / Partial support for other Windows versions.
- Silabs Driver 3.9.2 for XP/VISTA/WIN7/WIN8
- Silabs Driver 3.9.2 - ZIP - 1.65 Mo
- USB2.0: WIN XP / VISTA / WIN7 / WIN8
- USB3.0: WIN XP / VISTA / WIN7 / WIN8
Note: If you are using Windows 10, the Silabs Driver 4.0.0 is mandatory. However, Silabs driver 4.0.0 only has partial support for USB3.0 on Win8 and previous Windows versions, so you might prefer 3.9.2 in such cases.
For installation simply download from the above link, unzip and then run the .EXE file.
- Silabs 3.9.2 driver: run the USBXpressInstaller.exe
- Silabs 4.0.0 driver: USBXpressInstaller_x86.exe for 32bit or USBXpressInstaller_x64.exe for 64bit.
Once you have correctly selected, downloaded, and installed the right driver, you can proceed with either updating Firmware (p.14) or using GUI utility (p.16). Both Firmware update and GUI utility provide 2 directories labelled as per Driver version, make sure to use the right directory matching your driver version.
Ex: If you installed 3.9.2 driver, use the 3.9.2 directory to run Firmware update or the 3.9.2 directory to run the GUI utility.
Note: You can install or remove any driver any time: Control Panel > Program > Remove Software.
Update the AVR-Key Firmware with a Windows PC
Disclaimer: 3rd party and/or custom firmware providing extra features are not covered in this manual.
Updating your AVR-Key Firmware for Windows PC
The AVR-Key Firmware Updater is compatible with all Windows from Win XP to Win 10. Make sure you have installed the right Silabs driver based on your Windows version and USB port as described in previous page.
You can download the latest Firmware version for your AVR-Key device from the Download Tab on the AVR-Key Product page: here. If you are unsure about your Firmware version currently in use, simply use the USB GUI for Windows PC to retrieve it.
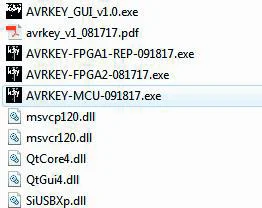
Once downloaded and extracted, you should have a directory on your computer with the following files. You will have to run AVR-KEY-MCU update to successfully upgrade your AVR-Key unit.
Note: Version number could be different depending on the FW revision you downloaded.
MCU Update Instructions
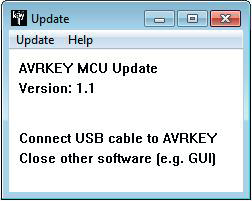
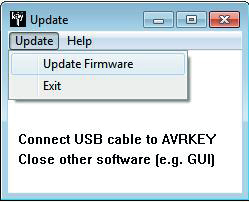
- Double-click AVR-KEY-MCU executable (if needed, right-click and select Run as Administrator)
- The window will open as shown below.
- Click Update Firmware as shown on the below picture.
- Flashing time is about 5 seconds.
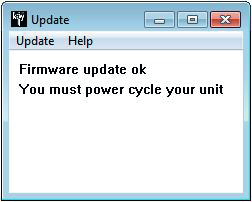
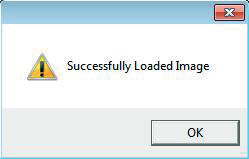
Once completed, you will hear a windows notification sound and the following window will pop up. Simply click OK and the main updater will display the message below.
Congratulations, you have successfully updated the AVR-Key MCU and your unit is now ready to operate with the benefits from the latest software additions.
Please note that if your firmware package contains more than one updater file, you need to run all updater files in order to properly upgrade your unit. FPGA update takes longer than MCU update and displays progress via percentage.
AVR-Key USB GUI for Windows PC
Disclaimer: 3rd party and/or custom firmware providing extra features are not covered in this manual.
AVR-Key USB GUI (Software for Windows PC)
The USB GUI is compatible with all Microsoft Windows version from Win XP to Win 10. Make sure you have installed the right Silabs driver based on your Windows version and USB port as described in p.13
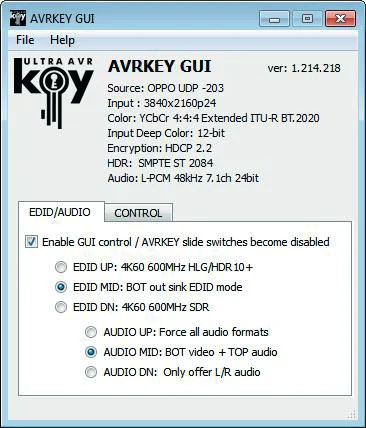
The USB GUI for Windows PC allows the following control:
- Display Information on Source device when available.
- Display Input signal resolution, refresh rate and bandwidth.
- Display Input signal HDR Type, Color Space and Deep Color.
- Display Input signal encryption. Set HDCP output revision.
- Display Audio information.
- Display the Firmware revision.
- Select Output resolution for Audio stream.
- Select the default VIDEO EDID table from a selection of multiple presets.
- Select the default AUDIO EDID table from a selection of multiple presets.
- Turn ON/OFF the LOGO LED. (GREEN)
- Perform Soft Reset
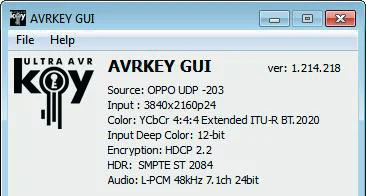
You can download the latest GUI version for your AVR-Key device from the Download Tab on the AVR-Key Product page: here. Always run latest FW when running latest GUI to benefit from all new features.
The TOP SECTION of the USB GUI for Windows PC
- Source: When available it will display information about the source device in use.
- Input: Display Input signal resolution and refresh rate.
- Color: Display Color Space of Incoming signal.
- Input Deep Color: Display Deep Color of Incoming signal.
- Encryption: HDCP encryption information at Input.
- HDR: Display HDR signal information.
- Audio: Display Audio information.
- Ver: Displayed on top right, it indicates the current FW version of your AVR-Key unit.
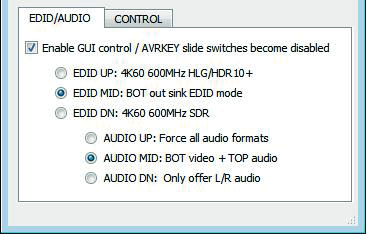
The EDID/AUDIO MANAGER section of the USB GUI for Windows PC
- [Enable GUI Control]: Check this box to disable slide switch and set the unit configuration via GUI.
[EDID UP: 4K60 600MHz HLG/HDR10+]: In this mode, no matter the connected sink video capabilities, AVR-Key will always present Full Video capabilities to the source, except for Dolby Vision that requires the Video slide switch to be in the middle position.
[EDID MID: OUT SINK EDID MODE]: Default setting that will use Video capabilities from the connected display/sink and mix them with Audio capabilities defined by the audio slide switch (if any, see audio options p.8). If nothing is connected to BOT, it will use 4K60 600MHz HLG/HDR10+ as default.
If you have a Dolby Vision display, you must use this setting.
[EDID DN: 4K60 600MHz SDR]: Special Video EDID mode to force some capable UHD BR players to output 4K BT2020 SDR instead of 4K BT2020 HDR.
Note: Video slide or GUI settings will override the results even if nothing is connected to BOT. If video slide or GUI settings are in the middle and nothing is connected to the BOT then [4K60 600MHz HLG/HDR10+] will be used and any audio is normally handled by the Audio slide switch or GUI settings.
[Full HDMI Audio]: In this mode, no matter the connected sink audio capabilities, AVR-Key will always present Full HDMI Audio capabilities to the source, including Atmos, DTS:X and all latest.
[BOT Video + TOP Audio]: Default setting that will use Audio capabilities of the connected AVR and mix them with Video capabilities of the connected display (if any, see video options p.10).
[STEREO Limited]: In this mode, no matter the connected sink audio capabilities, AVR-Key will always present L/R Audio capability to the source. It can be used as a testing mode to ensure sound in every setup/situation.
Note: You can also switch Audio EDID mode and other controls from the USB GUI for Windows PC or via the Android/iOS APP or IR using the optional GoBlue. Audio slide or GUI settings will override the results even if nothing is connected to the TOP. If audio slide or GUI settings are in the middle and nothing is connected to the TOP, then [Full HDMI Audio] will be used. Both slide switches Default/Factory setting is to the middle position to follow sink capabilities.
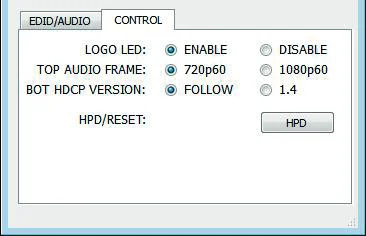
The CONTROL MANAGER section of the USB GUI for Windows PC
- [LOGO LED]: ENABLE/DISABLE the main LOGO LED. Similar as [LP] Long Press on the OPTIONS button (see page 9).
- [TOP AUDIO FRAME]: Cycle audio stream output resolution between 720p60 and 1080p60. Similar as [SP] Short Press on the OPTIONS button (see page 9).
- [BOT HDCP VERSION]: Cycle HDCP version for BOT OUT between FOLLOW and 1.4. Similar as [LP] Long Press on the RESET button (see page 7).
- [HPD/RESET]: Once clicked, it will generate Hot Plug Detection event. Soft reset. Similar as [SP] Short Press on the RESET button (see page 7).
Frequently Asked Questions (FAQ)
Note: 3rd party and/or custom firmware providing extra features are not covered in this manual.
My display is supposed to accept 4K60 4:4:4 signals but it does not work?
For most UHD TV set we tried, there are always extra configuration options to active in order to achieve a 4K60 4:4:4 600MHz link. For ex, on samsung: in order to enable the 444 colorspace for 4k in Samsung TV’s you must go to "settings" and "hdmi" and "UHD color" and enable it. Then also you must assign the HDMI port1 as "PC" in the tools menu. Only after these two steps will 600MHz be accepted. Similar activation tricks are required on most UHD TV’s. Additionally, most UHD TV’s only have specific ports that are 600MHz capable.
I have a PC mode on my TV (or a PC monitor) what resolutions are supported for graphics mode?
All PC graphics mode within the 600MHz bandwidth are supported, including ultra-high resolution such as WQSXGA, QUXGA, QFHD, WQUXGA, 4K.
What output resolution does the AVR-Key support in HDTV mode?
All known SD, HD, Full HD and UHD formats are supported including: 480i50, 480i60, 480p50, 480p60, 576p50, 576p60, 720p50, 720p60, 720p100, 720p120, 1080i25, 1080i30, 1080p24, 1080p25, 1080p30, 1080p48, 1080p50, 1080p60, 1080p72, 1080p75, 1080p96, 1440p50, 1440p60, 2160p24, 2160p25, 2160p30, 2160p50, 2160p60, 4K DCI (these are examples only, anything within the 600MHz bandwidth is supported.)
What version of HDMI does the AVR-Key work with? Do I need HDMI 1.3/1.4a/2.0a? Does it matter?
It does not matter. HDfury AVR-Key works with any version of HDMI from 1.0 and up to latest.
Do I need to set anything special in my HDMI source device to set the resolution correctly?
No. The HDfury AVR-Key will be detected as 2160p60 4:4:4 capable device by your source and it will always accept and process the highest quality stream from your source devices. There is no need to set the HDMI source to any specific resolution.
Is there any latency (delay) introduced to the signal?
Virtually none. The latency added is in the order of a few pixel clocks only. Nothing noticeable at all.
What is the USB port for?
To provide power from the supplied USB power unit and for firmware upgrades when new (additional) functions and enhancements are offered.
What about long HDMI cable runs? Can I expect issues?
For 600MHz users must use "high speed" cables, or 600MHz/18Gbps certified. For 4K30, 1080p or less almost all cables are ok. HDfury AVR-Key acts as a HDMI repeater device. So having a HDfury AVR-Key in the path will amplify and recover the signal. You should not need any passive (or active) HDMI
amplifiers, especially if you put the HDfury AVR-Key in the middle of your cable run. If you previously had to use an amplifier, the HDfury AVR-Key can most likely take its place. The HDfury AVR-Key has been used with 50 foot (and longer) HDMI cables without issues.
How are the new lossless audio formats via HDMI input handled? E.g. DTS-HD/MA and DD/E-AC3: Are they stripped down to DTS core or Dolby Digital respectively to fit the requirements of the S/PDIF standard?
Lossless audio is transmitted through HDMI output. HDfury AVR-Key does not compress or otherwise downconvert the incoming audio.
Do I need to use the USB power supply?
Yes. Due to the advanced features, the AVR-Key draws more power than previous HDfury models. The AVR-Key power supply must be used at all times.
Is the AVR-Key power supply the same as that used by the HDfury1, HDfury2, and GammaX?
No. The power supply for the HDfury1, HDfury2 and GammaX kits are 0.5A max current. The HDfury3 is 1A max current. The AVR-Key power supply can supply up to 2.0A. Do not use an HDfury1, HDfury2, HDfury3 or GammaX power supplies with the AVR-Key.
What sort of power supply does the AVR-Key use?
- Provides REGULATED (+/- 5%) 5VDC power with 2.0A min DC current
- Delivers the power through a mini usb connector.
Caution: Trying to use an AC/DC adaptor that doesn't adhere to these three requirements may destroy the AVR-Key. Do not use the power supply from the HDfury1, HDfury2, HDfury3 or GammaX with the AVR-Key.
I tried to update my unit, it failed and AVR-Key is shown as USBBOOT under Windows?
Some users are reporting AVR-Key as USBBOOT USBXPRESS under windows after firmware update attempt. USBBOOT means AVR-Key is in the booltoader state, waiting for the actual FW. It means that the update of MCU FW failed or was not even launched properly or cut in between. That leaves the device in bootloader ready to accept the FW update again. Make sure the PC Windows GUI is closed (not running), unplug/replug AVR-Key and launch the FW update again. PC Reboot could be needed.
Note: Make sure you are using the right Silabs driver for your Windows version and USB port version in use as per explanations on p.15
Specifications
Note: 3rd party and/or custom firmware providing extra features are not covered in this manual.
Highlight Features:
- All setups suitability: AVR Key pass-thru any HDMI, HDCP and HDR signal from source to sink and provide a HD or FHD Full HDMI audio stream for older AVR.
- Just add power: Think it’s complicated? AVR Key is Plug and play or Set and forget.
- Unlock HDCP 2.2: Keep all advantages from HDCP2.2 sources and sink when you insert an older AVR in the mix.
- Digital Doctor: EDID related issues, HTPC issues or HDMI/HDCP handshake, compatibility or revision issues can be solved as well.
- iOS & Android APP: Control AVR Key using your tablet or smartphone with the optional GoBlue Bluetooth and IR dongle.
- Windows GUI: Access additional options and control with the Windows GUI.
- Custom configuration: Select Video, Audio and EDID rules and set the HDMI audio output stream to 720p or 1080p.
- Dedicated HDCP Doctor: Providing a total of 4 HDCP 1.4 and 2.2 engines for decryption/encryption, HDfury AVR-Key offers a workaround for HDCP issue including HDCP 2.2 > HDCP 1.4 conversion.
Display HDCP 2.2 Content with Non-HDCP2.2 Compliant Devices
HDCP 2.2 is the new copy-protection scheme for 4K UHD content. Not only it is not backward compatible but many recent 4K devices don’t even support it. Source devices, including media servers and head-ends like Netflix, will encode their 4K content with this new scheme. TVs must be HDCP 2.2-enabled to play it, and everything in the video chain including switches and receivers must be compliant as well, or the display will go dark and/or display a HDCP error message. Bad news for consumers who have purchased expensive, high-bandwidth, processor-rich switchers, receivers and displays to accommodate 4K. While the newer products may support the bandwidth needs of 4K, they won’t play copy-protected works until HDfury AVR-Key is an active part of the setup.
Advanced EDID Management
AVR-Key EDID Management allow to define Video and Audio section of EDID separately, each section can be defined using Audio or Video information from connected sinks or from a list of presets.
Control and Update
- USB GUI Utility via Windows PC and various physical buttons for configurations are available.
- External Wi-Fi/Bluetooth dongle for iOS/Android control.
Main Specifications
- 1x Input / 2x Output (HDMI2.0b/HDMI1.4/DVI1.0 compatible)
- 4K60 4:4:4 600MHz 18Gbps Pass through (with DV/HLG/HDR10+ support)
- 720p60/1080p60 Full HDMI sound extraction (up to DD+/ATMOS/DTS:X and all latest)
- Video Bandwidth - 18 GBP/sec.
- Supports BT.2020.
- 4K 10, 12, 16 Bit Support
- 16 Bit Per Pixel Deep Color Depth Available (48 Bit)
- HDCP Doctor (HDCP Workaround solution to any HDCP error)
- HDCP 2.2 > HDCP 1.4 conversion
- HDMI Booster/Extender: Capable of extending 1080p resolution up to 15m. in and 15m. out (30m. total for 1080p), UHD resolution up to 10m.
- HDMI Doctor: Solves most HDMI integration issues such as HDCP, EDID, HPD, and audio breakout.
- HDMI Equalevel: Precise signal equalization towards both input and output signals perfectly delivers the best possible picture quality.
- Hot-Plug control: Force the input device to always see an active connection.
- Licensing: Fully licensed and compatible with all HDMI and HDCP technologies.
- Deep Color & xvYCC Support
- Flexible/Portable/Plug’n Play
- 3D Ready: Capability to pass 3D stereoscopic signal formats.
Supported Audio/Video Signals
Supported Format: SD/HD/FullHD/UHD/4K30/4K60, basically INPUT/OUTPUT any video format up to 4K60 4:4:4 600MHz 18Gbps
Supported resolution examples: 480p/720p/1080i/1080p24/1080p25/1080p30/1080p50/1080p60/1440p50/1440p60/2160p24/2160p25/2160p30/2160p50/2160p60 and DCI
Support all UHD/BR standard resolution
- 4K60 4:2:2 12bit BT2020 HDR
- 4K60 4:2:0 10bit
- 4K60 4:2:0 12bit
- 4K30 4:4:4 12bit
- 4K30 4:4:4 16b
- 4K24 4:2:2 12bit
- ..
Support all VESA mode video format (PC Resolutions) up to ultra-high resolution such as WQSXGA, QUXGA, QFHD, WQUXGA, 4K
Support any Audio format
PCM at up to 192kHz, compressed audio (IEC61937), DSD, DST, DTS, DTS-HD, Dolby True HD, DTS-MA, DTS:X, Atmos and HBR.
Technical Specifications
- Audio: PCM at up to 192kHz, compressed audio (IEC61937), DSD, DST, DTS, DTS-HD, Dolby True HD, DTS-MA and HBR.
- DDC Signal: 5V p-p (TTL)
- Power Supply: External 5 Volt 2 Amp USB (same as most smartphone/tablet PSU)
- Power Consumption: <2Watts
- Current Absorption: around 400mA
- Shipping Dimensions: 6.3” x 4.2” x 3.3”, Weight: 16 oz
- Enclosure: Silver with Blue Logo Led
Consolidated Specs Summary
- HDMI revision: HDMI 2.0b (Level A) 600Mcsc – 18Gbps
- Max Resolution: 4K60 4:4:4 8b, 4K60 4:2:2 12b, 4K120 4:2:0 8b or 8K30 4:2:0 8b
- I/O: 1 HDMI In, 2 HDMI Out, USB.
- Pass-thru Channel: Support any signals up to 18Gbps including HLG/DV and HDR10+
- HDMI audio: 720p or 1080p Full HDMI Audio.
- Audio support: Any sound format from lower mono up to Dolby Atmos and all latest.
- HDCP Conversion: Any HDCP to any HDCP with CST1 support
- Operating Modes: 18Gbps pass-through with full HDMI audio at 720p or 1080p
- Special Modes: HDMI Doctor and booster.
- EDID Modes: SDR BT2020 or HDR BT2020 selection for UHD BR player
- Dimension: 2.2″L x 1.5″W x 1″H – in CM: 6 x 4.5 x 3
- Enclosure: Weight: 65g – 0.15 LBS
Certifications



- AVR-Key CE EMC Certification – AVR-Key CE LVD Certification
- AVR-Key RoHS Certification
- AVR-Key FCC Certification
Disclaimer: 3rd party and/or custom firmware providing extra features are not covered in this manual.
Legal & Compliance
Product identification
Model: HDF0100 – manual version 1.0
Warranty and liability
The manufacturer grants the full statutory warranty on all new devices. As the manufacturer has no influence on installation, the warranty only applies to the product itself. If you detect a fault or damage, please contact your dealer and provide your sales slip or invoice as proof of purchase.
The manufacturer is not liable for damage to persons or property caused by improper installation, operation or maintenance not described in this manual. Do not alter or modify the product or its accessories. Any use other than described in this manual is not permitted and voids warranty and guarantee.
Trademarks and disclaimer
Product model and logo are trademarks. All other company and product names mentioned are trademarks of their respective owners. All rights reserved. No part of this publication may be copied or reproduced without prior written permission. We reserve the right to make changes to the device, packaging or manual and accept no liability for misprints.
Disposal of electrical and electronic equipment
WEEE reg. no.: DE 93847290
The crossed-out wheelie bin symbol on the product, packaging or in this manual means that electrical and electronic equipment must not be disposed of with household waste at the end of its life. Hand in old devices free of charge at a public collection point or return them to a distributor obliged to take them back. Remove batteries and lamps that can be removed without destroying the device before handing it in, and delete any personal data stored on the device. Details are regulated by national law. By returning old devices you help protect the environment.
Packaging
Dispose of packaging separately by material (paper/cardboard, plastics) via the local collection systems. Keep packaging material away from children – risk of suffocation. Packaging register LUCID: DE5958616449295.