
Chapter 1. Introduction / 1.1 Safety Precautions
- All safety instructions should be read and understood before the unit is operated.
- The owner’s manual and safety instructions should be retained for future reference.
- Unplug this unit from the wall outlet before cleaning. Do not use liquid or aerosol cleaners. Use a damp cloth only.
- Keep away from wet, magnetic, and flammable surfaces or substances.
- Always use the correct power supply (indicated on the product label) when operating this unit.
- This unit may be equipped with a 3 wire grounding-type plug - a plug having a third (grounding) pin. This pin will only fit in to a grounding type power outlet. If you are unable to insert the plug in to the outlet, contact your electrician to replace your obsolete outlet.
- Air vents should be kept clean and unobstructed at all times.
- Please refrain from using frayed power cords and damaged wall outlets.
- Do not place any heavy objects or equipment on top of the unit.
Note: If you experience any malfunctioning of product or have any question as to operation of the product, please contact our customer service center. PureLink TM Tel: 201.488.3232 Email: support@purelinkav.com
1.2 Declaration of Conformity
According to Council Directive 73/23/EEC (February 19, 1973) on the Harmonization of the Laws of Member States relating to Electrical Equipment; Council Directive 89/336/EEC (May 3, 1989) on Electromagnetic Compatibility; Council Directive 93/68/EEC (July 22, 1993)-Amending Directives 89/336/EEC (MC) and 73/23/EEC (Low Voltage Equipment Safety), and/or CPU Boards and Power Supplies used Council Directive 93/68/EEC with Matrix, Dtrovision LLC, 535 E Crescent Ave Ramsey, NJ 07446 201-488-3232, declares under sole responsibility, that the product identifies with 93/66/EEC of the Council Directive Low Voltage Equipment Safety. Each product marketed is identical to the representative unit tested and found to be compliant with the standards.
1.3 What’s in the Box
- Main Frame: HTX-4400-U
- Power cord
- 5 x IR Tx cable
- 6 x IR Rx cable
- Phoenix connectors for RS232
- IR remote
- RS-232C & LAN cables
- Rack Ears
- Owner’s manual
1.4 Product Introduction
The new HTX-4400-U Ultra HD/4K HDMI to HDBaseT & HDMI mirrored outs with POE and HDCP 2.2 provides switching for up to four (4) HDMI to any four (4) HDBaseT outputs and (4) mirrored HDMI outputs. PureLink’s legendary EDID/HDCP Management System, consistently praised by system integrators as the most reliable in the industry. Together with full HDCP v 2.2, PureLink’s uncompromising design and manufacturing standards, the HTX-4400-U delivers unparalleled quality and value.
Features
- (4) Ultra HD/4K source devices independently switchable to (4) Ultra HD/4K destinations
- Ultra HD/4K support with HDCP v2.2 compliance
- HDBaseT™ 5-play technology for Ultra HD/4K video, HD multichannel audio distribution, bi-directional control via IR, RS-232 and LAN, Ethernet switching, and POE
- Mirrored HDMI/HDBaseT™ outputs, providing up to 8 ports
- (4) HDBaseT™ outputs for remote destinations (@100m)
- (4) HDMI outputs for local destinations, such as in-room displays, AVRs, and switchers
- Audio de-embedding for each output via (1) 3.5mm analog stereo or (1) RCA coaxial digital output
- Auto EDID management (EDID library and EDID emulation)
- Full 3D compatibility (up to 1080p)
- Supports Dolby TrueHD, Dolby Digital Plus and DTS-HD Master Audio plus LPCM (up to 192kHz)
- Ideal for multi-zone applications to distribute A/V with control
- DVI and DisplayPort support via HDMI ports with adapters (sold separately)
- Includes IR remote for basic matrix switching
- Front panel LCD display for easy menu navigation and status check
- Compact 19’’ standard 1RU rack-mountable chassis
- HDMI v1.4b uncompressed video/audio up to 10.2 Gbps
- Integrated Ethernet switch serves LAN to all connected zones
- HDBaseT outputs directly drive HTX extender receivers (sold separately) up to 330ft (100m)
- Scaling receiver (HTX-RX-S) is available for up and down scaling
- TCP/IP, RS-232, IR and front panel control
- Bundle kits available with receivers
- 3-year parts and labor warranty, extends to 5-year when used exclusively with PureLink TotalWire™ CATx cable (some restrictions may apply, ask factory for details)
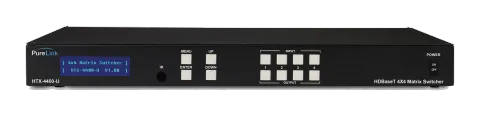
1.5 Front View of HTX-4400-U
The HTX-4400-U chassis is mountable on 19” standard rack with brackets. On front panel, there are some function keys, input-output buttons and a status display window placed as shown in Figure 1-1. (Figure 1-1) POWER: Main power switch ON / OFF DISPLAY: View menu and system mode MENU: EDID setup menu UP: Up button DOWN: Down button ENTER: Execution button
1.6 Front panel button operation
- Press Output # button
- Press Input # button
- Switching is completed
EDID
- Press MENU button
- Use Up and Down buttons to select EDID from the EDID library list
- Press Enter button
- Select input# which you want to save selected EDID to
- Press Enter button

EDID HTX series matrix switcher provides Auto EDID management system; easy and fail safe way to handle EDID, via EDID library system and EDID emulation.
What's EDID?
Extended Display Identification Data (EDID) is an information set that digital display provides to describe its capabilities to a Video source. Video source will know what kinds of displays are connected and it will determine which resolution to Output according to the EDID information received from the display.
The EDID normally includes manufacturer name and serial number, sets of capable resolution including native resolution, supported timing, pixel mapping data (for digital displays only) and etc.
In a digital connectivity environment; in order to support the maximum resolution of connected monitor, EDID handshake is a critical because improper EDID handshake between sources to the display will result in no image on the display.
EDID handshake may sound simple; however, with multiple peripheral devices within the chain, display's EDID information easily get lost or blocked while it is traveling to the source device.
HTX series matrix switcher provides Auto EDID management system to meet today's sophisticated digital connectivity integration environment.
Auto EDID management system
EDID library
15 most widely used EDID data is pre-programmed internal EEPROM chipset which user can take and save onto the any of the matrix switcher's Input EEPROM.
EDID library list
- 1080p, 2 ch audio 1080p, dolby/dts 5.1 1080p, HD audio
- 1080i, 2 ch audio 1080i, dolby/dts 5.1 1080i, HD audio
- 3D, 1080p, 2 ch audio 3D, 1080p, dolby/dts 5.1 3D, 1080p, HD audio
- 4K@30Hz, 2 ch audio 4K@30Hz, dolby/dts 5.1 4K@30Hz, HD audio
- 4K@60Hz, 2 ch audio 4K@60Hz, dolby/dts 5.1 4K@60Hz, HD audio
Note: Factory default EDID is set to 1920 x 1080p@60Hz
By optimizing factory default EDID and EDID library feature, in most cases, HTX series matrix switcher will work out of the box without any additional configuration.
Emulation
The user can easily save an EDID data from any display devices directly onto the matrix switcher’s input port. By saving display device's EDID information on the matrix switcher input port, input port will act as a display to the video source.
Note: There may be display devices that are not allowing other device to emulate its EDID data.
Note: Certain EDID data may not be compatible with some devices, in this case, it is recommended to use scaling option
1.7 Rear View of HTX-4400-U
<Back Panel> (Figure 1-2)
- IR EXT, IN/OUT: IR ext is for HTX-4400-U control, IR Inputs, and IR outputs are for IR communication on HDBT outputs pass-thru
- Control Interface: LAN (TCP/IP) and RS232 control ports
- 4 x HDMI inputs
- Each output consists with 1 x HDBaseT, 1 x HDMI, 1 x bi-directional RS232, 1 x 3.5mm analog audio extraction,
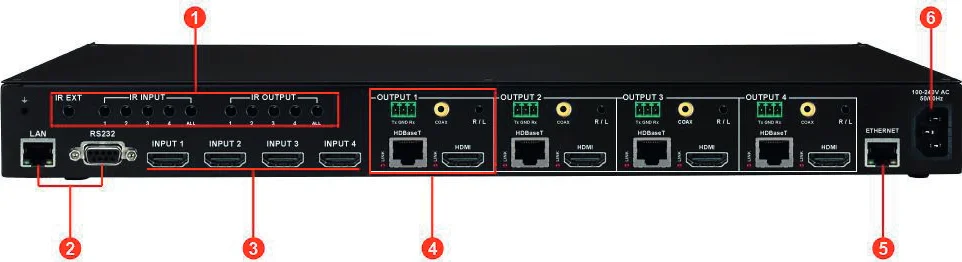
- 1 x digital coaxial audio extraction port
- Signals are outputting simultaneously to on each output’s HDMI, HDBaseT, 3.5mm analog audio, and digital coaxial ports
- ETHERNET: Integrated Ethernet switch serves LAN to all connected zones (HDBaseT Rx)
- AC Power: IEC power connector
1.8 Matching Receiver Option / HTX-Rx : Standard non-scaling receiver
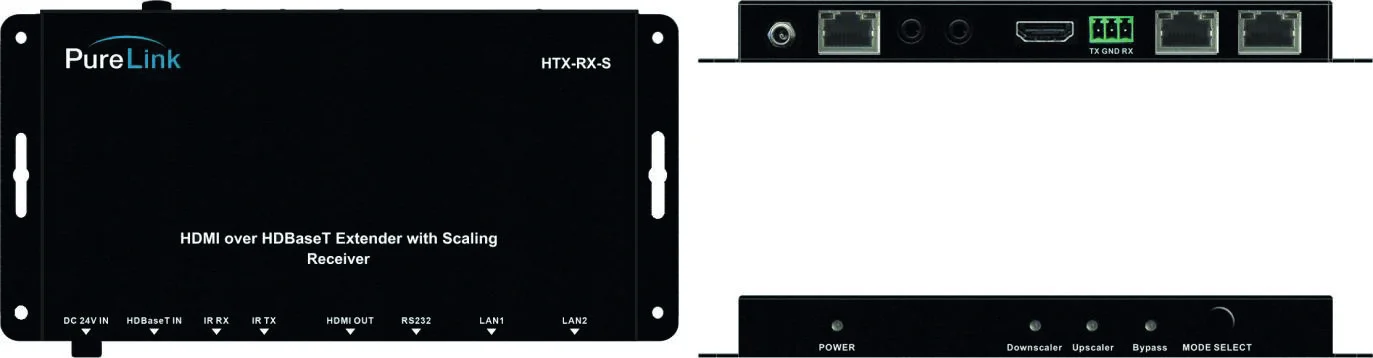
- HDMI OUT: HDMI output port
- ETHERNET: Provides internet connection to the connected device
- RS232: Provides bi-directional serial control to the connected device
- DC IN: Optional 24V DC power supply connector
- IR TX/RX: Provides bi-directional IR control to the connected device
- HDBASET IN: Receives HDBaseT signal from HTX series matrix switcher’s HDBaseT output
- There are LED signal status indicators next HDMI output port and HDBaseT input port
HTX-RX-S : Scaling receiver
Scaling receiver is ideal for an environment where you have mix of 1080p and 4K sources with 1080p and 4K displays. Depending on the application, HTX-RX-S will upscale 1080p signal to 4K or downscale 4K signal to 1080p.
Note: HTX-RX-S does not support frame conversion. Please check UHD-Scaler-FC for more powerful scaling capability with frame conversion support.
- HDMI OUT: HDMI output port
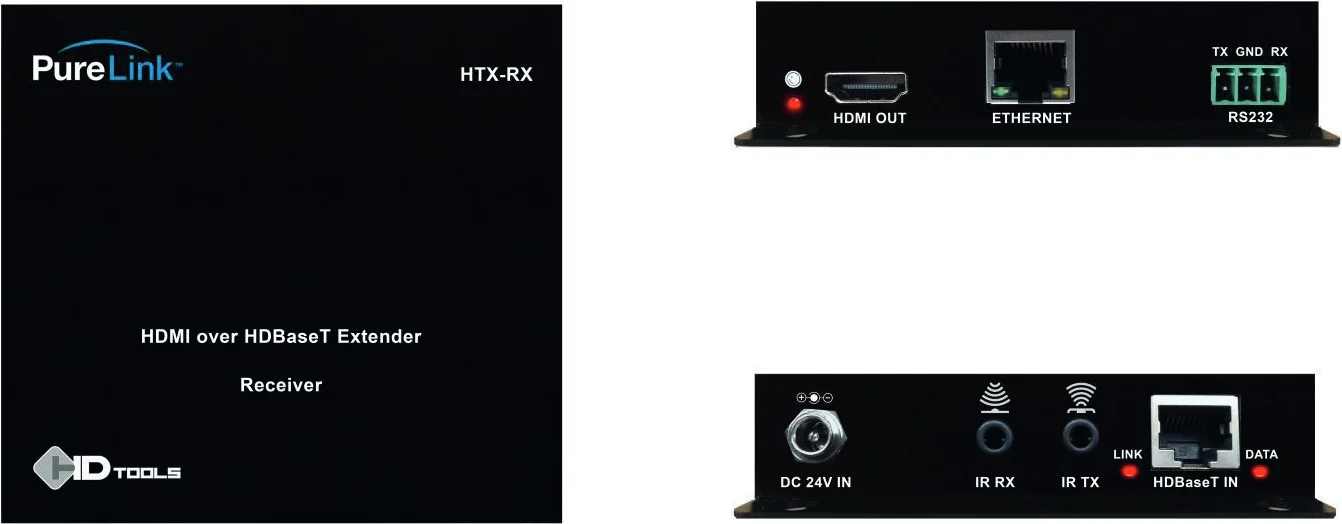
- LAN 1, 2: Provides internet connection to the connected device
- RS232: Provides bi-directional serial control to the connected device
- DC IN: Optional 24V DC power supply connector
- IR TX/RX: Provides bi-directional IR control to the connected device
- HDBASET IN: Receives HDBaseT signal from HTX series matrix switcher’s HDBaseT output
- MODE SELECT: To select scaling mode between Upscaling, Downscaling, and Bypass
Upscaling mode signal process
| Input signal | Output signal |
|---|---|
| 1080p@24Hz | 4K@24Hz |
| 1080p@25Hz | 4K@25Hz |
| 1080p@30Hz | 4K@30Hz |
| 1080p@50Hz | 4K@50Hz |
| 1080p@60Hz | 4K@60Hz |
| Other resolution | BYPASS |
Downscaling mode signal process
| Input signal | Output signal |
|---|---|
| 4K@24Hz | 1080p@24Hz |
| 4K@25Hz | 1080p@25Hz |
| 4K@30Hz | 1080p@30Hz |
|---|---|
| 4K@50Hz | 1080p@50Hz |
| 4K@60Hz | 1080p@60Hz |
| Other resolution | BYPASS |
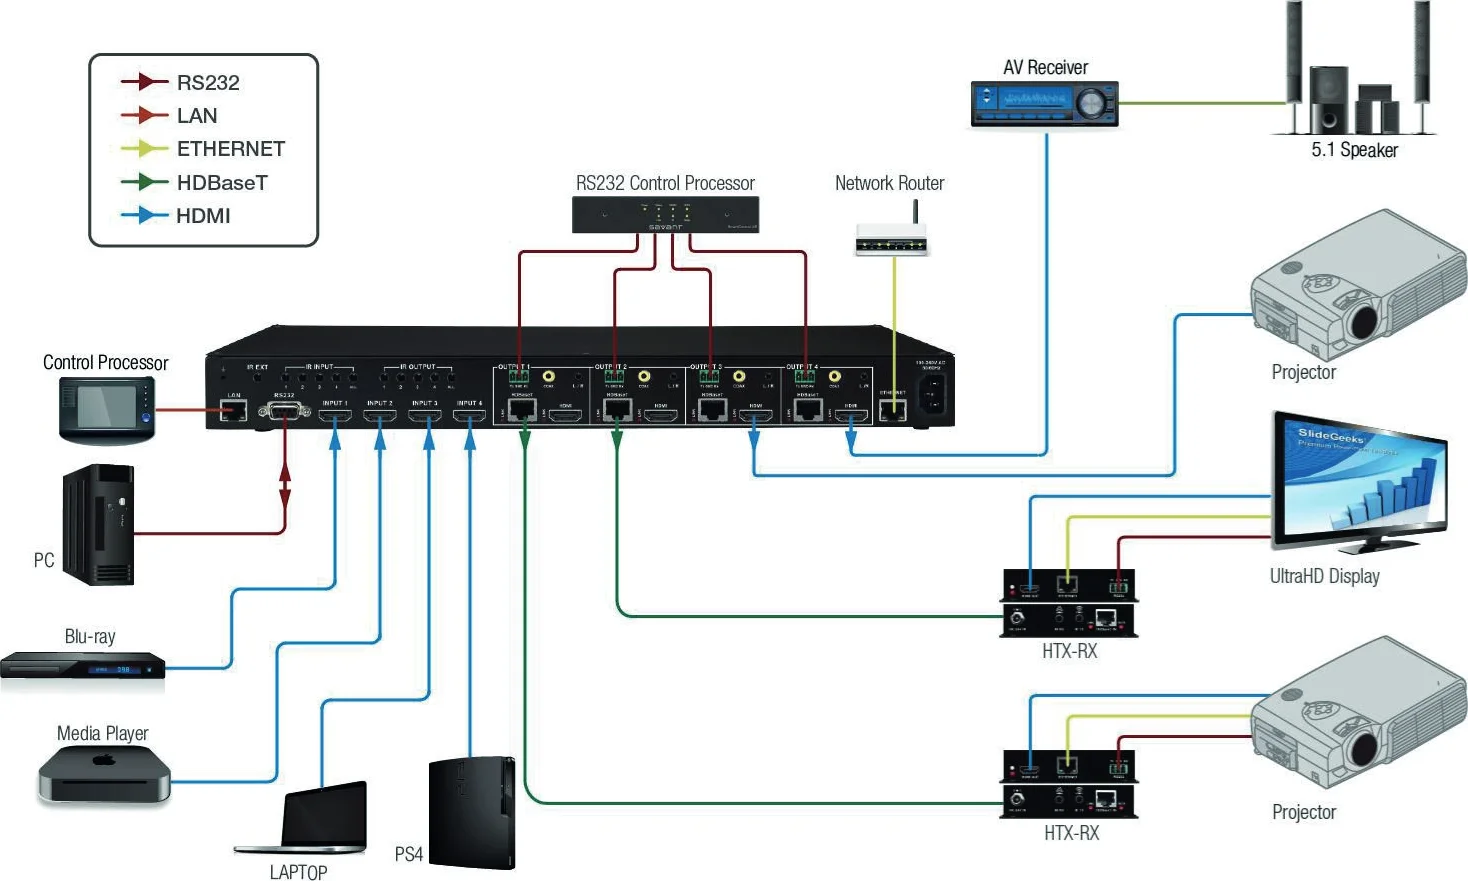
<Application diagram>
1.9 Product Specifications
HTX-4400-U General Specification
| Power | AC power supply (US/EU standards, CE/FCC/UL certified) |
|---|---|
| Operational Temperature | 32° ~ 117° F (0° to 47° C) |
| Storage Temperature | - 4° ~ 140° F (-20° to 60° C) |
| Humidity | 0 ~ 90% non-condensing |
| MTBF | 50,000 hours |
| Dimensions (W x D x H) | 17.3'' x 7.9'' x 1.8'' (440 x 200 x 45mm) |
| Shipping Dimensions (with cover box) | TBD |
| Rack mounting | Yes, 19'' standard rack, 1RU |
| Weight | 4.0 lbs (1.82 kg) |
| Shipping Weight (with accessories and cover box) | TBD |
* Functional Specification
Communication
- HDMI HDMI v1.4b, HDCP v2.2, EDID
- RS-232 2-way device control and monitoring. Fixed baud rate at 115200, 8 data bits, no parity, and 2 stop bits
- LAN TCP/IP (Default IP: 192.168.0.100)
Video
- Switcher HDMI input, HDBaseT & HDMI output 4x4 matrix switcher
- Input Signal Types HDMI, DVI, Displayport
- Output Signal Types HDMI, DVI, Displayport
- Formats HDMI v1.4b, DVI 1.0, HDCP v2.2content protection support
HDMI Input resolutions
- Ultra HD/4K up to 4096x2160 @24/25/30Hz (RGB/YCbCr 4:4:4 8 bits, YCbCr 4:2:2 8/10/12 bits), 4096 x 2160 @50/60Hz (YCbCr 4:2:0 8 bits)
- PC resolution up to 1920 x 1200 @ 60Hz
Output Resolutions (HDBaseT & HDMI)
- Ultra HD/4K up to 4096x2160 @24/25/30Hz (RGB/YCbCr 4:4:4 8 bits, YCbCr 4:2:2 8/10/12 bits), 4096 x 2160 @50/60Hz (YCbCr 4:2:0 8 bits)
- PC resolution up to 1920 x 1200 @ 60Hz
Control
- Input ports 1 x RJ-45 6 x IR input 1 x RS232
- Output ports 5 x IR output
HTX-Rx
HDBaseT receiver for HTX series matrix switchers
330ft (100m) @ Ultra HD/4K
HDMI v1.4b uncompressed video/audio up to 10.2 Gbps
Receives POE from HTX matrix switchers (optional local power provided)
Bi-directional IR and RS232
Supports HD multichannel audio including Dolby TureHD, Dolby Digital Plus and DTS-HD Master audio plus LPCM (up to 192kHz)
Compact size for convenient installation behind displays
LED indicators for HDMI and HDBaseT signal status
Ethernet port for easy third party device networking
Power DC 24V power supply (optional)
Operational Temperature 32° ~ 117° F (0° to 47° C)
Storage Temperature - 4° ~ 140° F (-20° to 60° C)
Humidity 0 ~ 90% non-condensing
MTBF 50,000 hours
Dimensions (W x D x H) 4.0'' x 4.0'' x 0.9'' (102 x 102 x 22.86mm)
Weight 0.5 lbs (0.23 kg)
HTX-Rx-S
HDBaseT receiver with built-in scaler for HTX series matrix switchers
330ft (100m) @ Ultra HD/4K
HDMI v1.4b uncompressed video/audio up to 10.2 Gbps
Receives POE from HTX matrix switchers (optional local power provided)
Bi-directional IR and RS232
Supports HD multichannel audio including Dolby TureHD, Dolby Digital Plus and DTS-HD Master audio plus LPCM (up to 192kHz)
Low profile size for convenient installation behind displays
Ethernet port for easy third party device networking
Power DC 24V power supply (optional)
Operational Temperature 32° ~ 117° F (0° to 47° C)
Storage Temperature - 4° ~ 140° F (-20° to 60° C)
Humidity 0 ~ 90% non-condensing
MTBF 50,000 hours
Dimensions (W x D x H) 7.2'' x 3.5'' x 0.6'' (182 x 89 x 15.25mm)
Weight 0.8 lbs (0.36 kg)
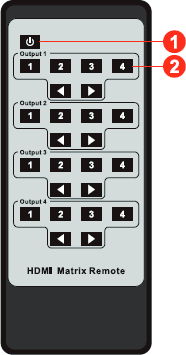
1.10 IR remote control

1.11 IR control
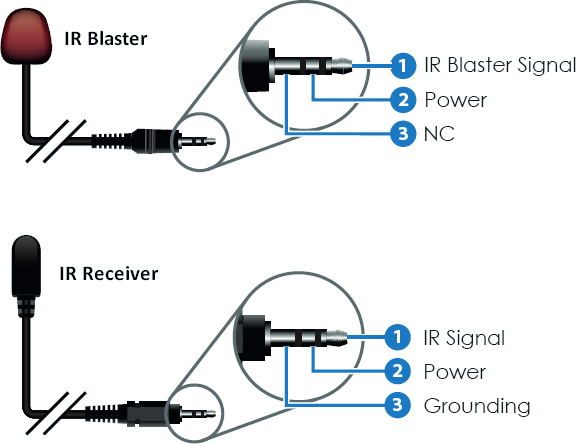
IR EXT: This port is to extend IR Rx for HTX-4400-U control
IR INPUT: These ports are for IR communication of end-points via HTR Rx (HDBaseT receiver)
1,2,3,4 indicate each HDBaseT output. Connect IR blasters to the IR inputs
IR OUTPUT: These ports are for IR communication of end-points via HTR Rx (HDBaseT receiver)
1,2,3,4 indicate each HDBaseT output. Connect IR receivers to the IR outputs
Note: Infrared receiving areas of devices can be located by shining a flashlight onto the front of the device – the sensor should be able to be seen through the plastic as a small, round object inside. Insert 3.5mm jacks of
- Power button
- Input # 1 ~ 4 for each output # for switching
IR RX receivers into RX ports, making sure the receivers themselves are placed in clear view to receive an infrared signal from the remote handset used to control the display outputs.
1.12 Cable Termination
- CATx (HDBaseT) cable
- RS-232 (HTX matrix switcher)
- LAN cable
- RS-232 (HTX extenders)

Blue/ White TMDS Data0-
Green TMDS Data1-
Brown/ White TMDS Clock+
Brown TMDS Clock-
CATx (HDBaseT) Cable Termination
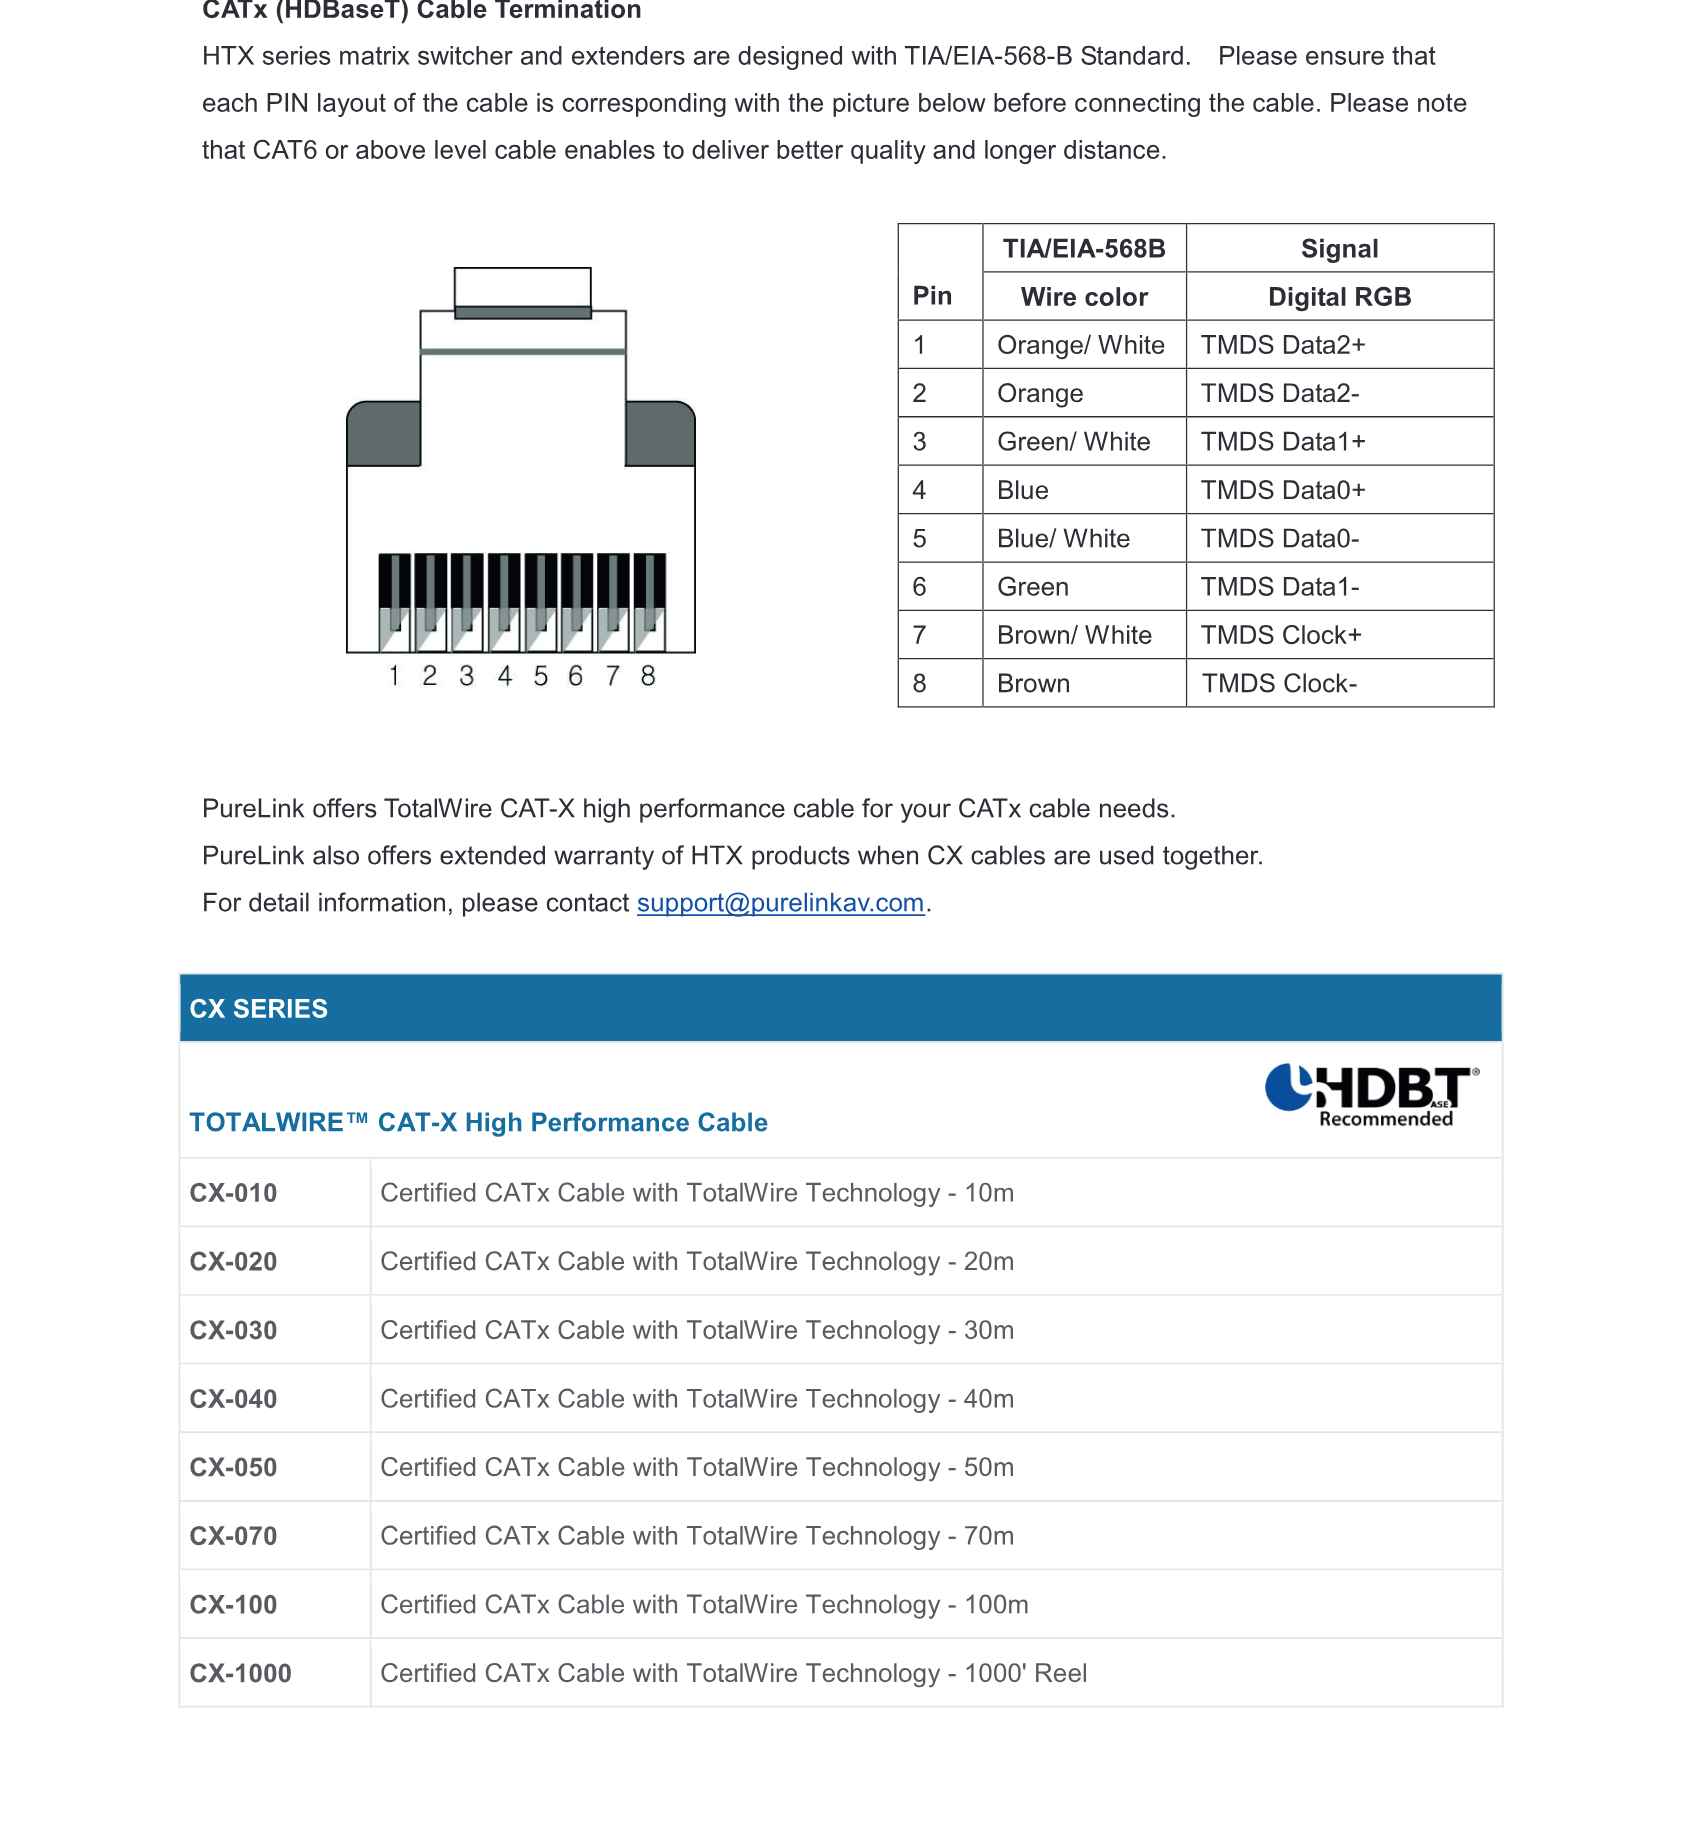
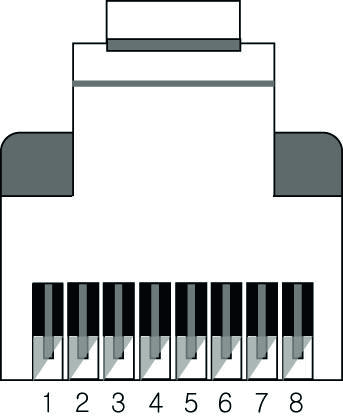
HTX series matrix switcher and extenders are designed with TIA/EIA-568-B Standard. Please ensure that each PIN layout of the cable is corresponding with the picture below before connecting the cable. Please note that CAT6 or above level cable enables to deliver better quality and longer distance.
PureLink offers TotalWire CAT-X high performance cable for your CATx cable needs.
PureLink also offers extended warranty of HTX products when CX cables are used together.
For detail information, please contact support@purelinkav.com.
CX SERIES
TOTALWIRE™ CAT-X High Performance Cable
- CX-010 Certified CATx Cable with TotalWire Technology - 10m
- CX-020 Certified CATx Cable with TotalWire Technology - 20m
- CX-030 Certified CATx Cable with TotalWire Technology - 30m
- CX-040 Certified CATx Cable with TotalWire Technology - 40m
- CX-050 Certified CATx Cable with TotalWire Technology - 50m
- CX-070 Certified CATx Cable with TotalWire Technology - 70m
- CX-100 Certified CATx Cable with TotalWire Technology - 100m
- CX-1000 Certified CATx Cable with TotalWire Technology - 1000' Reel
| Pin | TIA/EIA-568B Signal | Wire color |
|---|---|---|
| 1 | Orange/ White | TMDS Data2+ |
| 2 | Orange | TMDS Data2- |
| 3 | Green/ White | TMDS Data1+ |
| 4 | Blue | TMDS Data0+ |
| 5 | Blue/ White | TMDS Data0- |
| 6 | Green | TMDS Data1- |
| 7 | Brown/ White | TMDS Clock+ |
| 8 | Brown | TMDS Clock- |
RS-232 Cable Termination (for Control)
Note: Straight cable must be used for the communication with HTX series matrix switcher
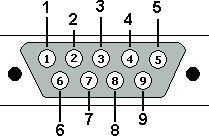
The following table shows the pinout of the RS-232 connector. DB9 cables are available with male-to-male, female-to-female, and male-to-female connectors. HTX series matrix switcher's RS-232 port uses a female DB9 connector and therefore requires a cable with a male connector.
| Pin | RS-232 |
|---|---|
| 1 | Not used |
| 2 | Rx: Receive |
| 3 | Tx: Transmit |
| 4 | Not used |
| 5 | Ground |
| 6 | Not used |
| 7 | Not used |
| 8 | Not used |
| 9 | Not used |
LAN Cable Termination (for Control)
The following table shows the pinout of the LAN connector. Note that in the pinout table, some transmit/receive functions (abbreviated as Tx/Rx) are different for straight-through cable and crossover LAN cable.
Straight-through Cable: for connection of HTX series matrix switcher to an Ethernet network
Crossover Cable: for direct connection between the PC or controller and the HTX series matrix switcher.
Crossover Cable
| Pin | End 1 Wire Color | End 2 Wire Color |
|---|---|---|
| 1 | Orange/White | Orange/White |
| 2 | Orange | Green |
| 3 | Green/White | Green/White |
| 4 | Blue | Blue |
| 5 | Blue/White | Blue/White |
| 6 | Green | Orange |
| 7 | Brown/White | Brown/White |
| 8 | Brown | Brown |
Straight-through Cable
RS-232 Cable Termination (for HTX receiver pass-thru)
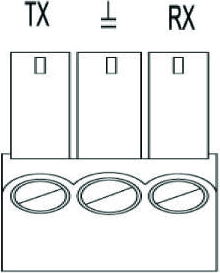
3-pin Phoenix connector is used for RS-232 communication between HTX matrix switcher and HTX receiver’s connected device.
* Pinout from the left
1.13 Installation Guidelines
The following installation settings are recommended for optimal performance.
- Operational temperature should be 30° C or below
- Operational humidity should be 60% or below
- Operational environment should be dust-free and well ventilated
- Stabilized AC input power (AVR-based power supply) is highly advised
1.14 Communication Settings (LAN and RS232)
Default RS232 communication parameters:
Baud rate: 115200
Data bit: 8 bits
Stop bit: 1 bits
Parity: none
Default LAN communication parameters:
IP address: 192.168.0.100
| Pin | End 1 Wire Color | End 2 Wire Color |
|---|---|---|
| 1 | Orange/White | Orange/White |
| 2 | Green | Green |
| 3 | Green/White | Green/White |
| 4 | Blue | Blue |
| 5 | Blue/White | Blue/White |
| 6 | Orange | Orange |
| 7 | Brown/White | Brown/White |
| 8 | Brown | Brown |
| Pin | RS-232 | RS-422 |
|---|---|---|
| 1 | Tx | Tx + |
| 2 | Ground | Ground |
| 3 | Rx | Rx + |
Chapter 2. Communication Code Configuration
2.1 Control Programmer’s Guide (Code Structure and Examples)
This section is designed for programmers who wish to create their own control programs using the command code. All PureLink digital matrix routers provide a simple character stream control used by external control devices attached to a PureLink device. Command codes are used primarily for control, during system installation and setup, and for diagnostic purposes.
2.2 Overview
Command code is a set of alphanumeric characters that combine to form control commands. Command code strings are entered into a terminal emulation program (such as windows HyperTerminal) running on an external control device. The control device (PC, third-party controller) sends the commands to the system. Control devices must be able to send and receive ASCII or HEXA code via an RS-232 or Ethernet port.
2.3 Command Code Formats
A command code is a series of command characters and numbers used to send commands to the system. Commands include basic formulas for creating and disconnecting switches, as well as for verifying the status of switches.
In a command code, each character is either general command (e.g., C for connect) or an identifier that indicates what the following number designates (e.g., “O” and the number following it designate an “output number”). The command code *999CI01O01! can be interpreted as follows: (*) Starting the command code (999) Router ID is 999 (C) Create connection on (I01) Input 01 to (O01) Output 01 (!) take the command. For a complete list of command characters and their functions, see pages 16 -
Note: Ack value (Acknowledge value: Response from Pure Link device) will be echoed back to the terminal screen as the unit accepts them. When a command is successfully executed, all of the characters appear containing the character “s” which stands for status.
Ex 1) Command (Connect Input 1 to Output 1)*999CI01O01! ↵
Ack value*999sC I01O01!
Ex 2) Command (Check Input connection status on Output 3)*999?O03! ↵
Ack Value*999s? I03O03!
2.4 General Rules for Command Codes
The commands are coded in ASCII and HEXA. Please refer to Table 2.1 on pg. 17 for detailed descriptions of keys and functions. A basic command code setup is shown below;
Ex) *999CI01O01! ↵
Start (*) + Router ID (999) + Command (C) + Input number (I01) + Output number (O01) + End (!) + Enter (↵ )
- A command line allows execution of only one command. Multiple commands require execution of multiple strings; one command per string.
- All s begin with * (Start) byte.
- All s end with ! (End) byte.
- All s will be executed when ↵ (Enter) is entered.
- The correct Router ID must be entered in a command code. Systems will not react to the command if a wrong Router ID is entered. The Factory Default Router ID is set to 999 and the universal Router ID is 999. Systems will react to the command whenever universal Router ID is entered in command code.
- Command codes typically are not case-sensitive.
- To specify multiple inputs and outputs, enter a “,” (Comma) between numbers. (Ex., *999CI01O01,02,03! ↵ : Connects Input 01 to Output 01, 02, and 03)
- Use - (Hyphen) for range connection. (EX., *999CI01O01-04! ↵ : Connects Input 01 to Output 01,02,03, and 04)
Table 2.1 Command Codes Characters Table
The table below shows command code characters (keys), which are used to generate control commands, their functions, and short function descriptions.
| Key | Function | Description and Example | Byte |
|---|---|---|---|
| HEX | ASCII | ||
| 0x2A | * | Start the command Header Code | 1 |
| 0x21 | ! | End the command Tail Code | 1 |
| ↵ | Execute the command | Execute the command | |
| 0x43 | C | Connect Initiates a Connect (switch) command for Video; this must precede input and output specification | 1 |
| 0x3F | ? | Status Status command; this must precede input and output specification | 1 |
| 0x44 | D | Disconnect Disconnect command for both Video and Audio; this must precede input and output specification | 1 |
| , | Space Separates the numbers within entries that contain multiple numbers | 1 | |
| - | Range Specifies a range of numbers in entries containing multiple numbers | 1 | |
| ?version | Firmware version check Firmware version check command; *255?version! ↵ |
2.5 Command Ack (Acknowledge) Value Response
When command codes are entered into a terminal emulation program (such as HyperTerminal) and are accepted by the system, they respond back to the terminal screen one at a time, as noted below in the table. The complete command has executed successfully when all of the entered characters including “s” which stands for status, appear. If a command character is not accepted, a different character than the one entered appears and all or part of the command has not been executed.
Ack (Acknowledge) Value Response Table
| Ack value | Description |
|---|---|
| Input 1 is not connected | No information in each channel. |
| Command Code Error | Indicates that system has rejected all or part of the command |
| Ack value | Description |
|---|---|
| Router ID Error | Indicates that the wrong ID number was entered |
Command Code Ack Value Examples
| Command Code Entered | Ack Value as appears in the control program | Explanation of Result |
|---|---|---|
| *999CI01O01! ↵ | *255sC I01O01 ! | The command was successfully executed |
| *999CO01! ↵ | Command Code Error | The command was not executed because the input number was not included |
| *999CI01O01 ↵ | Command Code Error | The command was not executed because “!” (End) was not included |
| *300CI01O01! ↵ | Router ID Error | The command was not executed because the actual Router ID and entered Router ID did not match |
2.6 Connecting Switches
A switch is an active connection between an input (source) signal and one or more output (display) devices. The signals connected in a switch command are either individual signals or groups of signals coming through the connectors on the rear of the unit.
The “C” key initiates a Connect command for routing a switch. The characters and numbers that follow the “C” command tell the system, which inputs and outputs to connect. The last character “!” is found at the end of a command code which tells the system to execute the command.
For example, the command code *999CI01O01! ↵ can be interpreted as follows: (*) Starting the command code (999) Router ID is 999 (C) Create connection on (I01) Input 01 to (O01) Output 01 (!) take the command. For a complete list of command characters and their functions, see examples below.
- Enter the Connect command below. Replace the “#”s with the input and output number(s).
- *999CI#O#! ↵
Examples (Connect) :
| Command Codes | Action |
|---|---|
| *999CI01O01! ↵ | Connect Input 1 to Output 1 |
| *999CI01O04,I04O02! ↵ | Connect Input 1 to Output 4 and Input 4 to Output 2 |
| *999CI01O01,I02O02,I03O03! ↵ | Connect Input 1 to Output 1, Input 2 to Output 2, and Input 3 to Output 3 |
| *999CI01O01,02,03! ↵ | Connect Input 1 to Output 1, 2, and 3 |
*999CI01O01-04!Connect Input 1 to Output 1, 2, 3, and 4
*999PTP!Connect Input 1 to Output 1, Input 2 to Output 2, Input 3 to Output 3 and Input 4 to Output 4
Disconnecting Switches
The characters and numbers in a Disconnect command tell the system which input or output to disconnect. The “D” key initiates a Disconnect command for routing a switch. The characters and numbers that follow the “D” command tell the system that inputs and outputs to disconnect. The last character “!” is found at the end of the Command code, which tells the system to execute the command.
For example, the command code*999DI01O00!
It can be interpreted as follows: (*) Starting the command code (999) Router ID is 999 (D) Disconnect on (I01) Input 01 to (O00) Output 00 (!) take the command. For a complete list of command characters and their functions, see the command list below
- Enter the Disconnect command below. Replace the “#”s with the input and output number(s).
- *999DI#O#!
| Command Codes | Action |
|---|---|
| *999DI01O00! | Disconnect Input 1 to no Output (00) |
| *999DI00O03,04! | Disconnects Outputs 3, and 4 |
| *999DI00O03-04! | Disconnects output 3, and 4 |
| *999DALLIO! | Disconnects all inputs and outputs |
EDID Setting
*999EDIDI01E3!write E3 EDID (1080p, HD audio) to input # 1
List of EDID
| Code | Description |
|---|---|
| E1 | 1080p, 2 ch audio |
| E2 | 1080p, dolby/dts 5.1 |
| E3 | 1080p, HD audio |
| E4 | 1080i, 2 ch audio |
| E5 | 1080i, dolby/dts 5.1 |
| E6 | 1080i, HD audio |
| E7 | 3D, 1080p, 2 ch audio |
| E8 | 3D, 1080p, dolby/dts 5.1 |
| E9 | 3D, 1080p, HD audio |
| E10 | 4K@30Hz, 2 ch audio |
| E11 | 4K@30Hz, dolby/dts 5.1 |
| E12 | 4K@30Hz, HD audio |
| E13 | 4K@60Hz, 2 ch audio |
| E14 | 4K@60Hz, dolby/dts 5.1 |
| E15 | 4K@60Hz, HD audio |
| E16 | Emulate from HDMI output #1 |
| E17 | Emulate from HDMI output #2 |
| E18 | Emulate from HDMI output #3 |
| E19 | Emulate from HDMI output #4 |
| E20 | Emulate from HDBT output #1 |
| E21 | Emulate from HDBT output #2 |
| E22 | Emulate from HDBT output #3 |
| E23 | Emulate from HDBT output #4 |
Beep On
*999BeepON!
Beep Off
*999BeepOFF!
Front panel buttons Lock On
*999lockon!
Front panel buttons Lock Off
*999lockoff!
Power on
*999poweron!
Power off
*999poweroff!
Factory setting restore
*999restore!
Reboot
*999reboot!
Status Check
A connection status can be checked to confirm that the switch has been correctly executed or to confirm correct routing to multiple outputs. The characters and numbers in a status command tell the system which input or output to check.
- Enter the Connection status check command below. Replace the “#”s with the input and output number(s).
- *999?I#! or *255?O#!
| Command Codes | Action |
|---|---|
| *999?I01! | Check Output connection status on Input 1 |
| *999?O04! | Check Input connection status on Output 4 |
| *999?ALLIO! | Check all Input and Output connection status |
Input EDID status
*999?EDIDi01!
I01 = input 1 i02 = input 2 i03 = input 3 i04 = input 4
Firmware version check
*999?version!
Web UI guide
Google Chrome is recommended for web UI
HTX web UI consists with five menus
- General
- Control
- EDID
- Status
- Upgrade
General
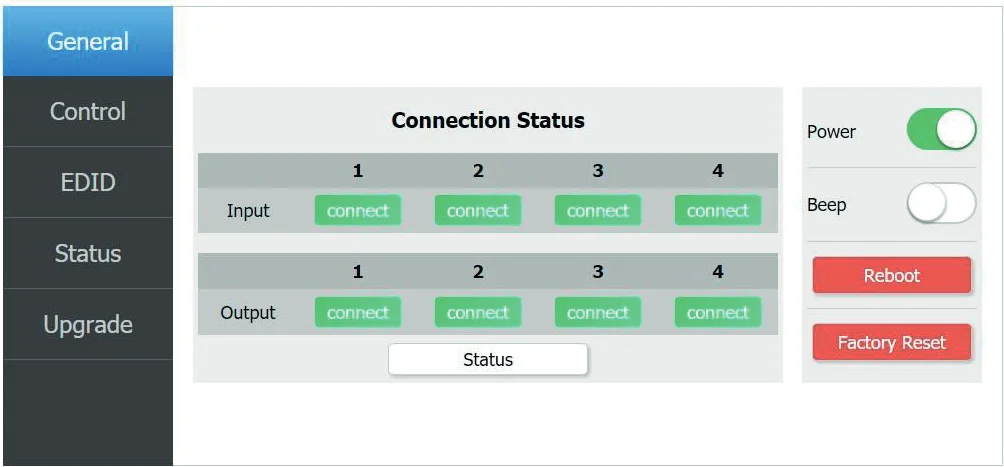
- Input/output connection status check
- Matrix power control
- Matrix beep control
- Matrix reboot
- Matrix factory reset
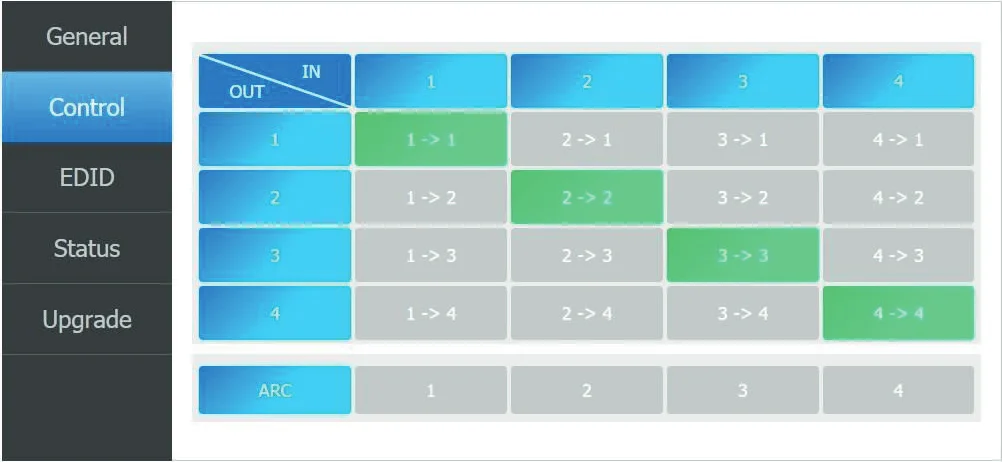
Control
- Intuitive X-Y switching
EDID
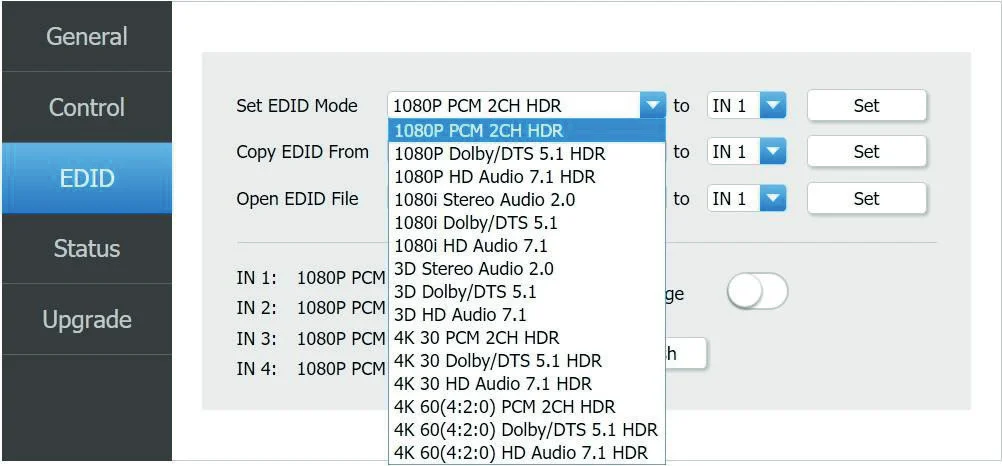
- Internal EDID library
- External EDID emulation
- EDID merge
- Current EDID status check
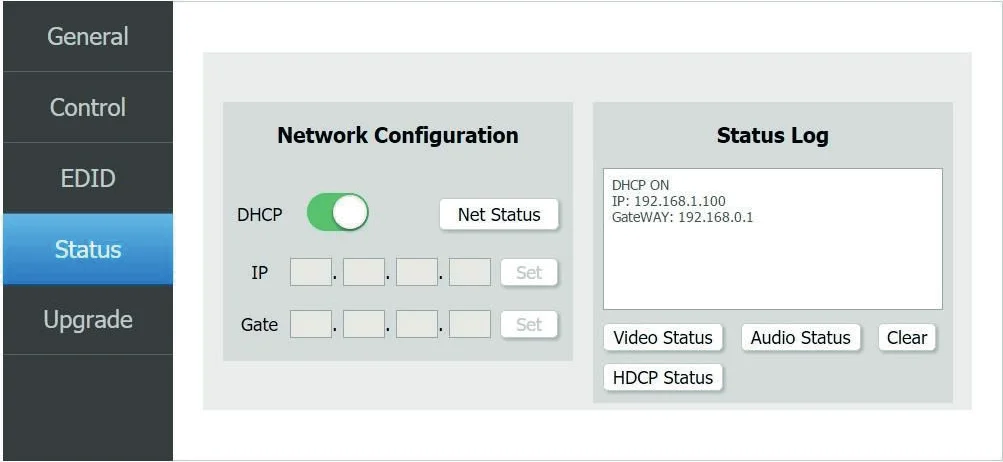
Status
- Network configuration status
- Video signal status for inputs and outputs
- Audio signal status for inputs and outputs
- HDCP status for inputs and outputs
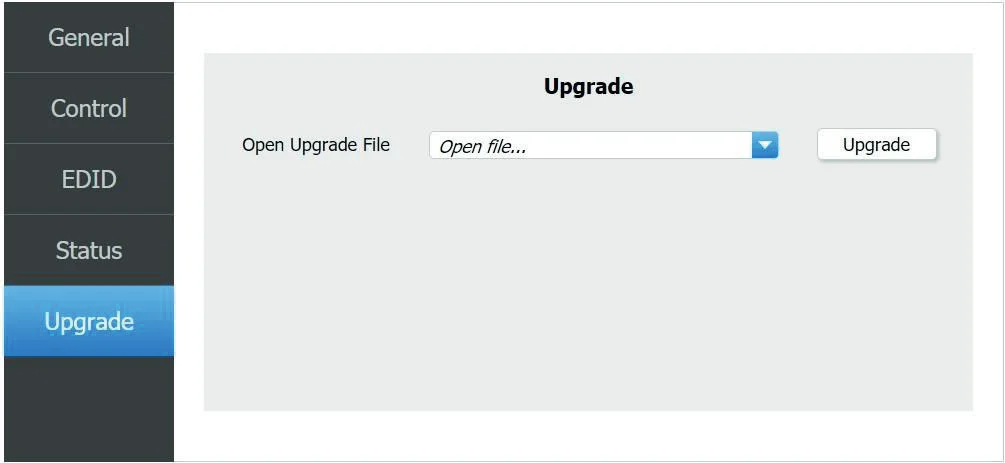
Upgrade
- Firmware upgrade
Additional Information / Manufacturer’s Warranty (3-Years)
PureLink warrants this HTX series matrix switcher to be free from defects in workmanship and materials, under normal use and service, for a period of three (3) year from the date of purchase from PureLink or its authorized resellers.
If the product does not operate as warranted during the applicable warranty period, PureLink shall, at its option and expense, execute one of the following as necessary:
- Repair the defective product or part
- Deliver to customer and equivalent product or part to replace the defective item
- Refund to customer the purchase price paid for the defective product
All products that are replaced become the property of PureLink. Replacement products may be new or reconditioned. Repaired or replacement products or parts come with a 90-day warranty or the remainder of the warranty period. Dtrovision shall not be responsible for any software, firmware, information, or memory data loss of contained in, stored on, or integrated with any products returned to Dtrovision for repair under warranty.
Customer Service
Any customer service inquiries can be submitted electronically through the Q&A form on our website ( www.purelinkav.com ).
For immediate assistance please contact us at (201) 488-3232 to reach our customer care or tech support team.
Legal & Compliance
Product identification
Model: PRO-HTX-4400-U – manual version 1.0
Trademarks and disclaimer
Product model and logo are trademarks. All other company and product names mentioned are trademarks of their respective owners. All rights reserved. No part of this publication may be copied or reproduced without prior written permission. We reserve the right to make changes to the device, packaging or manual and accept no liability for misprints.
Disposal of electrical and electronic equipment
WEEE reg. no.: DE 93847290
The crossed-out wheelie bin symbol on the product, packaging or in this manual means that electrical and electronic equipment must not be disposed of with household waste at the end of its life. Hand in old devices free of charge at a public collection point or return them to a distributor obliged to take them back. Remove batteries and lamps that can be removed without destroying the device before handing it in, and delete any personal data stored on the device. Details are regulated by national law. By returning old devices you help protect the environment.
Packaging
Dispose of packaging separately by material (paper/cardboard, plastics) via the local collection systems. Keep packaging material away from children – risk of suffocation. Packaging register LUCID: DE5958616449295.