
Safety precautions
- Unpack the equipment carefully and save the original box and packing material for possible future shipment.
- Follow basic safety precautions to reduce the risk of fire, electrical shock and injury to persons.
- Do not dismantle the housing or modify the module. It may result in electrical shock or burn.
- Using supplies or parts not meeting the products’ specifications may cause damage, deterioration or malfunction.
- Refer all servicing to qualified service personnel.
- To prevent fire or shock hazard, do not expose the unit to rain, moisture or install this product near water.
- Do not put any heavy items on the extension cable in case of extrusion.
- Do not remove the housing of the device as opening or removing housing may expose you to dangerous voltage or other hazards.
- Install the device in a place with fine ventilation to avoid damage caused by overheat.
- Keep the module away from liquids.
- Spillage into the housing may result in fire, electrical shock, or equipment damage. If an object or liquid falls or spills on to the housing, unplug the module immediately.
- Do not twist or pull by force ends of the optical cable. It can cause malfunction.
- Do not use liquid or aerosol cleaners to clean this unit. Always unplug the power to the device before cleaning.
- Unplug the power cord when left unused for a long period of time.
- Information on disposal for scrapped devices: do not burn or mix with general household waste, please treat them as normal electrical wastes.
INTRODUCTION
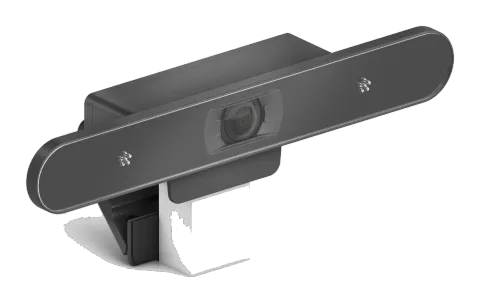
PureTools - 4K ePTZ Conference Camera with stereo mic and autoframing, helps to achieve an intelligent meeting experience, implemented with intelligent video analysis and ePTZ technology. It automatically frames all meeting participants, enabling meeting attendees to focus more on discussion and not worry about camera operation. The intelligent ePTZ function and 110-degree field of view, provides all the benefits of a traditional PTZ camera but with none of the draw backs.
FEATURES
- Supports auto framing function based on intelligent image algorithm;
- EPTZ function;
- High quality CMOS image sensor, up to 3840x2160P30 video output;
- High quality 4K super wide-angle lens with no distortion;
- Manual image adjustment;
- Standard USB3.2Type-C interface is adopted;
- UVC/UAC communication protocol;
- Supports YUY2, NV12 uncompressed video formats, MJPEG, H.264, H.265 compressed video formats;
- Built-in MIC audio input;
- Works with USB2.0 and USB3.2. For 4K video, USB3.2 is preferred.
PACKAGE CONTENTS
Please ensure you have all the items listed below. If anything is missing or damaged, please contact your distributor for a replacement.
- 1 x Remote Control
- 1 x PT-CAM-200
- 1 x 1.8m USB3.2 Cable
- 1 x User Manual
- 1 x Quick Installation Guide
MAIN PARTS & INTERFACES
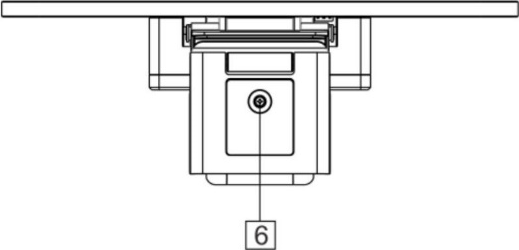
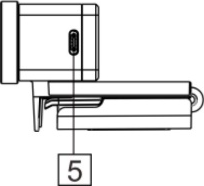
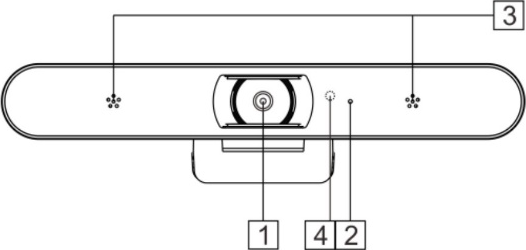
| # | Part |
|---|---|
| 1 | Camera Module |
| 2 | Indicator Light |
| 3 | Microphone |
| 4 | IR Sensor |
| 5 | USB 3.2Type-C |
| 6 | Mounting Hole |
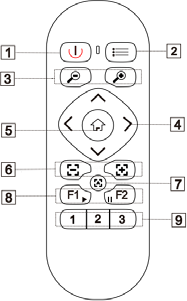
REMOTE CONTROL

| Item | Function |
|---|---|
| 1. Power | Turns the camera feed off or on. |
| 2. Menu | Open/close the OSD menu. |
| 3. Zoom | zoom in, zoom out. |
| 4. Direction | In menu mode, set menu options; In non-menu mode, use or for vertical adjustment of the screen and or used for horizontal adjustment of the screen. |
| 5. Home | In menu mode, confirm to enter; In non-menu mode, the screen returns to the original position. |
| 6. Focus | Reserved - not used on this model. |
| 7. Auto Focus | Reserved - not used on this model. |
| 8. Auto Framing | Short press F1 to enable; Press F2 to disable. |
| 9. Number | Long press to set the preset, short press to call the preset. After long press F1 for 3 seconds, press number key to set the IR address. |
COMMON FUNCTIONS
When the camera is in a working state, the indicator light is blue and always on.
- EPTZ The camera supports EPTZ control, and 4x digital zoom. The image can be controlled via direction keys to adjust the image position. And the current image size can be adjusted via zoom button. Note: when the image is under max range and the direction keys are pressed, the screen will not move. The indicator will flash twice with each effective key-press.
- Auto framing The camera has auto framing function. Press F1 and the camera will start the auto framing function. It will then zoom in/out to center all participants in the picture, according to the surroundings. Note: When the camera is under auto framing mode, press F2, the direction keys, the zoom keys, or call the Home and valid preset, then the auto framing mode will stop. Auto framing was not work if camera resolution is set to 4K.
- Set/Call the preset Long press the number key for more than 3 seconds to set presets. Short press the number key to call the presets, and the camera will quickly go to the preset position and size.
- Menu function Press the Menu button to enter the menu, select the menu options via direction keys. Press the Home button to enter the options, adjust the options by using the pan button (right and left arrow keys). To Exit, press the menu button to return to the previous interface, or until menu disappears. Note: See OSD Menu section for more details.
OSD MENU
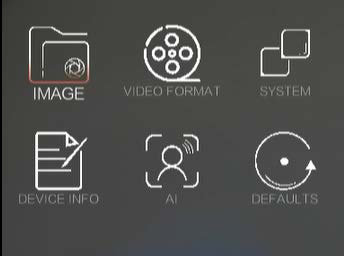
Press the menu button and choose the parameters you want to adjust.
Image
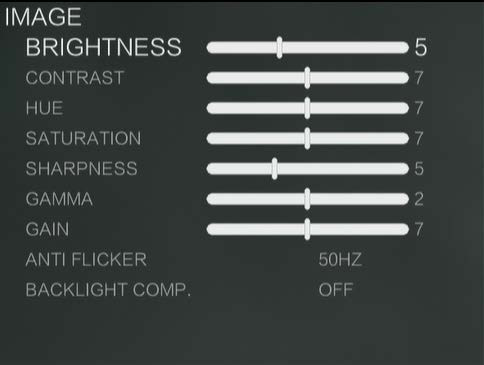
Brightness: Adjust the brightness of the image.
Contrast: Refers to the ratio between the brightest and darkest areas of the image. The greater the ratio, the more gradation levels from black to white will be, thus the richer the color performance, the clearer the image is.
Hue: Adjust the overall color of the image.
Saturation: Refers to the purity and brightness of image color, the higher the saturation, the color effect is bright and beautiful.
Sharpness: Adjust the sharpness of image and image edge sharpness. The higher this number is, the more contrast the detail in the plane of the image will be, making it look clearer.
Gamma: Adjust the brightness value of the image, the lower the gamma value, the brighter the image.
Gain: Adjust the light sensitivity.
Anti-Flicker: Prevent image flickering when working in an environment with refresh rates that are inconsistent with the power supply system.
Backlight Comp.: The camera lens can automatically compensate for the brightness of darker targets in the strong light background.
Video Format
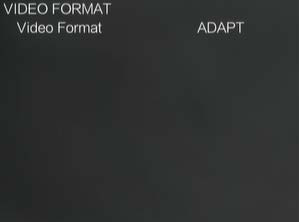
VIDEO FORMAT: View and set the max video format of the camera.
System
| Setting | Description |
|---|---|
| Language | Switch between English or Chinese. |
| IR Address | Set the IR remote address. |
| Mirror | Turn on /off the video mirror function. |
| Flip | Flip the picture up and down. |
| Dzoomlimit | Change the maximum zoom factor (2x, 3x, 4x) of the camera when zoom in function is enabled. |
| Audio Delay | Adjust the audio output delay. |
| OSD Menu Mirror | Turn on/off the OSD menu mirror. |
Device Info
IR Address: The IR remote address.
Firm Version: The camera firmware version.
AI
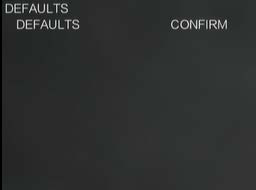
| Setting | Description |
|---|---|
| Auto Frame | When choosing “ON”, the camera will be zoom in/out to center all participants in the picture, according to the conference scene. |
| Expert Mode | Enable/disable the debug mode. |
| Detection Sens. | Adjust detection sensitivity. |
| Framing Move Sens. | Adjust framing move sensitivity. |
| Target Lost Act. | The camera action when the auto framing target is lost. ‘STAY’ keeps the camera where it is and ‘PRESET 1’ will revert to that stored setting. |
Defaults
Defaults: Restore menu parameters to default state.
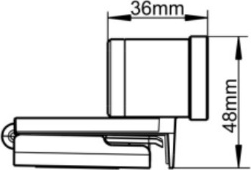
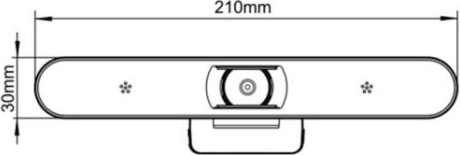
Size and Dimensions
Font Side
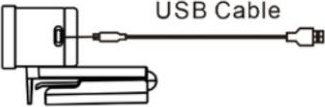
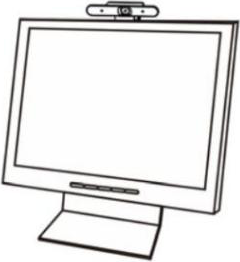
Bottom
Installation Instructions
Place the camera holder on the display and fix it by adjusting the folding arm at the rear. Alternatively fix it with the mounting screw.
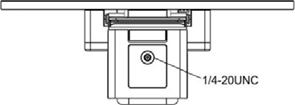
For best results using the wide angled lens, participants do not need to be seated close to the camera.
Check whether the connection and positioning is suitable before starting a call etc.
USB Cable
SPECIFICATION
Interface
| Output | |
|---|---|
| Output Connector | 1x Type-C USB3.0 |
Video
| Video Format | |
|---|---|
| YUY2, NV12: | 1920x1080P30, 1280x720P30, 640x360P30, 1920x1080P25, 1280x720P25, 640x360P25 |
| MJPEG, H.264, H.265: | 3840x2160P30, 1920x1080P30, 1280x720P30, 640x360P30, 3840x2160P25, 1920x1080P25, 1280x720P25, 640x360P25 |
| Max Resolution | 3840×2160@30fps |
| Digital Zoom | 4X |
| Field of View | Diagonal: 120°, Horizontal: 110°, Vertical: 87° |
| AI Function | Auto Framing |
| ePTZ | Support |
Temperature 0°C ~ +40°C
Reference
- Humidity: 10%RH ~ 90%RH
Power
| Consumption | < 4w |
|---|---|
| Power Supply | DC5V (USB power supply), current ≤0.9A |
Dimension (D*W*H) 210mm×74mm×48mm
Net Weight ≤0.28kg
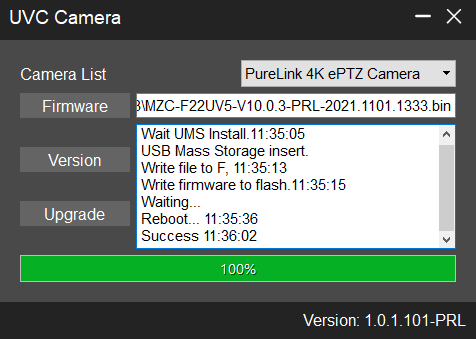
FW upgrade
- Download the Upgrade SW and the latest FW version from the PureLink website under the download section for this product.
- Connect a USB cable between a PC and the PT-CAM-200.
- Open the software UVC Camera on PC, select the correct device on the software, select the firmware, then click upgrade to finish the upgrading.
Simple Troubleshooting
| Fault | Possible Reasons | Solution |
|---|---|---|
| Device not recognized | The USB cable plug is loose | Plug tightly |
| Device not recognized | USB drive not installed correctly | Update the driver in Device Manager |
After-Sales Service
If there appear some problems when running the product, please check and deal with the problems referring to this user manual. Any transport costs are borne by the users during the warranty.
- Product Limited Warranty: This product will be free from defects in materials and workmanship for 3 year (The purchase invoice shall prevail). Proof of purchase in the form of a bill of sale or receipted invoice which is evidence that the unit is within the Warranty period must be presented to obtain warranty service.
- What the warranty does not cover (servicing available for a fee): Warranty expiration. Factory applied serial number has been altered or removed from the product. Damage, deterioration or malfunction caused by: Normal wear and tear. Use of supplies or parts not meeting our specifications. No certificate or invoice as the proof of warranty. The product model showed on the warranty card does not match with the model of the product for repairing or had been altered. Damage caused by force majeure. Servicing not authorized by distributor. Any other causes which does not relate to a product defect. Delivery, installation or labor charges for installation or setup of the product.
- Technical Support: For any questions or problems, contact your distributor or reseller and tell them the respective product name and version, the detailed failure situation as well as the formation of the cases.
Asking for Assistance
Technical Support:
Phone: +49 5971 800299 - 0
Fax: +49 5971 800299 – 99
Technical Support Hours:
8:30 AM to 5:00 PM Monday thru Thursday
8:30 AM to 4:00 PM Friday
Write to:
PureLink GmbH
Von-Liebig-Straße 10
D - 48432 Rheine
www.purelink.de
info@purelink.de
Legal & Compliance
Product identification
Model: PT-CAM-200 – manual version 1.0
Trademarks and disclaimer
Product model and logo are trademarks. All other company and product names mentioned are trademarks of their respective owners. All rights reserved. No part of this publication may be copied or reproduced without prior written permission. We reserve the right to make changes to the device, packaging or manual and accept no liability for misprints.
EU conformity
PureLink hereby declares that this product PureTools PT-CAM-200 complies with Directives 2020/171/EU und 2011/65/EU. PureLink GmbH hereby declares that this product PureTools PT-CAM-200 complies with Directives 2014/30/EU and 2014/35/EU.
| Directive / Regulation |
|---|
| 2011/65/EU |
| 2020/171/EU |
| 2014/30/EU |
| 2014/35/EU |
The full text of the EU Declaration of Conformity is available at: http://www.purelink.de/ce/
FCC
Statement This equipment generates, uses and can radiate radio frequency energy and, if not installed and used in accordance with the instructions, may cause harmful interference to radio communications. It has been tested and found to comply with the limits for a Class B digital device, pursuant to part 15 of the FCC Rules. These limits are designed to provide reasonable protection against harmful interference in a commercial installation.
Disposal of electrical and electronic equipment
WEEE reg. no.: DE 93847290
The crossed-out wheelie bin symbol on the product, packaging or in this manual means that electrical and electronic equipment must not be disposed of with household waste at the end of its life. Hand in old devices free of charge at a public collection point or return them to a distributor obliged to take them back. Remove batteries and lamps that can be removed without destroying the device before handing it in, and delete any personal data stored on the device. Details are regulated by national law. By returning old devices you help protect the environment.
Batteries
Batteries must not be disposed of with household waste. Return used batteries free of charge to collection points or retailers.
Packaging
Dispose of packaging separately by material (paper/cardboard, plastics) via the local collection systems. Keep packaging material away from children – risk of suffocation. Packaging register LUCID: DE5958616449295.