

 Tech Hub
Safety Precautions
Thank you for purchasing the PT-SCREEN-100. This manual serves as the operating manual for the PT-SCREEN-100 LCD monitors, and hence, documents instructions and precautions in relation to this product. Please read this manual carefully before using the product. To prevent harm or damage to the user, product, property or other people, please adhere to the safe and correct methods of using this product.
Caution: Ignoring the safety precautions documented here could result in serious injuries or even death.
- Please adhere to the instructions documented in this user manual. PureLink GmbH shall not be responsible for any damage, harm or injuries caused by improper use of our product not documented in this manual.
- Use only the accessories (AC adapters, cables, etc.) bundled in the same package or those provided by PureLink GmbH.
- Do not insert flammable or metal objects into the product. Also, do not apply or use near water. Doing so could result in electrical shock or fire. If any of the above occurs, stop using the product immediately and contact our customer service.
- Do not use/place/install this product or its cable(s) near high temperature equipment. Deformation or melting of the housing could occur, resulting in electrical shocks or fire.
- Place/install this product in/on a stable location. In an unstable location, the product may fall, causing injuries and the product could be damaged from the fall.
- Do not dismantle or modify the housing/product. Damage to the product, electrical shock or fire could occur. If smoke, strange smell or strange noises are emitted from the product during use, stop using the product immediately, disconnect all cables and contact our customer service.
- When disconnecting/connecting the AC adapter, hold the plugs properly while doing so. Pulling the cords forcefully could result in the cable breaking. Malfunction of device, electrical shocks or fire could occur.
- Do not touch the product or cables with wet hands. Electrical shocks or equipment damage could occur.
- Disconnect all cables before cleaning. Do not use liquid, aerosol cleaners or organic solvents (benzene, thinner, etc.) to clean the product.
- Do not wash the product with water. Discoloration, deformation or damage could occur. Please use neutral cleaners and a soft cloth to clean the product. Use a dry cloth to absorb any remaining moisture after cleaning.
- When the product it not being used for extended periods of time, disconnect the AC adapter and cables. Fire could occur or the equipment could be damaged.
Introducing PT-SCREEN-100
PT-SCREEN-100 features a 15.6” 3840x2160 UHD IPS panel with wide view angles of 178° vertical and 178° horizontal 1), a contrast ratio of 1000:1 (15.6”), and with 2x HDMI 2.0, 2x HDMI 1.2, DVI-D, VGA input interface. PT-SCREEN-100 also supports HDCP 2.2 and HDCP1.4 for content copy right protection.
Package Contents
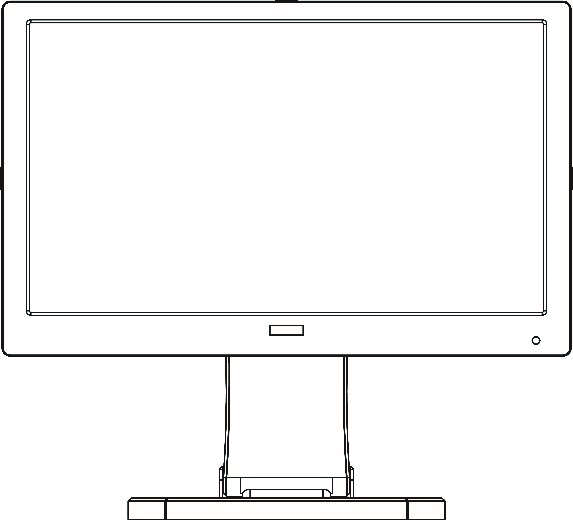
- PT-SCREEN-100 1pcs
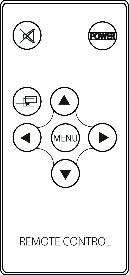
- Remote Control 1pcs (battery included)
- AC Adaptor 1pcs
- AC Cable 1pcs
- User Manual 1pcs
PT-SCREEN-100
AC Adaptor
AC Cable
Remote Control
Parts and Feature Description
Front:
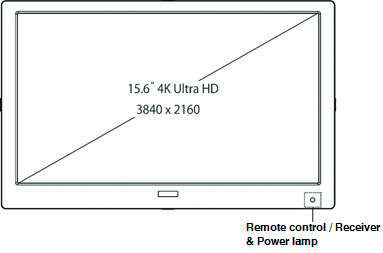
- Remote control / Receiver & Power lamp
- 1/4 inch screw hole
- 2W Speaker
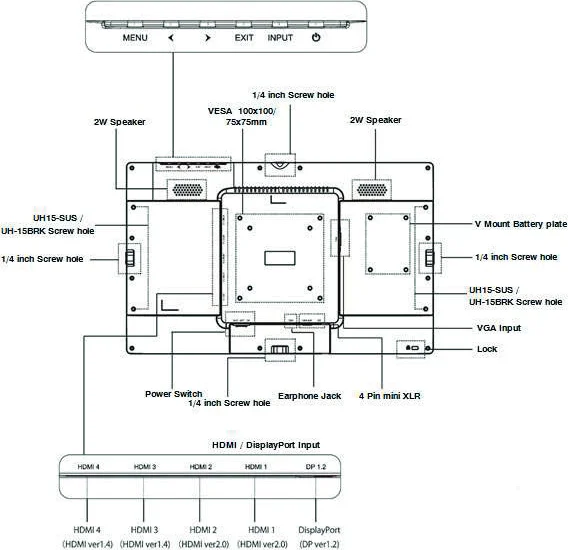
Back:
- Screw holes
- 1/4 inch Screw hole
- 2W Speaker
- V Mount Battery plate
- 1/4 inch Screw hole
- Screw holes
- VGA Input
- Lock
- Power Switch
- 1/4 inch Screw hole
- HDMI / DisplayPort Input
- Earphone Jack
- HDMI4 (HDMI v1.4)
- 4 Pin mini XLR
- VESA 100x100/75x75mm
- 15.6” 4K Ultra HD 3840 x 2160
IR Receiver and Power LED:
- IR Receiver: When using the remote control, point the remote control towards this receiver for better response.
- Power LED: Red when monitor is turned OFF, Green when monitor is turned ON. No light when there is no power input.
Buttons:
- Menu: Pushing the button down brings up the settings menu. Push Menu Button for 8 sec, will lock the operation of all the buttons. Press 8 sec again will unlock.
- Cursor: Move Left. In a vertical menu, it means move down Move Right. In a vertical menu, it means move up
- EXIT: Back to the previous level of OSD Menu
- Input: Video input source
- Power: Pressing the button turns the monitor ON or OFF.
HDMI / DisplayPort:
- HDMI 1 (HDMI v2.0): 4K HDMI 2.0 Input
- HDMI 2 (HDMI v2.0): 4K HDMI 2.0 Input
- HDMI 3 (HDMI v1.4): HDMI 1.4 Input
- HDMI 4 (HDMI v1.4): HDMI 1.4 Input
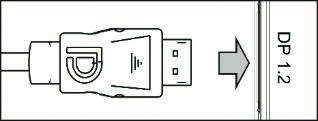
- DP 1.2 (DisplayPort v1.2): DisplayPort 1.2 Input
VGA Mini D-Sub15:
- VGA Input:
Ear phone:
- 3.5mm stereo earphone:
DC / 4 Pin Mini XLR:
- DC: DC Power Input. Please connect with the AC Adaptor.
- Mini 4 Pin XLR: Use 4 pin mini XLR as power input
Power Switch:
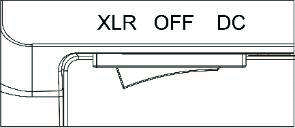
- DC: Use AC Adaptor as power input
- OFF: Turn off power input
- XLR: Use 4 pin mini XLR as power input
Kensington Lock:
- Kensington lock for anti-theft
VESA 100 x 100 / 75 x 75mm:
- Used for VESA mounting kit
V-mount Battery Plate:
- Place for V mount Battery Plate
1/4 inch screw hole:
- screw hole for optional U-stand (PT-SCREEN-STD)
PT-SCREEN-SUS / PT-SCREEN-BRK screw hole:
- screw hole for optional item: Screw hole for sunshade PT-SCREEN-SUS and bracket for EIA rackmount PT-SCREEN-BRK
2W Speaker:
- Stereo 2W speaker
Remote Control
- POWER: Power On / Off
- MUTE: Audio off
- INPUT: Input Source Selection
- MENU: Start Menu selection
- : No function
- : No function
- : Move cursor up
- : Move cursor down
Note: Please use Coin Battery
Power Switch
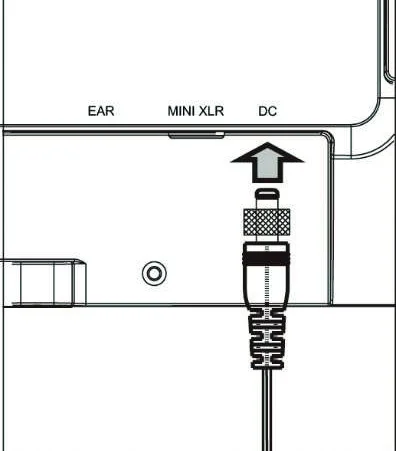
DC Adaptor:
Connect the DC plug of the provided AC adaptor as indicated by the arrow.
*For safety reasons, please unplug the AC adaptor when not using for a long period of time.
After video cable is connected, press power switch to DC source.
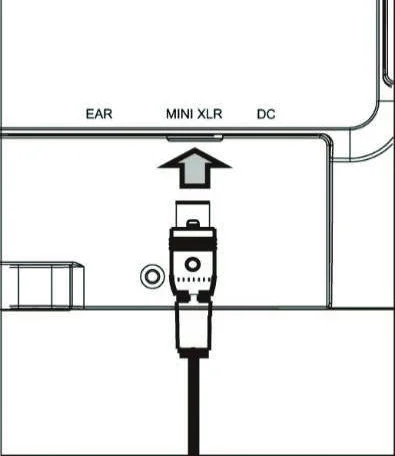
4 pin mini XLR:
Connect the Mini XLR cable with the interface as indicated by the arrow.
*For safety reasons, please unplug the XLR adaptor when not using for a long period of time.
After video cable is connected, press power switch to XLR source
Video Cable
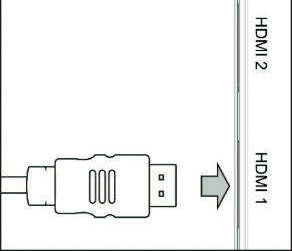
HDMI 2.0:
Connect the HDMI cable as indicated by the
arrow.
HDMI 1.4:
Connect the HDMI cable as indicated by the
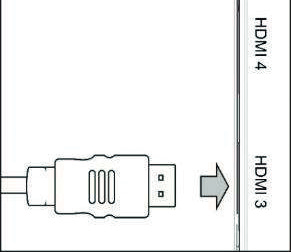
arrow.
Note: HDMI 3 and HDMI 4 max. 4K@30
DisplayPort:
Connect the DP cable as indicated by the arrow.
Note: When unplugging the DP connector, press the button on the connector first, then unplug the cable from the DP interface. If the button is not being pressed, this could damage the PT-SCREEN-100.
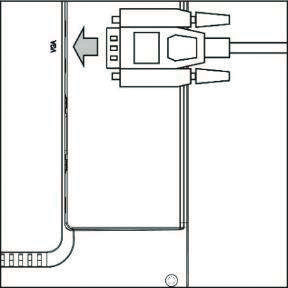
VGA:
Connect the provided VGA cable as indicated by the arrow. Tighten the screws to ensure that the cable does not fall out easily.
Earphone
Connect the earphone cable as indicated by the arrow.
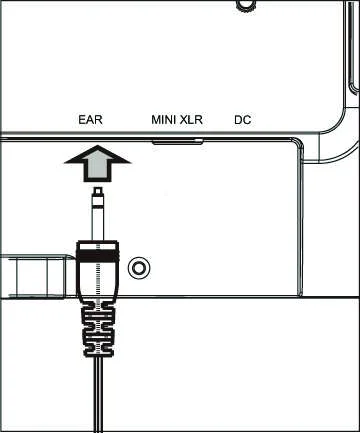
- When VGA is connected, no audio output from earphone.
- When earphone is connected, no audio output from speaker.
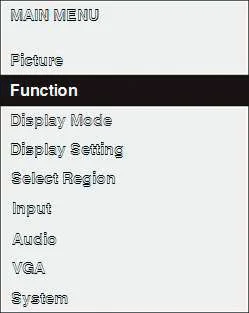
OSD Menu
Press Menu button will bring up the OSD Menu
Press Menu button for 8 sec will lock all
button function.
| Main Menu | Setting #1 | Setting #2 | Setting #3 |
|---|---|---|---|
| Picture | |||
| Brightness | 0 ~ 100 | - | - |
| Contrast | 0 ~ 100 | - | - |
| Saturation | 0 ~ 100 | - | - |
| Hue | 0 ~ 100 | - | - |
| Sharpness | 0 ~ 4 | - | - |
| Temperature | |||
| 9300 K | - | - | - |
| 7500 K | - | - | - |
| 6500 K | - | - | - |
| User | |||
| R | 0 ~ 255 | ||
| G | 0 ~ 255 | ||
| B | 0 ~ 255 | ||
| Backlight | 0 ~ 100 | - | - |
| Function | |||
| Center Marker | - | - | - |
| Safety Marker | OFF | - | - |
| 95 % | - | - | - |
| 93 % | - | - | - |
| 90 % | - | - | - |
| 88 % | - | - | - |
| 85 % | - | - | - |
| 80 % | - | - | - |
| Aspect Ratio | FULL | - | - |
| 16 : 9 | - | - | - |
| 1.85 : 1 | - | - | - |
| 2.35 : 1 | - | - | - |
| 4 : 3 | - | - | - |
| Under Scan | ON | - | - |
| OFF | - | - | - |
| Zoom | OFF | - | - |
| x2 | - | - | - |
| x4 | - | - | - |
| x6 | - | - | - |
| x8 | - | - | - |
| Pixel to Pixel | OFF | - | - |
| ON | - | - | - |
| Image Mirror | OFF | - | - |
| H | - | - | - |
| V | - | - | - |
| H / V | - | - | - |
| Check Field | OFF | - | - |
| R | - | - | - |
| G | - | - | - |
| B | - | - | - |
| Mono | - | - | - |
| Display Mode | 1P | - | - |
| 2P LR | - | - | - |
| 2P TB | - | - | - |
| 2P PIP | - | - | - |
| 4P | - | - | - |
| Display Setting | |||
| 1P Disp Rotate | 0 | - | |
| 90 | - | ||
| 180 | - | ||
| 270 | - | ||
| 2P LR | LR Ration | 0 ~ 4 | |
| Input Swap | OFF | - | |
| ON | - | ||
| 2P TB | Input Swap | OFF | |
| ON | - | ||
| PIP | PIP position | 1 | |
| 2 | - | ||
| 3 | - | ||
| 4 | - | ||
| Center | - | ||
| User Setting | Horizontal | ||
| Vertical | PIP | 0 ~ 10 | |
| Transparency | - | - | |
| PIP size | 0 ~ 10 | - | |
| Input Swap | OFF | - | |
| ON | - | ||
| Select Region | 1P | - | - |
| 2P LR | Left Side | - | - |
| Right Side | - | - | - |
| Full | - | - | - |
| 2P TB | Top Side | - | - |
| Bottom Side | - | - | - |
| Full | - | - | - |
| PIP | Main | - | - |
| Sub | - | - | - |
| Full | - | - | - |
| 4P | 1P ON | - | - |
| 1P OFF | - | - | - |
| 2P ON | - | - | - |
| 2P OFF | - | - | - |
| 3P ON | - | - | - |
| 3P OFF | - | - | - |
| 4P ON | - | - | - |
| 4P OFF | - | - | - |
| Full | - | - | - |
| Input | VGA | - | - |
| HDMI1 | - | - | - |
| HDMI2 | - | - | - |
| HDMI3 | - | - | - |
| HDMI4 | - | - | - |
| DP | - | - | - |
| Audio Volume | 0 ~100 | - | - |
| Audio Source | 1 | - | - |
| 2 | - | ||
| 3 | - | ||
| 4 | - | ||
| VGA | Auto Adjust | - | - |
| Horizontal Adjust | 0 ~100 | - | - |
| Vertical Adjust | 0 ~ 100 | - | - |
| Clock | 0 ~ 100 | - | - |
| Phase | 0 ~ 100 | - | - |
| System | |||
| Language | 日本語 | - | - |
| ENG | - | - | - |
| 中文 | - | - | - |
| Menu Time | 0 ~ 60 | - | - |
| Transparency | 0 ~ 255 | - | - |
| Rotate | 0 | - | - |
| 90 | - | - | - |
| 270 | - | - | - |
| Border Width | 0 ~ 10 | - | - |
| Border Color | R | - | - |
| G | - | - | - |
| B | - | - | - |
| W | - | - | - |
| LOGO | ON | - | - |
| OFF | - | - | - |
| Information | - | - | - |
| Version | - | - | - |
| Reset | - | - | - |
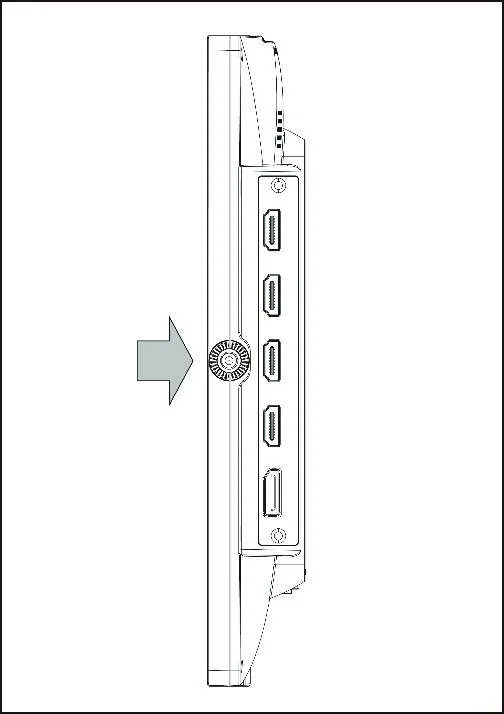
1/4 Inch Screw Hole
There are four 1/4 inch screw holes on the up, bottom, left and right side of housing.
These screw holes can be used with tripod stand.
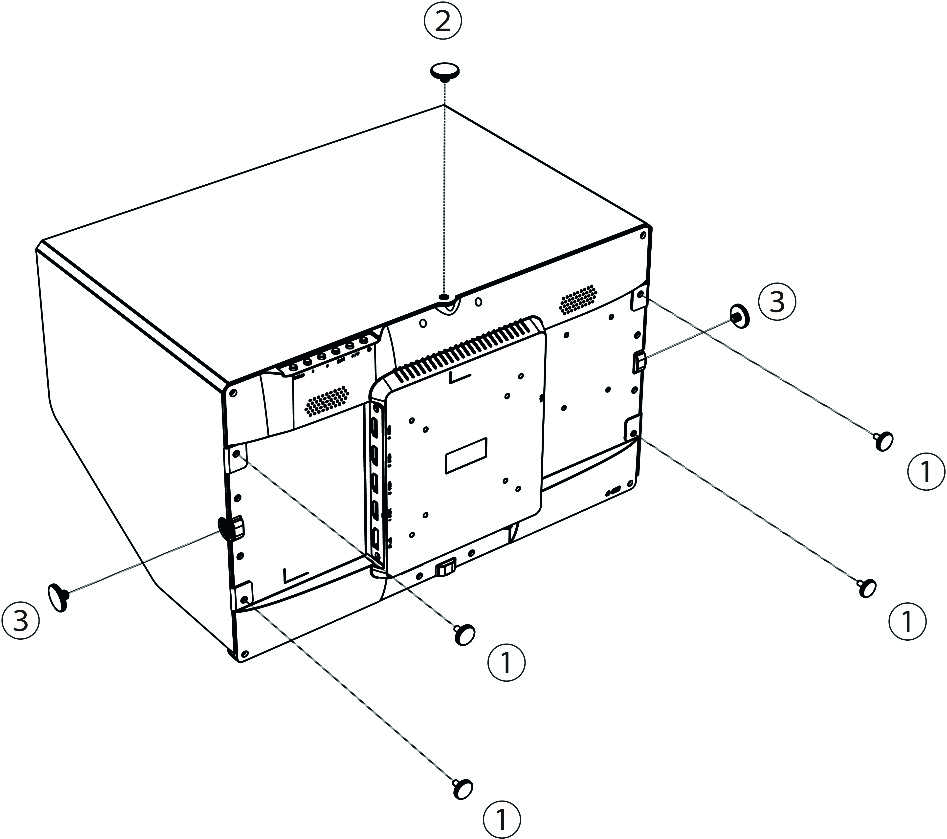
- When used with optional Sun Shade (PT-SCREEN-SUS), need to fix with 1/4 inch screw hole on the upper side of housing.
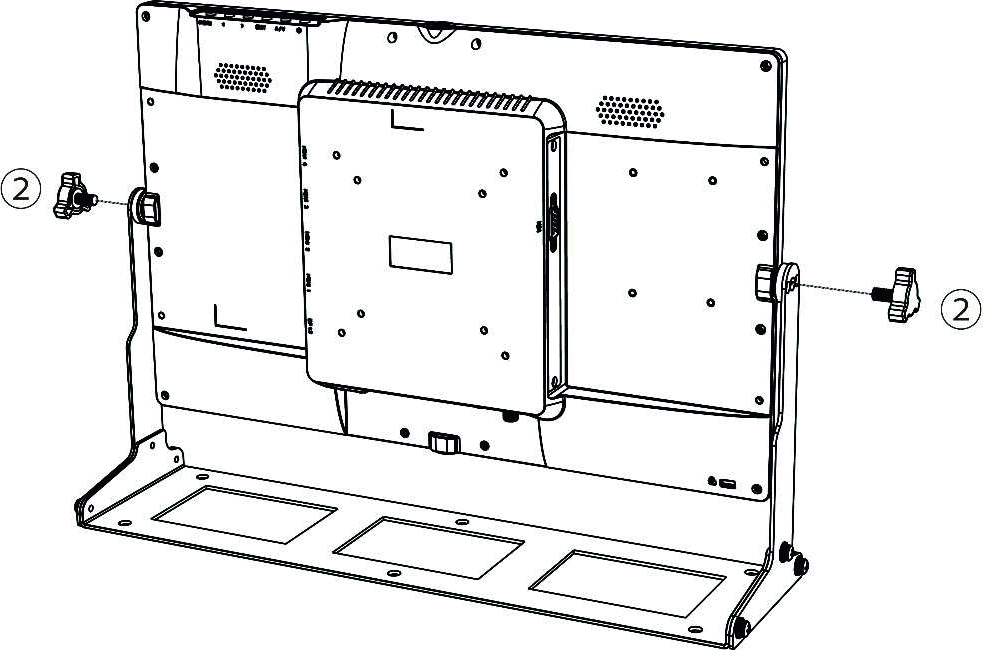
- When used optional U-Stand (PT-SCREEN-STD), need to fix with the left and right side housing.
V Mount Battery
V Mount Battery Plate
On the back of the display, there is a space reserved for
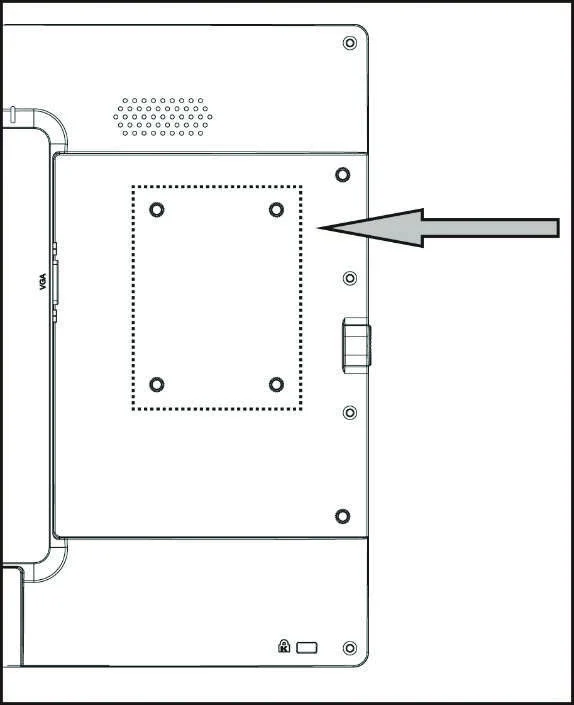
the V Mount Battery Plate.
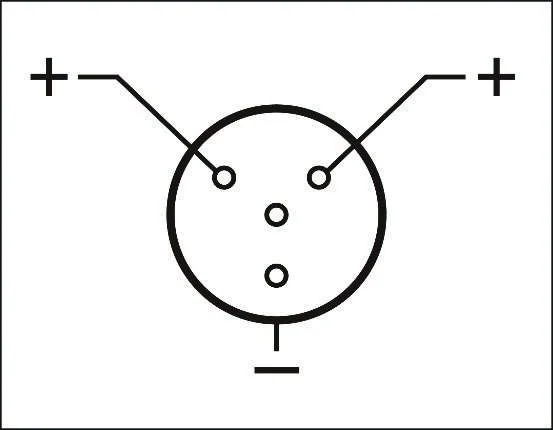
Pin Mini XLR Pin Assignment
Make sure the 4 pin mini XLR pin assignment before use.
Caution: If pin assignment of mini XLR connector is not connect, this could damage the whole unit of PT-SCREEN-100.
Sun Shade (optional)
Please see illustration below to fix the optional Sun Shade with PT-SCREEN-100.
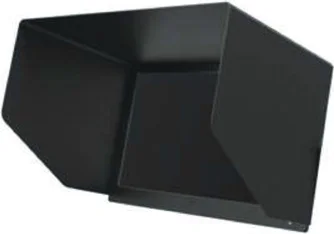
Sun Shade
Model: PT-SCREEN-SUS
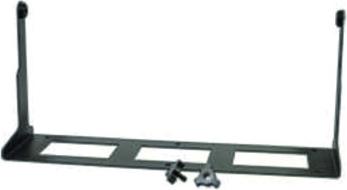
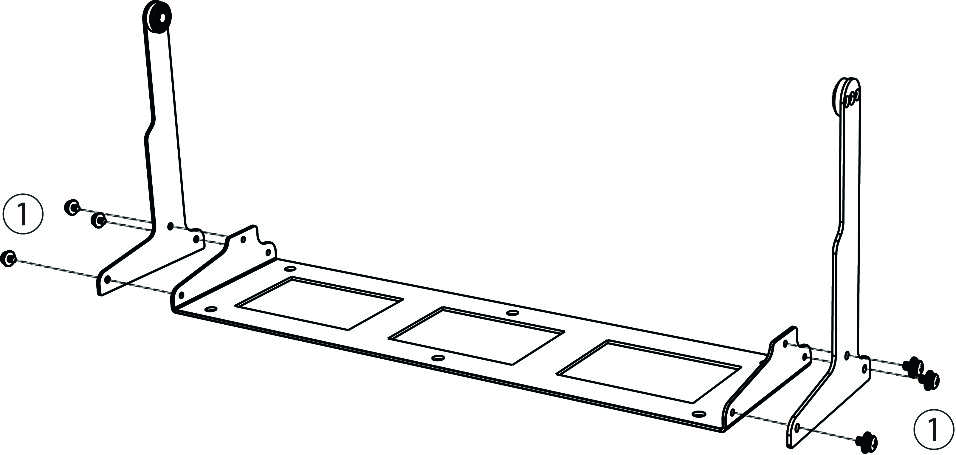
U Type Stand (optional)
Please see illustration below to fix the optional U Type stand with PT-SCREEN-100
Sun Shade
Model: PT-SCREEN-STD
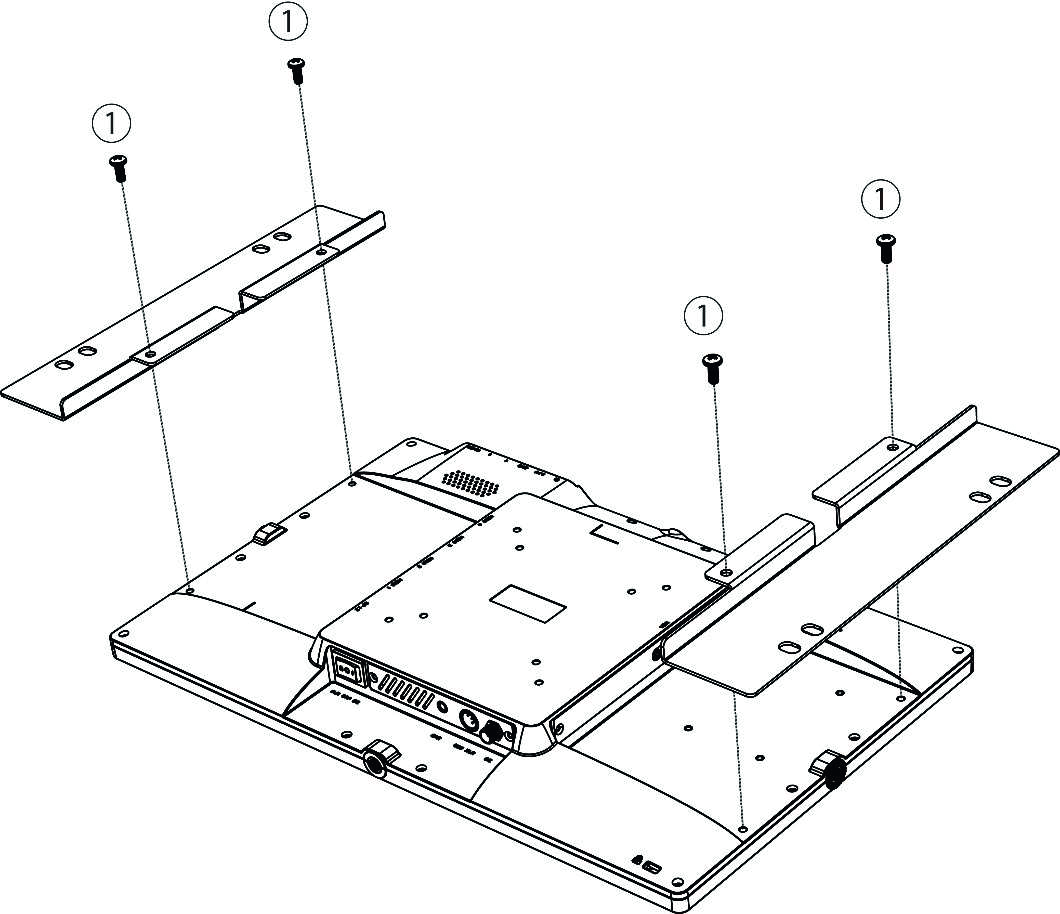
Rack Mount Bracket (optional)
Please see illustration below to fix the rack mount bracket with PT-SCREEN-100.
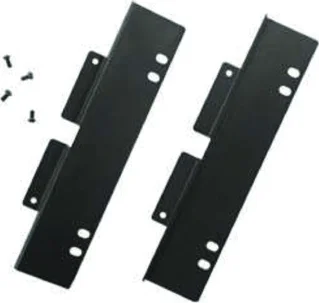
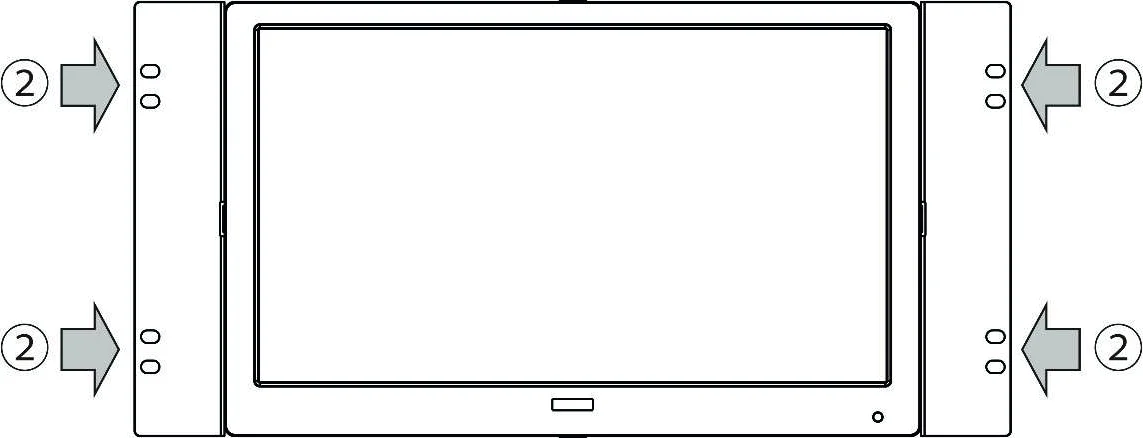
Note: Please reserve 6U space for this rack mount bracket
EIA Rack Mount Backet 6U
Model: PT-SCREEN-BRK
Input Signal
HDMI & DisplayPort input resolution and frequency
| Resolution | Frequency (Hz) |
|---|---|
| 480p | 50 / 59.94 / 60 |
| 576p | 50 |
| 720p | 50 / 59.94 / 60 |
| 1080p | 23.976 / 24 / 25 / 29.97 / 30 / 50 / 59.94 / 60 |
| 4K UHD | 23.976 / 24 / 25 / 29.97 / 30 / 50 / 59.94 / 60 |
| 4096 x 2160 | 23.976 / 24 / 25 / 29.97 / 30 / 50 / 59.94 / 60 |
- Interlace mode is not supported
- 4K UHD@50, 59.94, 60 are only supported by HDMI 1 , HDMI2 and DP input
- 4096x2160@25 and above is only supported by HDMI 1 and HDMI 2
VGA input resolution and frequency
| Resolution | Frequency (Hz) |
|---|---|
| 640 x 480 | 60 |
| 640 x 480 | 75 |
| 640 x 480 | 85 |
| 720 x 400 | 70 |
| 720 x 400 | 85 |
| 800 x 600 | 56 |
| 800 x 600 | 60 |
| 800 x 600 | 72 |
| 800 x 600 | 75 |
| 1024 x 768 | 60 |
| 1024 x 768 | 70 |
| 1024 x 768 | 75 |
| 1280 x 720 | 60 |
| 1280 x 800 | 60 |
| 1280 x 960 | 60 |
| 1280 x 1024 | 60 |
| 1280 x 1024 | 70 |
| 1280 x 1024 | 75 |
| 1366 x 768 | 60 |
| 1600 x 1200 | 60 |
| 1600 x 1200 | 65 |
| 1920 x 1080 | 60 |
| 1920 x 1200 | 60 |
Input Signal
HDMI and DisplayPort Input Signal Resolution and Frequency:
| Resolution | Frequency (Hz) |
|---|---|
| 480p | 50 / 59.94 / 60 |
| 576p | 50 |
| 720p | 50 / 59.94 / 60 |
| 1080p | 23.976 / 24 / 25 / 29.97 / 30 / 50 / 59.94 / 60 |
| 4K UHD | 23.976 / 24 / 25 / 29.97 / 30 / 50 / 59.94 / 60 |
| 4096 x 2160 | 23.976 / 24 / 25 / 29.97 / 30 / 50 / 59.94 / 60 |
- Interlace mode is not supported
- 4K UHD@50, 59.94, 60 are only supported by HDMI 1 , HDMI2 and DP input
- 4096x2160@25 and above is only supported by HDMI 1 and HDMI 2
VGA Input Resolution and Frequency:
| Resolution | Frequency (Hz) | Resolution | Frequency (Hz) |
|---|---|---|---|
| 640 x 480 | 60 | 1280 x 720 | 60 |
| 640 x 480 | 75 | 1280 x 800 | 60 |
| 640 x 480 | 85 | 1280 x 960 | 60 |
| 720 x 400 | 70 | 1280 x 1024 | 60 |
| 720 x 400 | 85 | 1280 x 1024 | 70 |
| 800 x 600 | 56 | 1280 x 1024 | 75 |
| 800 x 600 | 60 | 1366 x 768 | 60 |
| 800 x 600 | 72 | 1600 x 1200 | 60 |
| 800 x 600 | 75 | 1600 x 1200 | 65 |
| 1024 x 768 | 60 | 1920 x 1080 | 60 |
| 1024 x 768 | 70 | 1920 x 1200 | 60 |
| 1024 x 768 | 75 |
Specification
| Specifications | |
|---|---|
| Model No. | PT-SCREEN-100 |
| Color | Black |
| LCD | |
| Size | 15.6“ Wide |
| Panel Type | IPS |
| Resolution | 3840 x 2160 |
| Brightness | 330 cd/m² |
| Contrast | 1000:1 |
| View Angle | 176° (H) / 176° (V) |
| Input | 2x HDMI 2.0 ( HDCP 2.2/1.4 ) |
| 2x HDMI 1.4 ( HDCP 1.4 ) / | |
| 1x DisplayPort 1.2 | |
| 1x VGA | |
| Output | Earphone Jack (3.5mm Stereo) |
| Speaker | 2W x2 |
| VESA (FPMPMI) | 75 x 75 mm / 100 x 100 mm |
| Power | DC 10~24V / Mini XLR change by switch |
| Power Consumption | 17W |
| Operational Temperature | 0 ~ 50°C |
| Storage Temperation | -20 ~ 65°C |
| Dimension | 383(W) x 239(H) x 36(D) mm |
| Weight | about 1.360g |
| Accessories | Remote Control/ AC adaptor |
| Certificate | FCC/CE/PSE (AC adaptor) /RoHS |
Note: HDMI is the trademark of HDMI Licensing LLC.
Warranty
- Limited warranty: PureLink warrants that its products will be free from defects in materials and workmanship for one year, starting from the date of shipment (As per recorded in the invoice or receipt). This warranty covers only the main device. Accessories and consumables are not covered under warranty. Proof of purchase in the form of a bill of sale or receipted invoice to proof the validity of the warranty as well as the corresponding product serial number must be presented during servicing to obtain free warranty service within the warranty period. Note: To ensure warranty validity, please retain the receipt or invoice during purchase.
- Out-of-warranty Services: PurelLink provides paid servicing for products that are out-of-warranty or damages/malfunctions occurring outside of warranty coverage such as:
- Warranty/Servicing delivery charges Any delivery charges incurred from shipping the product for servicing within or after the warranty period is to be covered by the user.
- Exceeded warranty period
- Product seal with serial number has been altered or removed
- No proof of purchase or invalid serial number
- Delivery, installation or labor charges for installation or setup of the product
- Damage or malfunction caused by:
- Wear and tear
- Incorrect usage
- Use of unauthorized equipment or accessories
- Use of third-party accessories not meeting product specifications
- Damage caused by other connected faulty equipment
- Tempering
- Force majeure or Act of God
- Servicing not authorized by PureLink GmbH
- Any other cause of damage that is considered a defect
Technical support:
PureLinks technical support team is available via email or live telephone support to help you with any problems regarding our products. To ease the process, please prepare the following information before contacting us:
- Product model and name
- Details of the problem(s)
- Details leading up to the cause of the problem(s)
Remarks:
For any queries or problems, contact your nearest distributor or email us at: info@purelink.de
Legal & Compliance
Product identification
Model: PT-SCREEN-100 – manual version 1.0
Trademarks and disclaimer
Product model and logo are trademarks. All other company and product names mentioned are trademarks of their respective owners. All rights reserved. No part of this publication may be copied or reproduced without prior written permission. We reserve the right to make changes to the device, packaging or manual and accept no liability for misprints.
FCC
This equipment has been tested and found to comply with the limits of a Class B digital device, pursuant of Part 15 of the FCC Rules. These limits are designed to provide reasonable protection against harmful interference in a residential installation. This equipment generates, uses and radiates radio frequency energy and, if not installed and used in accordance with the instructions, may cause harmful interference in the radio communications. If this equipment does cause harmful interference to radio or television reception, which can be determined by turning the equipment off and on, you are encouraged to try to correct the interference by one or more of the following measures:
Disposal of electrical and electronic equipment
WEEE reg. no.: DE 93847290
The crossed-out wheelie bin symbol on the product, packaging or in this manual means that electrical and electronic equipment must not be disposed of with household waste at the end of its life. Hand in old devices free of charge at a public collection point or return them to a distributor obliged to take them back. Remove batteries and lamps that can be removed without destroying the device before handing it in, and delete any personal data stored on the device. Details are regulated by national law. By returning old devices you help protect the environment.
Batteries
Batteries must not be disposed of with household waste. Return used batteries free of charge to collection points or retailers.
Packaging
Dispose of packaging separately by material (paper/cardboard, plastics) via the local collection systems. Keep packaging material away from children – risk of suffocation. Packaging register LUCID: DE5958616449295.