
Product Introduction
Introduction
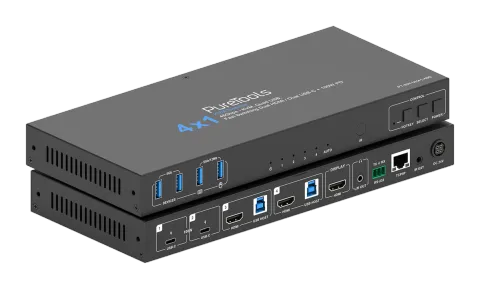
The 48G 4×1 KVM meeting room switcher enables fast video and device switching, allowing four computers (2× USB-C and 2× HDMI + USB-B) to connect to room peripherals such as a 4K/5K/8K TV, touchscreen, mouse, keyboard, and camera. The USB-C inputs also provide shared 100W power delivery. It supports automatic switching or manual control via the front panel button, hotkeys, mouse, RS-232, TCP/IP, and GUI. Ideal for meeting rooms and huddle spaces, it enables multiple PCs to share a single set of displays and USB peripherals.
Features
- HDCP 2.3 compliant
- Supports ultra-wide screen and video resolution up to 8K@60Hz, as specified in HDMI 2.1
- Supports video fast switching, keyboard, mouse switching
- Built-in EDID emulators on each input port ensure PCs get correct information
- Supports hot plug, to disconnect or connect devices to the KVM at any time
- Supports manual switching via front panel buttons, keyboard hotkeys, IR remote, mouse gestures, API command and Web GUI
- Supports auto switching to monitor computers in a specified time interval
- Video and audio zero latency
- The integrated USB 3.0 ports allow you to share USB peripherals like printer, scanner, webcam and hard drive between computers with data transfer rate up to 5Gbps
- USB-C ports support DP Alt-mode, USB 3.0 and 100W charging
Package List
- 1× 8K60 4x1 KVM Switcher
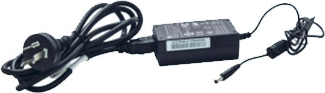
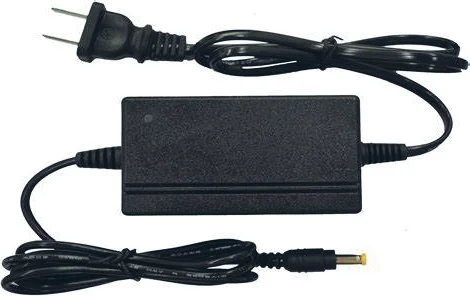
- 1× 24V/8A Power Supply with US/EU/UK/AU Conversion Plug
- 2× USB Cable (USB 3.0, Type A Male to Type B Male, 1.8m)
- 1× 3pin-3.5mm Phoenix Connector (male)
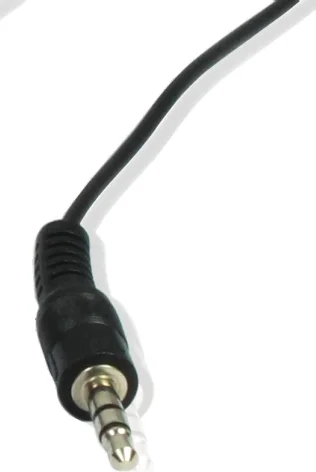
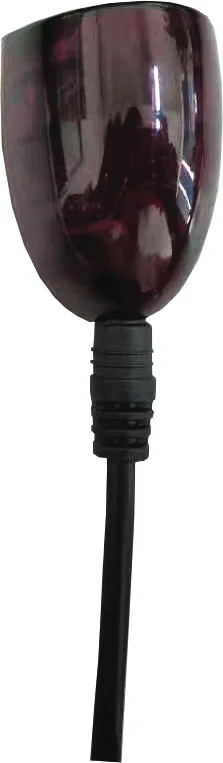
- 1× IR Receiver Cable (1.5m)
- 1× IR Remote
- 4× Machine Screw (KM3*6)
- 2× Mounting Ear
- 1× User Manual
Panel Description
Front Panel
| No. | Name | Function Description |
|---|---|---|
| 1 | USB 3.0 | Two USB 3.0 device ports, with 5V/1A power output and 5Gbps data rate. Connect to USB 3.0/2.0/1.1 devices. |
| 2 | USB 3.0 (mouse & keyboard) | Two USB 3.0 device ports, with 5V/1A power output and 5Gbps data rate. Connect to USB 3.0/2.0/1.1 devices. KVM function will be enabled or disabled when pressing the HOTKEY button. Note: If KVM is enabled, only USB 1.1 is supported now. |
| 3 | IN 1/2/3/4 LED | When PC 1/2/3/4 is selected, the corresponding LED will be on. |
| 4 | AUTO LED | When auto switching is enabled, the LED will be on. |
| 5 | IR | 38KHz IR receiver, no support for wideband. |
| 6 | HOTKEY LED | When HOTKEY function is enabled, the LED will be on. |
| 7 | HOTKEY button | Press to enable or disable the HOTKEY function. Note: HOTKEY is disabled by default. |
| 8 | SELECT button | Press to select the PC 1/2/3/4 circularly. |
| 9 | Power button | Press to enter working mode. Press and hold to enter standby mode. |
| 10 | Power LED | When the unit is powered on, the power LED is green; When the unit is standby, the power LED is red. |
Rear Panel
| No. | Name | Function Description |
|---|---|---|
| 1 | PC 1/2 | USB-C signal input ports, connected to PCs or hosts. Supporting fast charge up to 100W. The output power is 50W if the two ports are charged at the same time. |
| 2 | PC 3/4 HDMI | HDMI signal input ports, connected to PCs. Supporting bandwidth up to 48Gbps. USB HOST USB 3.0 signal input ports, connected to hosts. Supporting bandwidth up to 5Gbps. |
| 3 | DISPLAY HDMI | HDMI output port, connected to an display device, such as TV or monitor. Supporting bandwidth up to 48Gbps. |
| 4 | LINE OUT | Analog audio output port, connected to an earphone or speaker. Supporting unbalanced audio output with 2Vrms, and audio format PCM 2.0. |
| 5 | RS-232 | 3-pin phoenix connector, connected to a PC or control system for upgrade, debug and API commands transmission. |
| 6 | TCP/IP | Network interface. |
| 7 | IR EXT | IR signal input port, connected with IR receiver cable. Supporting 20K-60KHz wideband IR input. |
| 8 | DC 24V | DC 24V/8A power input port. |
IR Remote
Press this button to power on the switcher or set it to standby mode.
Press this button to enable/disable the auto switching function.
Press 1/2/3/4 button to select the PC 1/2/3/4, and the corresponding LED on the front panel will light in green.
Press this button to select the PC 1/2/3/4 circularly.
IR Receiver
Keyboard & Mouse Hotkey Function
The HOTKEY button on the front panel allows you to enable/disable the hotkey switching function.
When the hotkey switching function is enabled, the two USB 3.0 ports (mouse and keyboard) only support USB 1.1 mouse and keyboard, which can be used for hotkey switching.
When the hotkey switching function is disabled, the two USB 3.0 ports (mouse and keyboard) support USB 3.2 Gen 1 device.
(1) Keyboard hotkeys are defined by default as follow:
Note: Do not use the keypad on the right of the keyboard.
(2) Mouse hotkeys are defined by default as follow:
Double-Click Middle-Right (Double-click the mouse scroll wheel, and then click the right button): Switch to next input
Double-Click Middle-Left (Double-click the mouse scroll wheel, and then click the left button): Switch to previous input
Safety Precautions
To ensure the best from the product, please read all instructions carefully before using the device. Save this manual for further reference. Unpack the equipment carefully and save the original box and packing material for possible future shipment. Follow basic safety precautions to reduce the risk of fire, electrical shock and injury to persons.
- Do not dismantle the housing or modify the module. It may result in electrical shock or burn.
- Using supplies or parts not meeting the products’ specifications may cause damage, deterioration or malfunction.
- To prevent fire or shock hazard, do not expose the unit to rain, moisture or install this product near water.
- Do not remove the housing of the device as opening or removing housing may expose you to dangerous voltage or other hazards.
- Spillage into the housing may result in fire, electrical shock, or equipment damage. If an object or liquid falls or spills on to the housing, unplug the module immediately.
- Do not twist or pull by force ends of the optical cable. It can cause malfunction.
- Do not use liquid or aerosol cleaners to clean this unit. Always unplug the power to the device before cleaning.
- Information on disposal for scrapped devices: do not burn or mix with general household waste, please treat them as normal electrical wastes.
- Unplug the power cord when left unused for a long period of time.
- Keep the module away from liquids.
- Install the device in a place with fine ventilation to avoid damage caused by overheat.
- Do not put any heavy items on the extension cable in case of extrusion.
- Refer all servicing to qualified service personnel.
Specification
Technical
| Feature | Specification |
|---|---|
| HDMI Compliance | HDMI 2.1b |
| HDCP Compliance | HDCP 2.3 |
| Video Bandwidth | HDMI: 48Gbps USB-C: 18Gbps |
| USB Bandwidth | USB 3.0 DEVICES TO HOST/USB-C: 5Gbps USB 2.0 DEVICES TO HOST/USB-C: 480Mbps |
| Video Resolution | Up to 8K@60Hz |
| Color Space | RGB, YCbCr_4:4:4, YCbCr_4:2:2, YCbCr_4:2:0 |
| Color Depth | 8/10/12-bit |
| HDR | HDR, HDR10, HDR10+, Dolby Vision, HLG |
| Audio Format | LPCM 2.0 |
| Audio Latency | No Latency |
| Video Latency | No Latency |
| IR Level | 12Vp-p |
| IR Frequency | 20K-60KHz |
| Sample Rate | 32-192KHz (according to input signal) |
Transmission Distance
- 3m/9.8ft over HDMI 8K passive cable
- 1m/3.3ft over USB 3.2 Gen 1 5Gbps passive cable
ESD Protection
IEC 61000-4-2:
±8kV (air-gap discharge) & ±4kV (contact discharge)
Connection
Input
- 2× USB-C [USB-C, 24-pin female, USB tier 1]
- 2× USB HOST [USB-B, 9-pin female, USB tier 1]
- 2× HDMI [HDMI Type A, 19-pin female]
Output
- 4× USB DEVICE [USB-A, 9-pin female, USB tier 2]
- 1× HDMI [HDMI Type A, 19-pin female]
- 1× AUDIO OUT [3.5mm audio jack]
Control
- 1× RS-232 [3pin-3.5mm phoenix connector]
- 1× TCP/IP [RJ45 connector]
- 1× IR EXT [3.5mm audio jack]
Mechanical
- Housing: Metal Enclosure
- Color: Black
- Dimensions: 270mm [W] × 120mm [D] × 30mm [H]
- Weight: 1.03kg
Power Supply
- Input: AC 100-240V 50/60Hz, Output: DC 24V/8A (US/EU standard, CE/FCC/UL certified)
Power Consumption
150W (Max)
Operation Temperature
- 0°C ~ 40°C
Storage Temperature
- -20°C ~ 60°C
Operating Humidity
- 20%~80% relative humidity, non-condensing
Storage Humidity
- 10%~90% relative humidity, non-condensing
Web GUI User Guide
This product can be controlled by Web GUI. The operation method is shown as below:
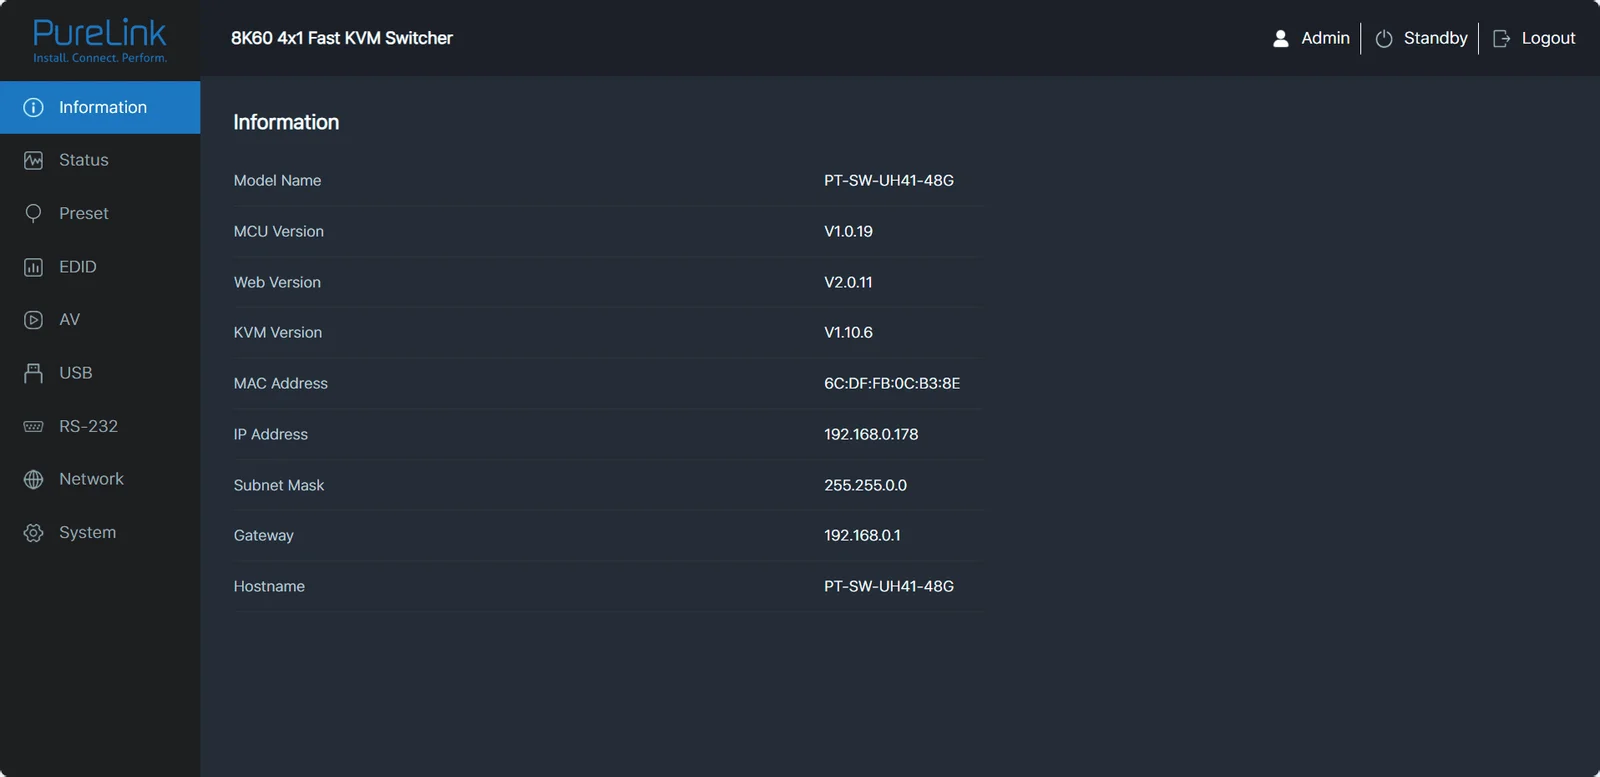
- Get current IP Address. The default IP address is 192.168.0.178 (when the system is not connected to a router). You can get the current IP address via API command control. Send the ASCII command r ip addr through a Serial Command tool, then you’ll get current IP address (The IP address is variable, depending on what the specific machine returns).
- Connect the TCP/IP port of the switcher to a PC with an UTP cable (as shown in the following figure), and set the IP address of the PC to be in the same network segment with the switcher.
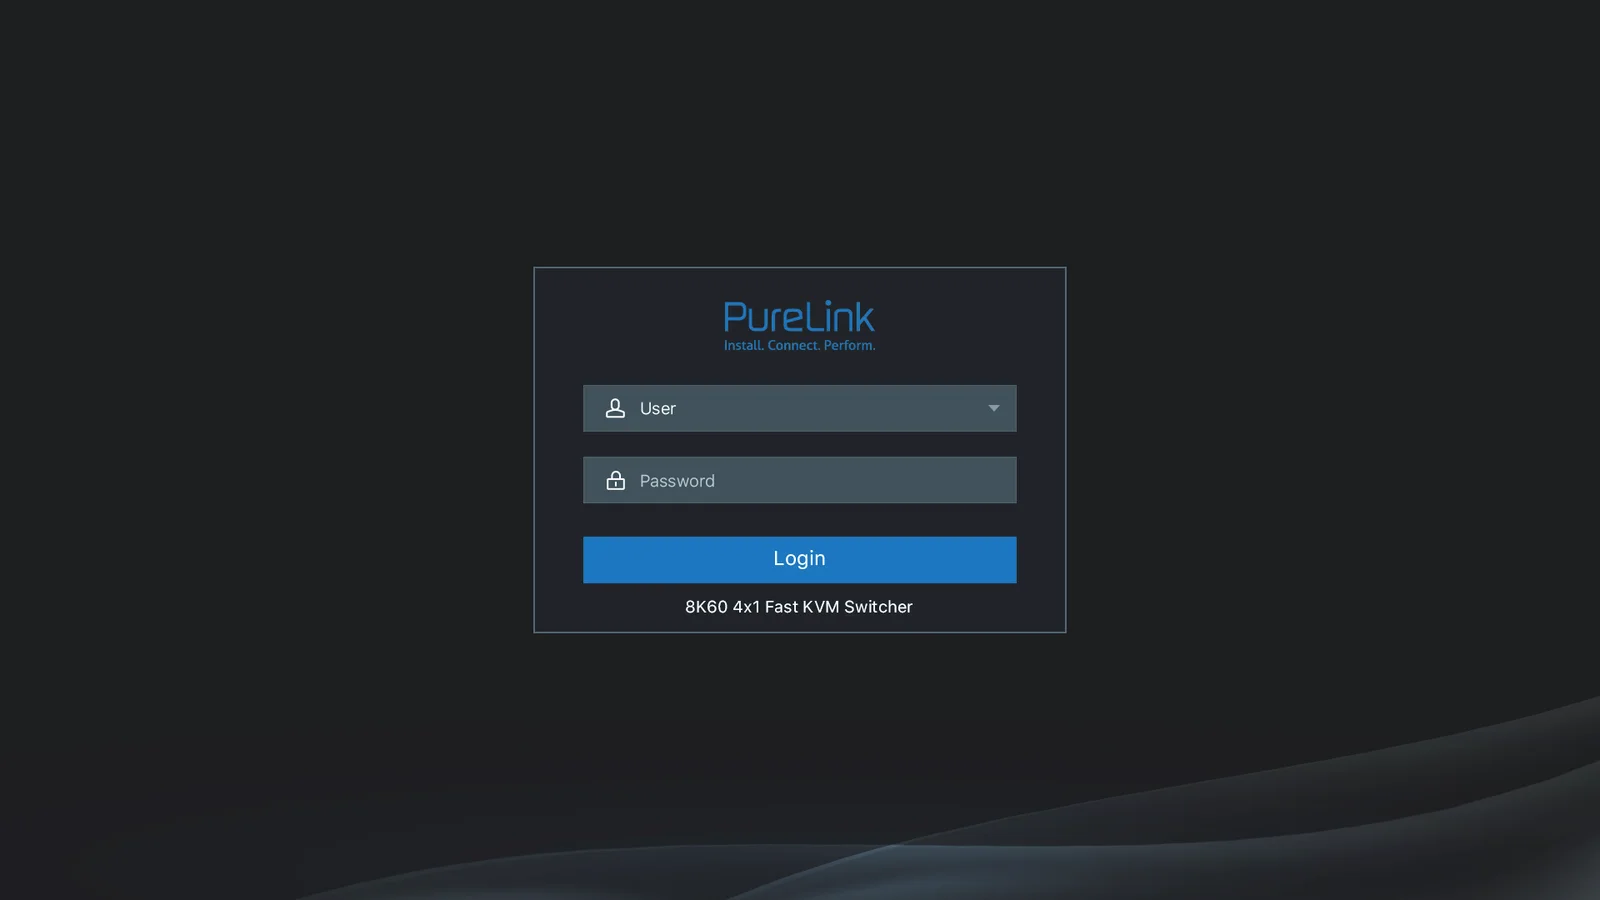
- Enter current IP address in your browser on the PC to visit Web GUI page. There will be a login page, as shown below:
For the details of API control, please refer to “API Control Command”.
Information Page
Select the Username and enter the password. The default passwords are:
| Username | Password |
|---|---|
| User | user |
| Admin | admin |
The Information page provides basic information about the model name, software version, IP information and current machine temperature.
The buttons at the top right of the web interface are always available:
- Clicking the Logout button will log out of current user.
- Clicking the Standby button will set the switcher to standby mode.
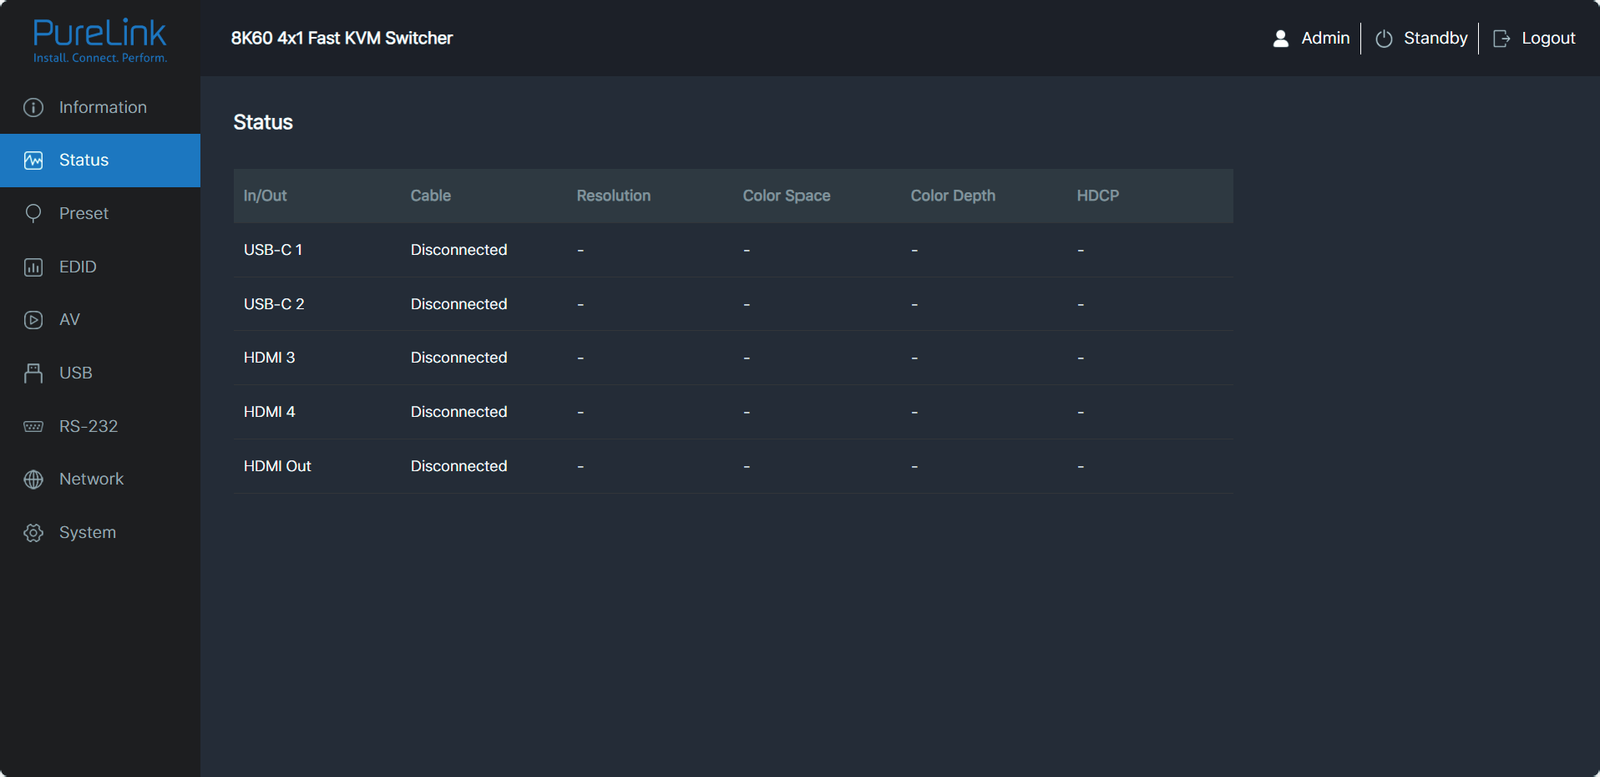
Status Page
The Status page displays the input & output port connection status, resolution, color space, color depth and HDCP.
Preset Page
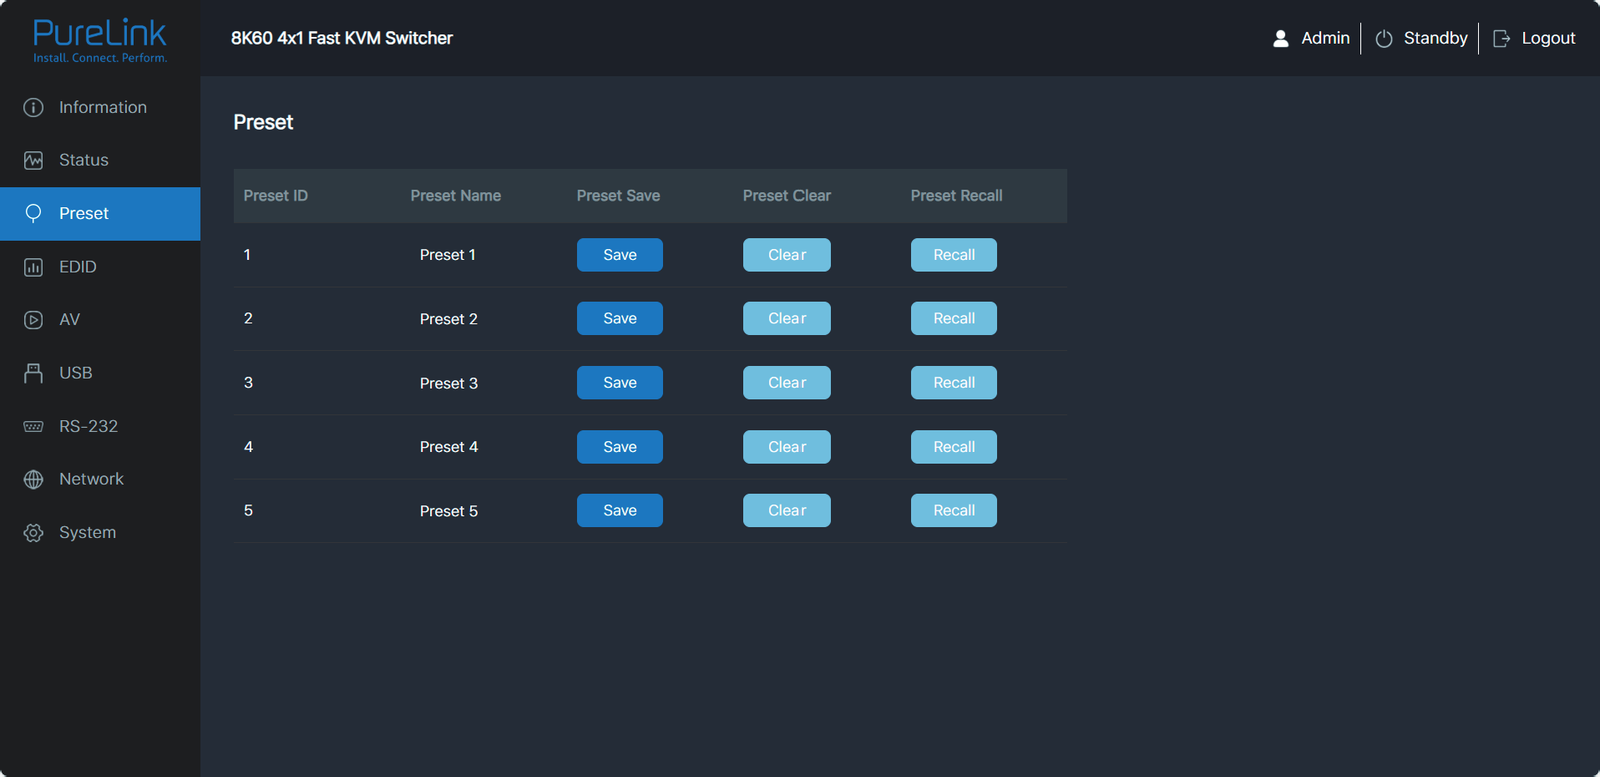
EDID Page
- You can set up to 5 preset scenes on the Preset page.
- ① Preset Name: You can name the preset scene.
- ② Preset Save: Click the Save button to save the scene.
- ③ Preset Clear: Click the Clear button to clear the saved scene.
- ④ Preset Recall: Click the Recall button to recall the saved scene.
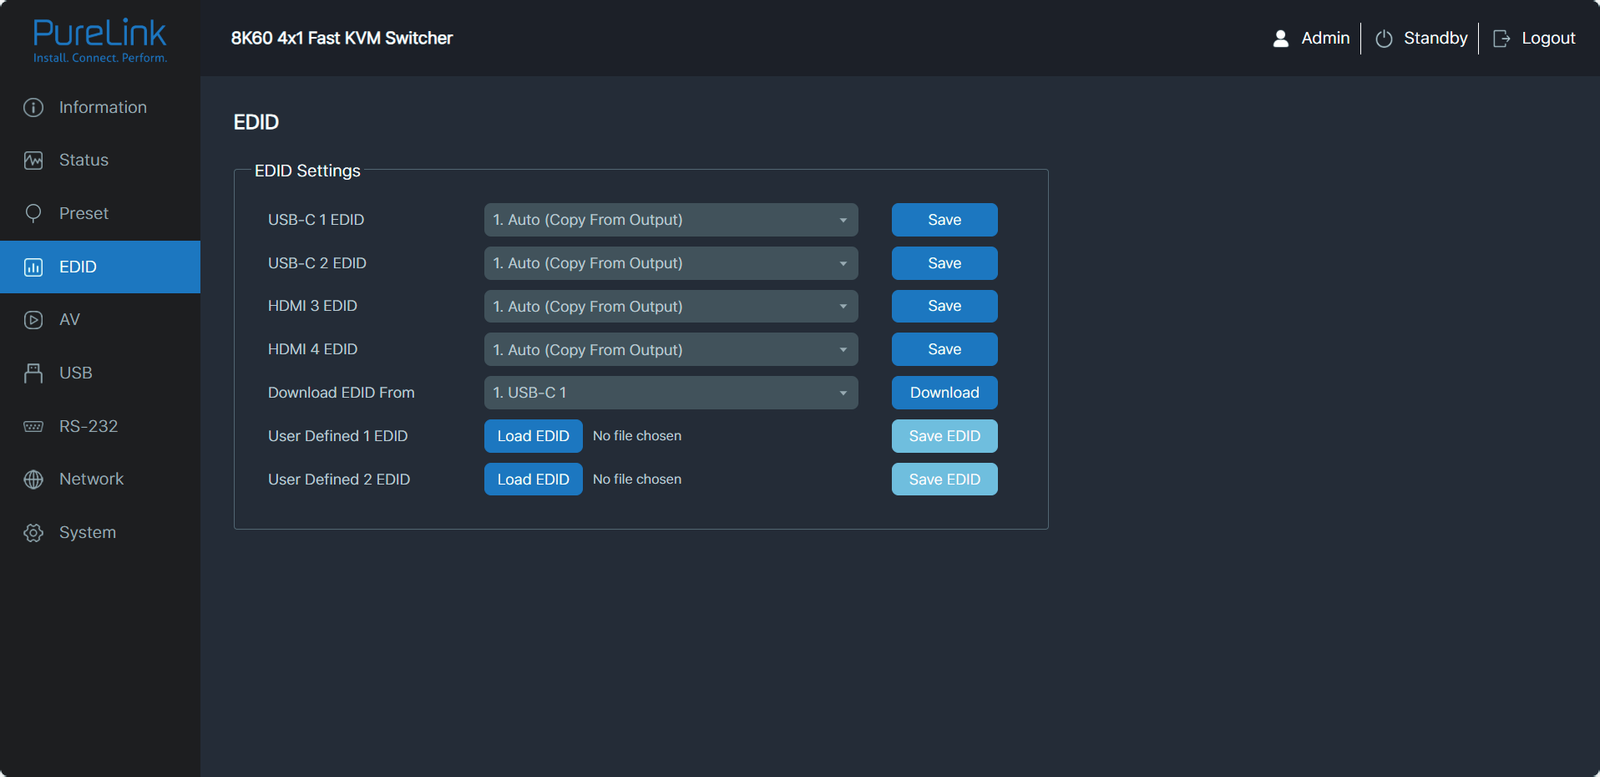
You can do the following operations on the EDID page.
- EDID list: Click the drop-down list to set EDID for each input port.
- EDID download: Click the drop-down list to select USB-C 1\USB-C 2\HDMI 3\HDMI 4\HDMI OUT for EDID download. Then click the Download button and generate a .bin file.
- User-defined EDID: Click the Upload EDID button to upload the defined EDID. Please note that only two user-defined EDID and .bin files are supported. Click the Save EDID button to save the user-defined EDID. Then it will be displayed in the EDID drop-down list, corresponding to the User Defined 1/User Defined 2.
| No. | EDID Mode | No. | EDID Mode |
|---|---|---|---|
| 1 | Auto (Copy from Output) | 12 | 4096x2160p120Hz 4:4:4, Audio 2CH PCM |
| 2 | 1920x1080p60Hz 4:4:4, Audio 2CH PCM | 13 | 5120x2160p50Hz 4:4:4, Audio 2CH PCM |
| 3 | 3840x2160p30Hz 4:4:4, Audio 2CH PCM | 14 | 5120x2160p60Hz 4:4:4, Audio 2CH PCM |
| 4 | 4096x2160p30Hz 4:4:4, Audio 2CH PCM | 15 | 7680x4320p30Hz 4:4:4, Audio 2CH PCM |
| 5 | 3840x2160p50Hz 4:4:4, Audio 2CH PCM | 16 | 7680x4320p50Hz 4:2:0, Audio 2CH PCM |
| 6 | 4096x2160p50Hz 4:4:4, Audio 2CH PCM | 17 | 7680x4320p60Hz 4:2:0, Audio 2CH PCM |
| 7 | 3840x2160p60Hz 4:4:4, Audio 2CH PCM | 18 | WUXGA 1920x1200p60Hz, Audio 2CH PCM |
| 8 | 4096x2160p60Hz 4:4:4, Audio 2CH PCM | 19 | DVI 1280x1024p60Hz, Audio None |
| 9 | 3840x2160p100Hz 4:4:4, Audio 2CH PCM | 20 | DVI 1920x1080p60Hz, Audio None |
| 10 | 4096x2160p100Hz 4:4:4, Audio 2CH PCM | 21 | DVI 1920x1200p60Hz, Audio None |
| 11 | 3840x2160p120Hz 4:4:4, Audio 2CH PCM | 22 | User Defined 1 |
| 23 | User Defined 2 |
AV Page
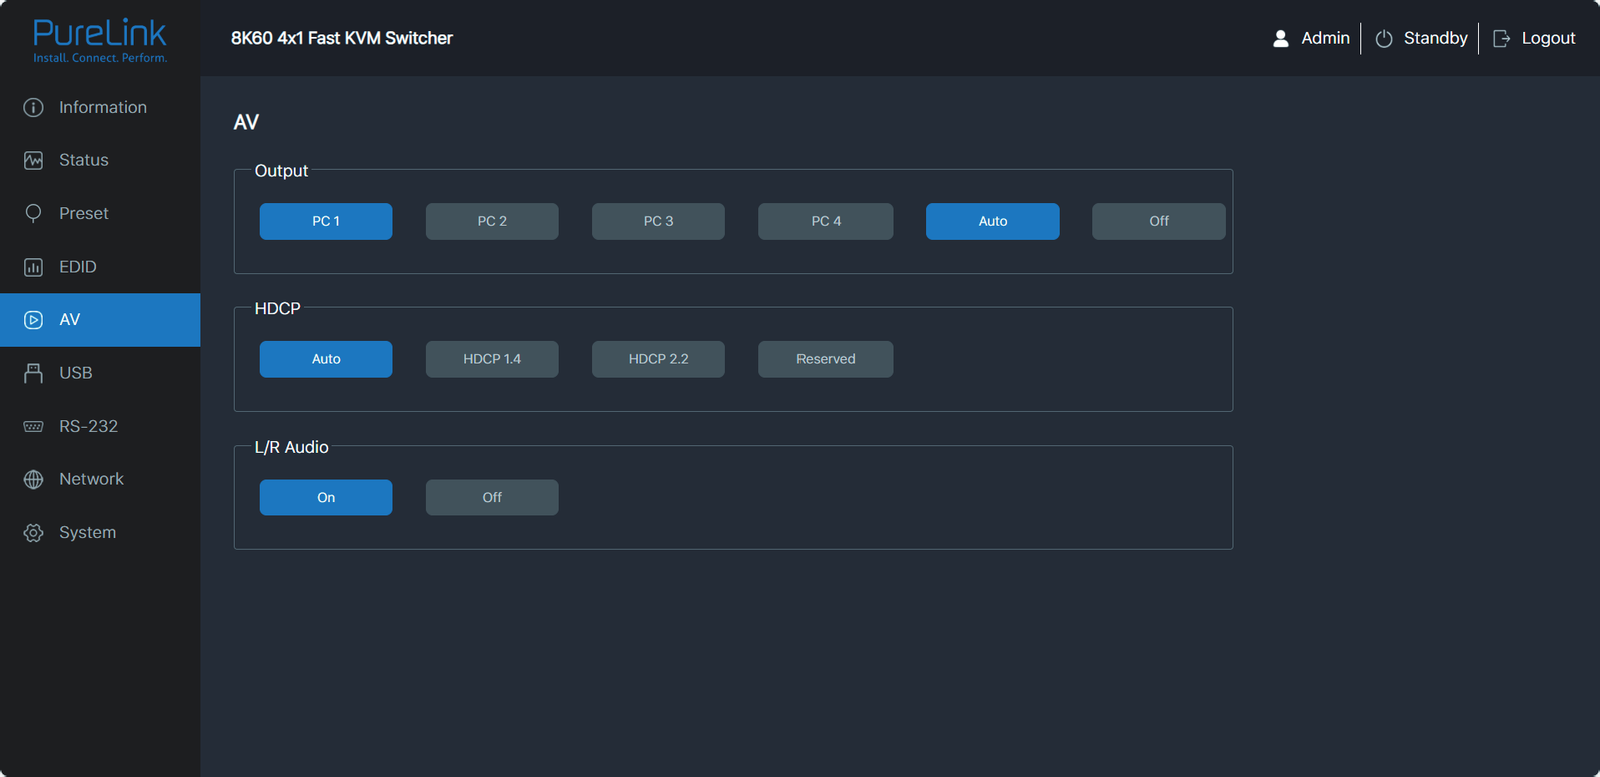
You can do the following operations on the AV page.
- Output: PC 1/2/3/4: Select PC 1/2/3/4 as the input source. Auto: Click Auto to enable or disable the auto switching function. Off: Click Off to turn off the HDMI output channel.
- HDCP: You can select any of the options for HDCP: Auto: HDCP version follows the corresponding display device. HDCP 1.4: HDCP 1.4 compliant. HDCP 2.2: HDCP 2.2 compliant. Reserved: User-defined mode.
- L/R Audio: Click On/Off button to turn on or turn off the audio output.
USB Page
You can do the following operations on the USB page.
- USB Switch: Follow Video: Click this button to set the USB devices follow the video. PC1/PC2/PC3/PC4: Select PC1/PC2/PC3/PC4 as the HOST for USB device.
- USB Power: You can set 5V detection for each USB device: Follow Host: 5V detection of the USB device follows the connection status of the selected host. Force 5V Always Output: 5V detection of the USB device is forced to be enabled. Disable 5V Output: 5V detection of the USB device is forced to be disabled.
- Hotkey Setting: Hotkey: Click On/Off button to enable or disable the hotkey function.
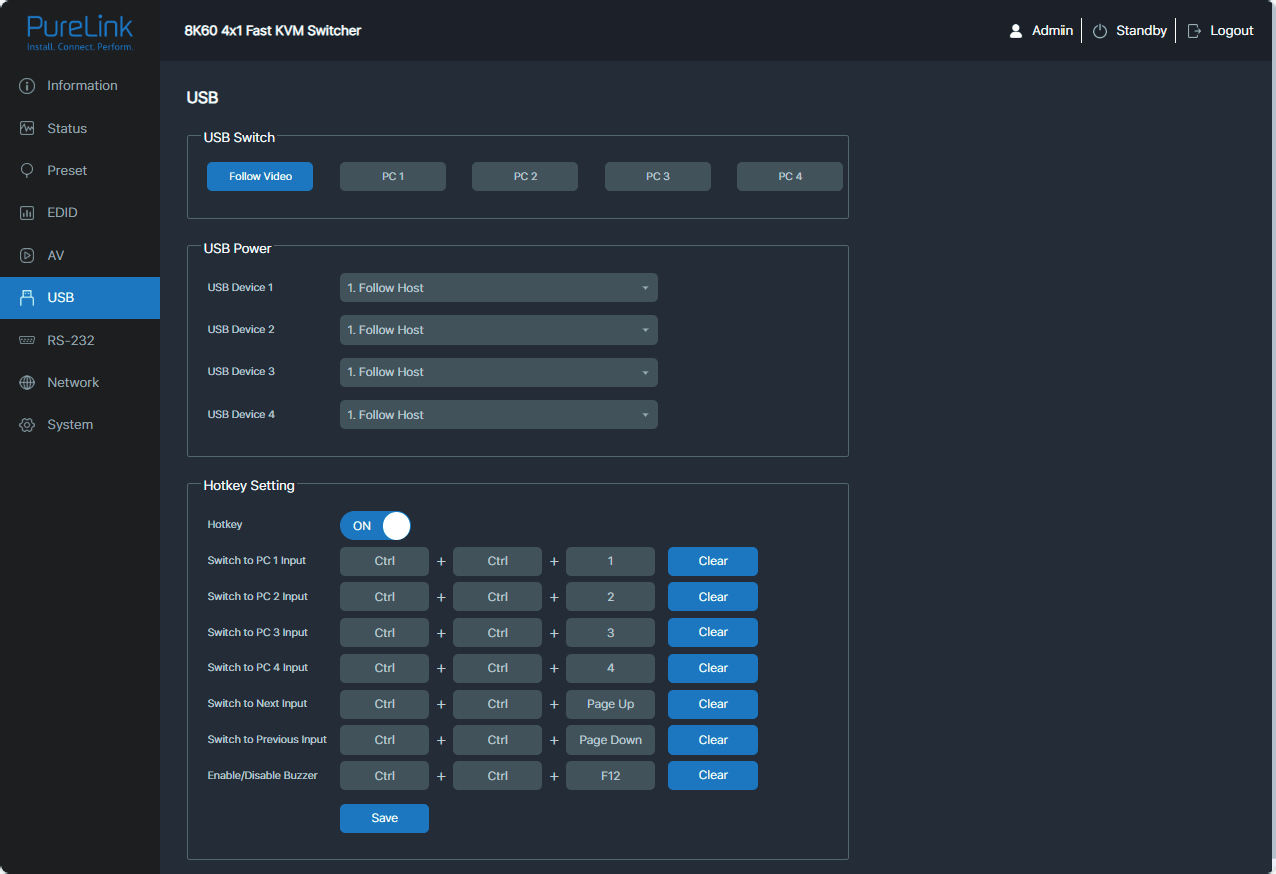
You can define any three keyboard values for the actions. Click Save to save the defined value. Click Clear to delete the defined value and set a new one. Note that it can't conflict with the setting of other hotkeys.
RS-232 Page
You can do the following operations on the RS-232 page.
- RS-232 Settings: Set baud rate, data bit, parity and stop bit, and then click "Save" to take effect.
- RS-232 Commands (Display Auto Power): RS-232 Commands: Turn on or turn off RS-232 commands control. If it is turned on, "Display On Command" will be sent after the Delay 1 time, and "Display Input Select" command will be sent after the Delay 2 time when the device is powered on. "Display Off Command" will be sent after the Delay time when the device is powered off.
Note: It is available when Display Auto Power is enabled and Control Type is selected as RS-232 or RS-232 and CEC on System page.
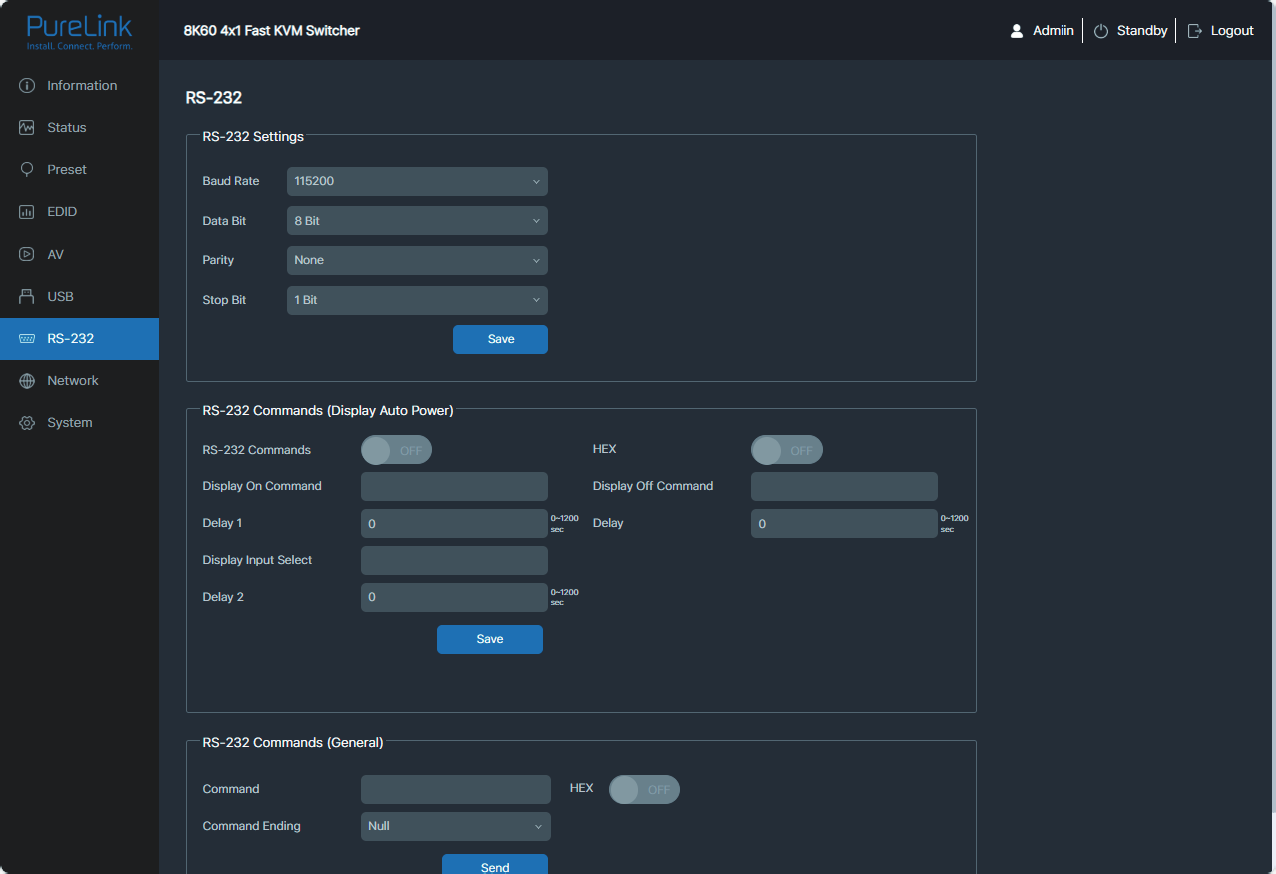
HEX: Turn on or turn off the HEX format. If it is turned off, the commands will be sent in ASCII format.
Network Page
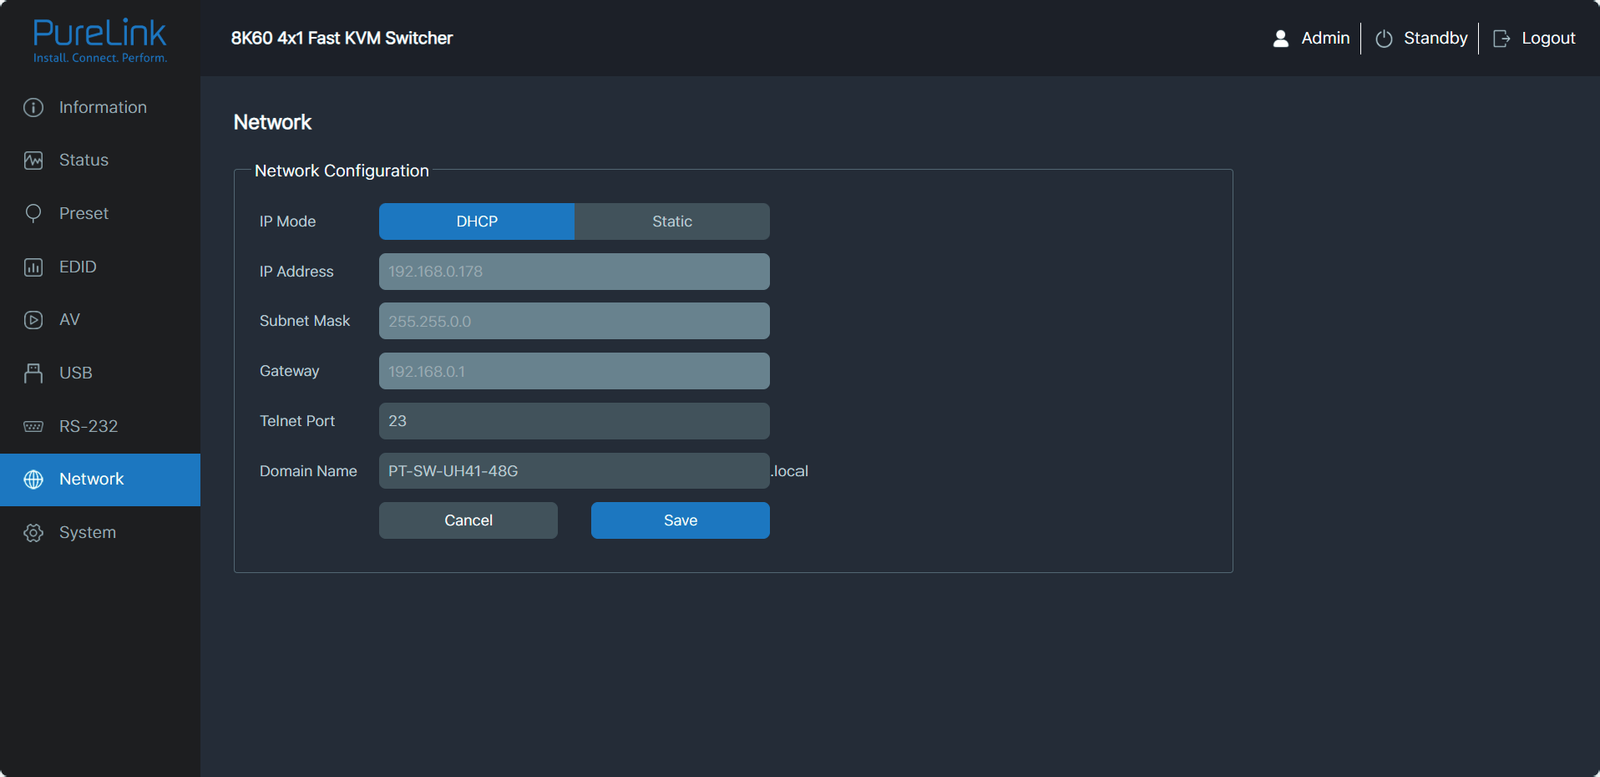
You can modify the IP Mode/IP Address/Gateway/Subnet Mask/Telnet Port/Domain Name as required on the Network page. Click “Save” to save the settings, and then it will come into effect.
If the Mode is “Static”, you can set manually the IP Address/Gateway/Subnet/Telnet Port/Domain Name as required.
If the Mode is “DHCP”, it will search and be filled with the IP Address assigned by the router automatically. You can't modify it now.
RS-232 Commands (General)
- Command: Enter a RS-232 command.
- HEX: Turn on or turn off the HEX format. If it is turned off, the command will be sent in ASCII format.
- Command Ending: Select a symbol used to end the command.
- Then Click "Send" to send the RS-232 command.
System Page
You can do the following operations on the System page.
- Display Control: CEC Command: Enable or disable CEC control on the TV. Display Auto Power: Set to turn on or turn off the TV via the power switch. Auto Power Off Timer: Set the auto power-off time, and then click "Save" to take effect. Control Type: Set and save the control type as required: CEC, RS-232, CEC and RS-232.
- System Utilities: Front Panel Buttons: Turn on or turn off the functions of the front panel buttons. IR: Turn on or turn off the functions of IR function. Beep: Turn on or turn off the functions of beep.
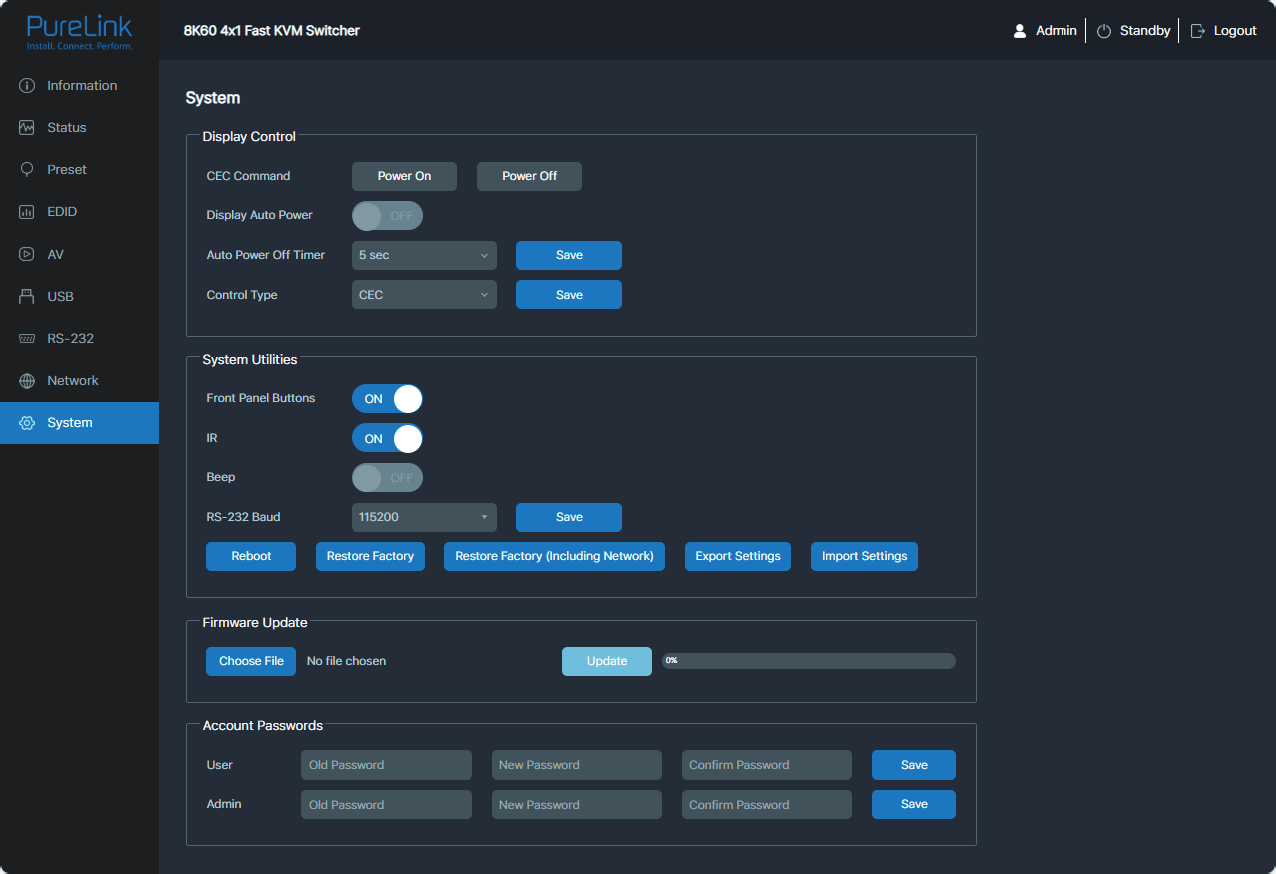
RS-232 Baud: Set and save the baud rate: 4800/9600/19200/38400/115200.
You can also reboot, restore factory, export settings or import settings via clicking the corresponding buttons.
- Firmware Update: Support update for MCU, Web and Video. Choose the update file first, and then click Update.
- Account Passwords: Enter the correct Old Password, New Password, and Confirm Password, and then click “Save”.
Note: Input rules for changing passwords:
(1) The password can’t be empty.
(2) New Password can’t be the same as Old Password.
(3) New Password and Confirm Password must be the same.
API Commands
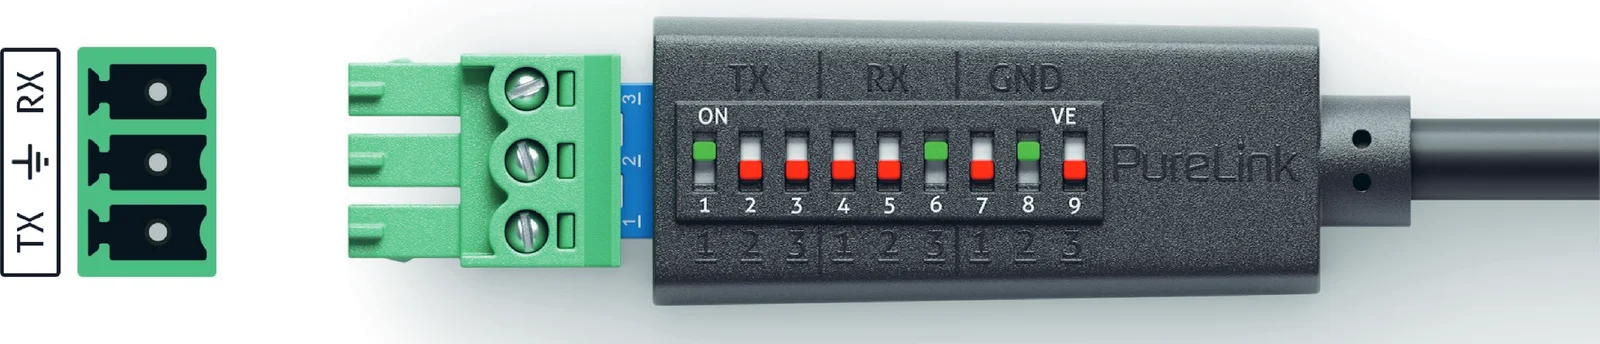
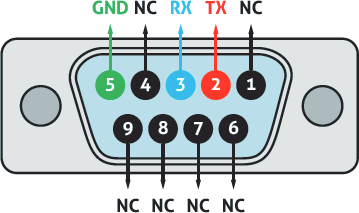
The product also supports API command control. Connect the RS-232 port of the PT-SW-UH41-48G to the PureLink PTM-RS100 configurable RS-232 cable (or other appropriate cable) and your control device. The DIP settings are as follows: Then open a Serial Command tool on PC to send ASCII commands to control the product. The ASCII command list of the product is shown below.
Communication Protocol
RS-232 Baud rate: 115200; Data bit: 8; Stop bit: 1; Parity bit: none; TCP/IP Port: 8000
The end mark of command is <CR><LF>
x - Parameter 1.
y - Parameter
| Command | Function | Example |
|---|---|---|
| ? | Get the list of all commands | ? |
| Command | Function | Example | Feedback |
|---|---|---|---|
| help | Get the list of all commands | help | |
| get model | Get device model | get model | PT-SW-UH41-48G |
| status | Get device current status Please refer to the note at the end of the list. | status | |
| get version | Get firmware version | get version | MCU v1.1.0 Web v1.1.0 KVM v1.1.0 |
| Command | Function | Example | Feedback | Default |
|---|---|---|---|---|
| power on/off | Power on/off the device | power on | Power on… System Initializing... Initialization Finished! MCU v1.1.0 Web v1.1.0 KVM v1.1.0 | |
| get power | Get current power state | get power | Power on | |
| reboot | Reboot the device | reboot | Reboot… System Initializing... Initialization Finished! MCU v1.1.0 Web v1.1.0 KVM v1.1.0 | |
| reset | Reset system settings to default (Should type "Yes" to confirm, "No" to discard) | reset | Sure to Reset System Settings To Default? Type "Yes" after next prompt to confirm… | |
| reset all | Reset system and network settings to default (Should type "Yes" to confirm, "No" to discard) | reset all | Sure to Reset System and Network Settings To Default? Type "Yes" after next prompt to confirm… | |
| set key on/off | Set front panel key on/off | set key on | Set key on | on |
| get key | Get front panel key on/off status | get key | On | |
| set ir on/off | Set IR on/off | set ir off | Set IR on | on |
| get ir | Get IR on/off status | get ir | On | |
| set beep on/off | Set buzzer on/off | set beep off | Set beep off | off |
| Command | Function | Example | Feedback | Default |
|---|---|---|---|---|
| get beep | Get buzzer on/off status | get beep | Off | |
| set hotkey on/off | Set hotkey function on/off | set hotkey on | Set hotkey on | on |
| get hotkey | Get hotkey function on/off status | get hotkey | On | |
| set hotkeys x | Set hotkeys (x=1~7) x=1: PC1 input hotkeys x=2: PC2 input hotkeys x=3: PC3 input hotkeys x=4: PC4 input hotkeys x=5: Next input hotkeys x=6: Previous input hotkeys x=7: Enable/disable buzzer | set hotkeys 1 | Type hotkeys… | |
| get hotkeys x | Get hotkeys (x=1~7) settings x=1: PC1 input hotkeys x=2: PC2 input hotkeys x=3: PC3 input hotkeys x=4: PC4 input hotkeys x=5: Next input hotkeys x=6: Previous input hotkeys x=7: Enable/disable buzzer | get hotkeys 1 | "Ctrl" + "Ctrl" + "1" | |
| set baud x | Set RS-232 baud rate to x bps x=1: 4800 x=2: 9600 x=3: 19200 x=4: 38400 x=5: 57600 x=6: 115200 | set baud 6 | Set baud rate 115200 | 9600 |
| get baud | Get RS-232 baud rate | get baud | 115200 |
| Command | Function | Example | Feedback | Default |
|---|---|---|---|---|
| set input x | Set input from (x=1~4) x=1: PC1 input x=2: PC2 input x=3: PC3 input x=4: PC4 input | set input 1 | Set PC1 input | 1 |
| get input | Get PC input | get input | PC1 | |
| set usb x | Set USB from (x=0~4) x=0: Follow video input x=1: PC1 USB host x=2: PC2 USB host x=3: PC3 USB host x=4: PC4 USB host | set usb 0 | Set USB follow video input | 0 |
| get usb | Get USB input | get usb | Follow video input | |
| get usb5v | Get USB host input 5V | get usb5v | PC1 USB: 5V PC2 USB: 5V PC3 USB: 5V PC4 USB: None | |
| set autoswitch on/off | Set auto-switching on/off | set autoswitch on | Set autoswitch on | on |
| get autoswitch | Get auto-switching on/off status | get autoswitch | On | |
| set autoswitch mode x | Set auto-switching detection mode x=0: 5V detection x=1: Signal detection | set autoswitch mode 1 | Set autoswitch mode to signal detection | signal detection |
| get autoswitch mode | Get auto-switching detection mode | get autoswitch mode | Signal detection |
| Command | Function | Example | Feedback |
|---|---|---|---|
| set edid x to y | Set input ports (x=0~4) EDID to (y=0~22) x=0: All inputs x=1: PC1 input x=2: PC2 input x=3: PC3 input x=4: PC4 input y=00: Copy EDID from HDMI output (default) y=01: 1920x1080p60Hz 4:4:4, Audio 2CH PCM y=02: 3840x2160p30Hz 4:4:4, Audio 2CH PCM y=03: 4096x2160p30Hz 4:4:4, Audio 2CH PCM y=04: 3840x2160p50Hz 4:4:4, Audio 2CH PCM y=05: 4096x2160p50Hz 4:4:4, Audio 2CH PCM y=06: 3840x2160p60Hz 4:4:4, Audio 2CH PCM y=07: 4096x2160p60Hz 4:4:4, Audio 2CH PCM y=08: 3840x2160p100Hz 4:4:4, Audio 2CH PCM y=09: 4096x2160p100Hz 4:4:4, Audio 2CH PCM y=10: 3840x2160p120Hz 4:4:4, Audio 2CH PCM y=11: 4096x2160p120Hz 4:4:4, Audio 2CH PCM y=12: 5120x2160p50Hz 4:4:4, Audio 2CH PCM y=13: 5120x2160p60Hz 4:4:4, Audio 2CH PCM y=14: 7680x4320p30Hz 4:4:4, Audio 2CH PCM y=15: 7680x4320p50Hz 4:2:0, Audio 2CH PCM y=16: 7680x4320p60Hz 4:2:0, Audio 2CH PCM y=17: WUXGA 1920x1200p60Hz, Audio 2CH PCM y=18: DVI 1280x1024p60Hz, Audio None y=19: DVI 1920x1080p60Hz, Audio None y=20: DVI 1920x1200p60Hz, Audio None y=21: User Defined 1 y=22: User Defined 2 | set edid 0 to 0 | Set all inputs EDID to 00: Copy EDID from HDMI output (default) |
| set user edid x | Set user defined EDID (x=0~2) to y x=0: User Defined 1 and User Defined 2 x=1: User Defined 1 x=2: User Defined 2 y=00 FF FF FF ….. (y is 256 bytes EDID data) | set user edid 1 | User Defined 1 EDID is loaded |
| get edid x | Get input ports (x=0~4) EDID x=0: All inputs x=1: PC1 input x=2: PC2 input x=3: PC3 input x=4: PC4 input | get edid 0 | PC1 EDID 00: Copy EDID from HDMI output (default) PC2 EDID 00: Copy EDID from HDMI output (default) PC3 EDID 00: Copy EDID from HDMI output (default) PC4 EDID 00: Copy EDID from HDMI output (default) |
| get edid data x | Get input ports (x=0~4) EDID data x=0: All inputs x=1: PC1 input x=2: PC2 input x=3: PC3 input x=4: PC4 input | get edid data 0 | PC1 EDID PC2 EDID PC3 EDID PC4 EDID |
| get user edid x | Get user defined EDID (x=0~2) data x=0: User Defined 1 and User Defined 2 x=1: User Defined 1 x=2: User Defined 2 | get user edid 1 |
| Command | Function | Example | Feedback | Default |
|---|---|---|---|---|
| set output stream on/off | Set output (x=0~1) stream on/off x=0: All outputs x=1: HDMI output | set output stream off set output 0 stream off | Set All outputs off | on |
| get output stream get output x stream | Get output (x=0~1) stream on/off status x=0: All outputs x=1: HDMI output | get output stream get output 0 stream | On | |
| set output hdcp y | Set output HDCP mode to (y=0~4) y=0: Reserved y=1: Auto y=2: HDCP 1.4 y=3: HDCP 2.2 | set output hdcp 1 | Set output HDCP to auto | 1 |
| get output hdcp | Get output HDCP mode | get output hdcp | Auto | |
| set audio mute on/off set audio mute on set audio mute off | Set de-embedding audio mute on/off | set audio mute on set audio mute off | Set de-embedding audio mute on Set de-embedding audio mute off | off |
| get audio mute | Get de-embedding audio mute on/off status | get audio mute | Mute on | |
| set output x usb5v y | Set USB device port output (x=0~4) 5V to y x=0: All USB device ports x=1: USB-A device 1 x=2: USB-A device 2 x=3: USB-A device 3 x=4: USB-A device 4 y=0: Disable 5V output y=1: Follow host y=2: Force 5V always output | set output 0 usb5v 1 set output 0 usb5v 1 1 | ||
| get output x usb5v | Get USB device port output (x=0~4) 5V status | get output 0 usb5v | USBA_1 5V: follow host USBA_2 5V: follow host USBA_3 5V: follow host USBA_4 5V: follow host |
| Command | Function | Example | Feedback | Default |
|---|---|---|---|---|
| set cec power on/off | Set CEC power on/off command | set cec power on set cec power off | CEC power on CEC power off | |
| set auto power feature on/off | Set display auto power feature on/off | set auto power feature on | Set auto power | on |
| get auto power feature | Get display auto power feature on/off status | get auto power feature | Auto power on | |
| set auto power off timer x | Set auto power off command will be sent out after x (x=1~6) x=1: 5 sec x=2: 10 sec x=3: 30 sec x=4: 1 min x=5: 5 min x=6: 10 min | set auto power off timer 1 | Set auto power off timer: 5 sec | 5 sec |
| get auto power off timer | Get auto power off timer | get auto power off timer | 5 sec | |
| set auto power control x | Set auto power feature control via (x=1~3) x=1: CEC x=2: RS-232 x=3: CEC and RS-232 | set auto power control 1 | Set auto power control: CEC | CEC |
| get auto power control | Get auto power feature control type | get auto power control | CEC | |
| set RS-232 setting x | Set RS-232 setting to x x= 115200-8n1 Baud rate: 115200/57600/38400/19200/9600/4800/2400 Data bits: 7/8 Parity: n(None)/ o(Odd)/ e(Even) Stop bits: 1/2 | set RS-232 setting 115200-8n1 | Set RS-232: 115200-8n1 | 9600-8n1 |
| get RS-232 setting | Get RS-232 setting | get RS-232 setting | 115200-8n1 | |
| set RS-232 command on/off | Set RS-232 command on/off | set RS-232 command on set RS-232 command off | Set RS-232 command on Set RS-232 command off | off |
| get RS-232 command | Get RS-232 command on/off status | get RS-232 command | On | |
| set RS-232 HEX/ASCII power on delay1 input delay2 | Set RS-232 HEX/ASCII power on delay1 input delay2 Command format is HEX or ASCII y1= RS-232 power on command y2= 0~1200sec y3= RS-232 input port selection y4= 0~1200sec NOTE: delay1 input delay2 can be NULL | set RS-232 ASCII power on delay1 input delay2 set RS-232 ASCII power on set RS-232 HEX power on delay1 input | Set RS-232 ASCII power on delay1 input delay2 Set RS-232 ASCII power on Set RS-232 HEX power on delay1 input | |
| get RS-232 power on command | Get RS-232 power on command | get RS-232 power on command | RS-232 ASCII power on delay1 input delay2 | |
| set RS-232 HEX/ASCII power off delay | Set RS-232 HEX/ASCII power off delay Command format is HEX or ASCII y1= RS-232 power off command y2= 0~1200sec NOTE: delay can be NULL | set RS-232 ASCII power off delay set RS-232 HEX power off | Set RS-232 ASCII power off delay Set RS-232 HEX power off | |
| get RS-232 power off command | Get RS-232 power off command | get RS-232 power off command | RS-232 ASCII power off delay | |
| set RS-232 HEX/ASCII command end z | Set RS-232 HEX/ASCII command ending with (z=0~3) Command format is HEX or ASCII y= RS-232 command z=0: Null z=1: z=2: z=3: | set RS-232 ASCII command end 0 set RS-232 HEX command end 3 | Set RS-232 ASCII command Set RS-232 HEX command |
System Diagram
The following diagrams illustrate typical input and output connections that can be utilized with this device:

The terms HDMI and HDMI High-Definition Multimedia interface, and the HDMI Logo are trademarks or registered trademarks of HDMI Licensing LLC in the United States and other countries.
Usage Precaution
- Make sure all components and accessories included before installation.
- System should be installed in a clean environment with proper temperature and humidity.
- All of the power switches, plugs, sockets, and power cords should be insulated and safe.
- All devices should be connected before power on.
Firmware Upgrade
Please follow the steps as below to upgrade firmware via the RS-232 port or WebGUI.
- Prepare the PC tool (.exe) and the latest upgrade file (.bin) on PC. Rename the upgrade file as “MCU_MAIN_PT-SW-UH41-48G_Vxx.xx.xx.bin”.
- Connect the RS-232 port on the switcher to the PC.
- Connect the power supply to the switcher and power on.
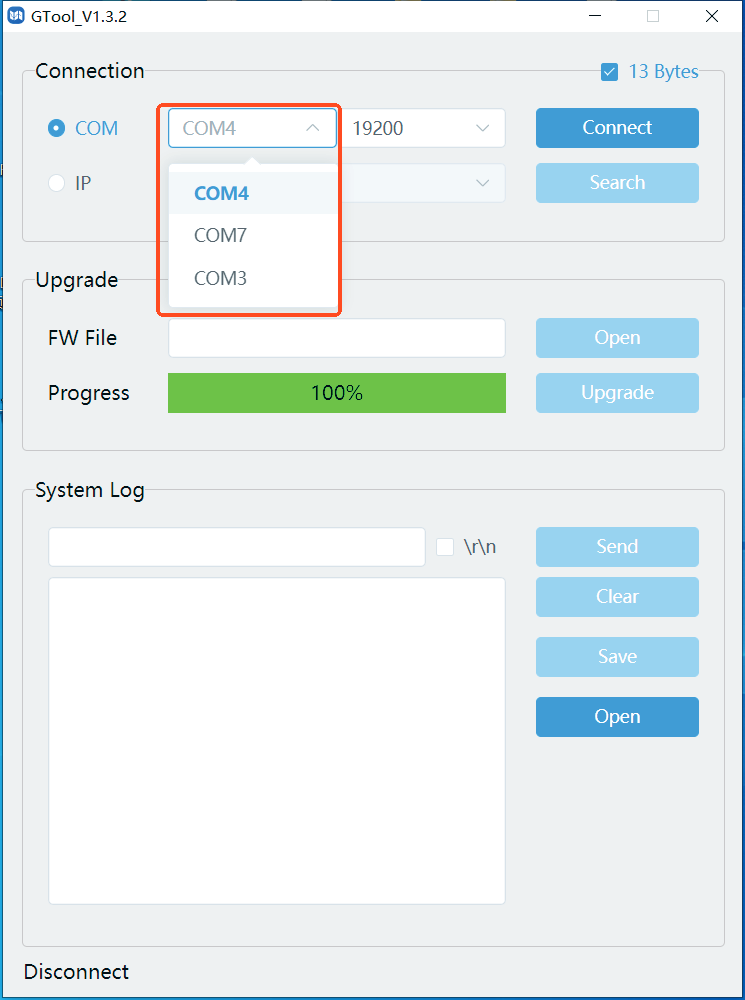
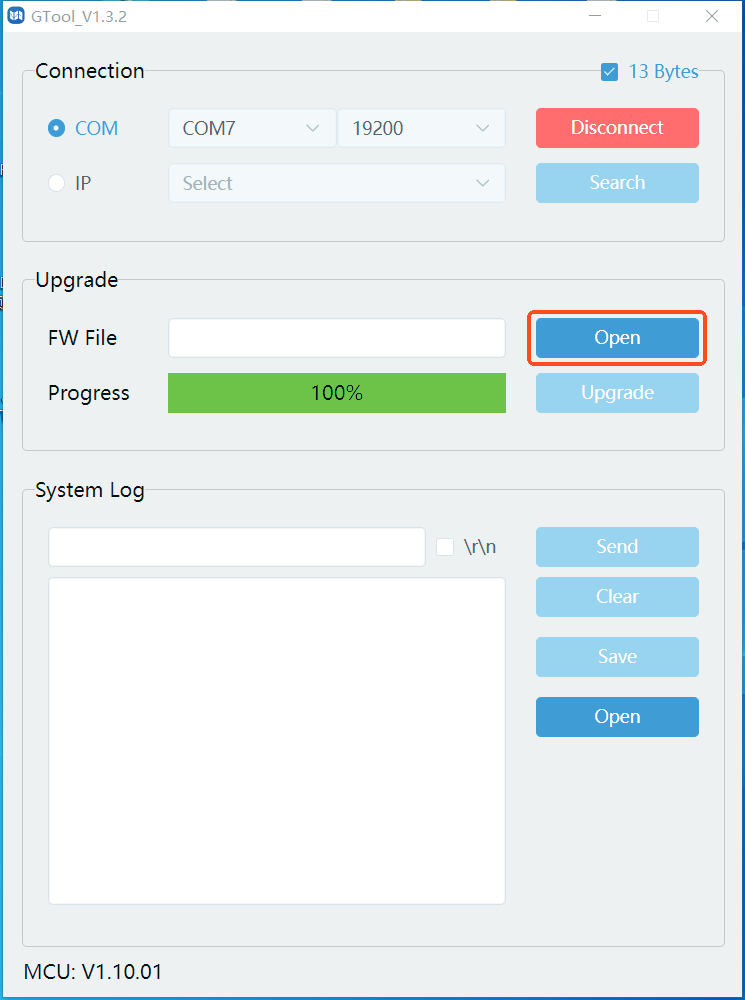
- Run GTool.exe on PC.
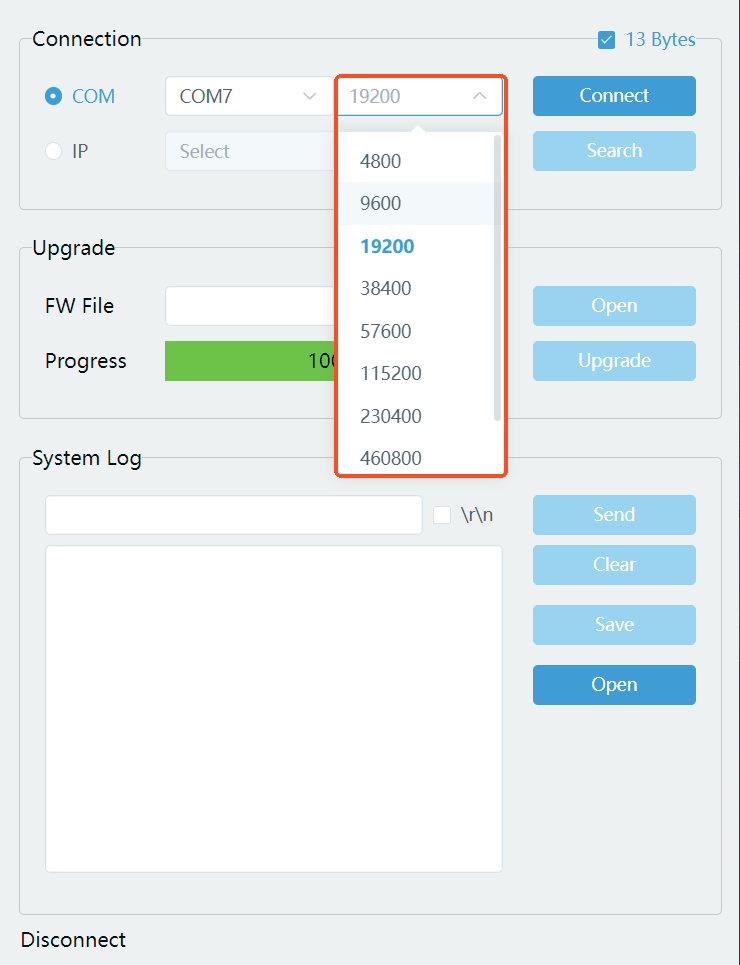
- Select the connection port and baudrate, and then click "Connect". "13 Bytes" must be checked.
- Click "Open" to select the prepared upgrade file, and then click "Upgrade".
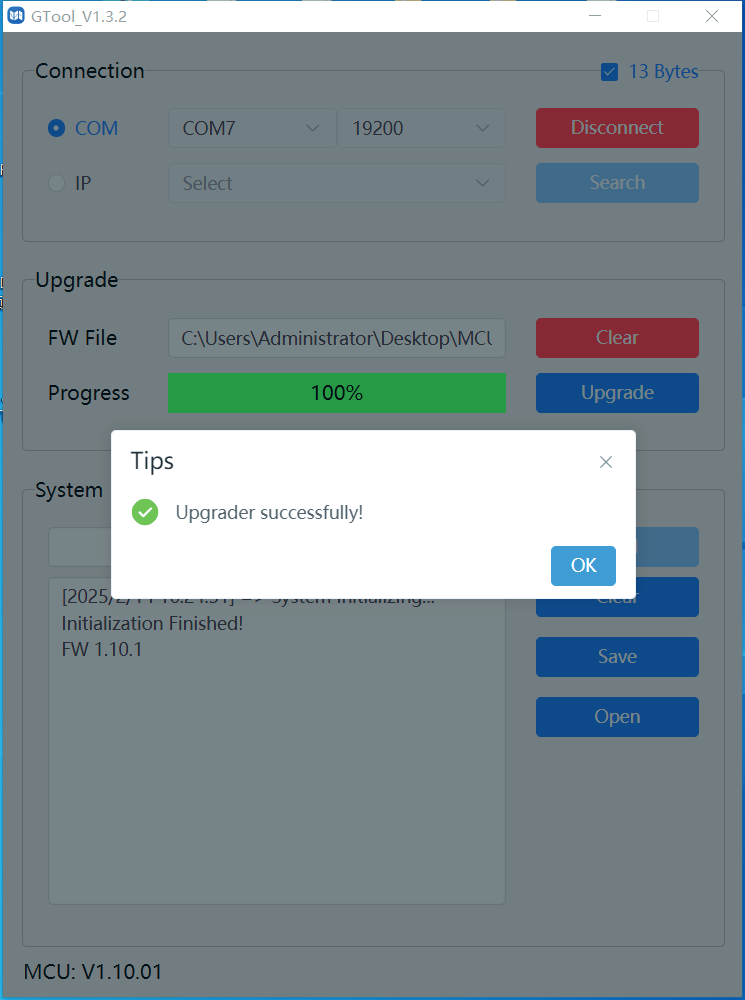
- When the upgrade is completed, it will pop up "Upgrade successfully". If the firmware updating is fail, the name of upgrade file (.bin) should be confirmed, and then follow the above steps to update again.
WebGUI Upgrade
- Prepare the PC tool (.exe) and the latest upgrade file (.bin) on PC. Rename the upgrade file as “MCU_MAIN_PT-SW-UH41-48G_Vxx.xx.xx.bin”.
- Log in Web GUI, and enter System page.
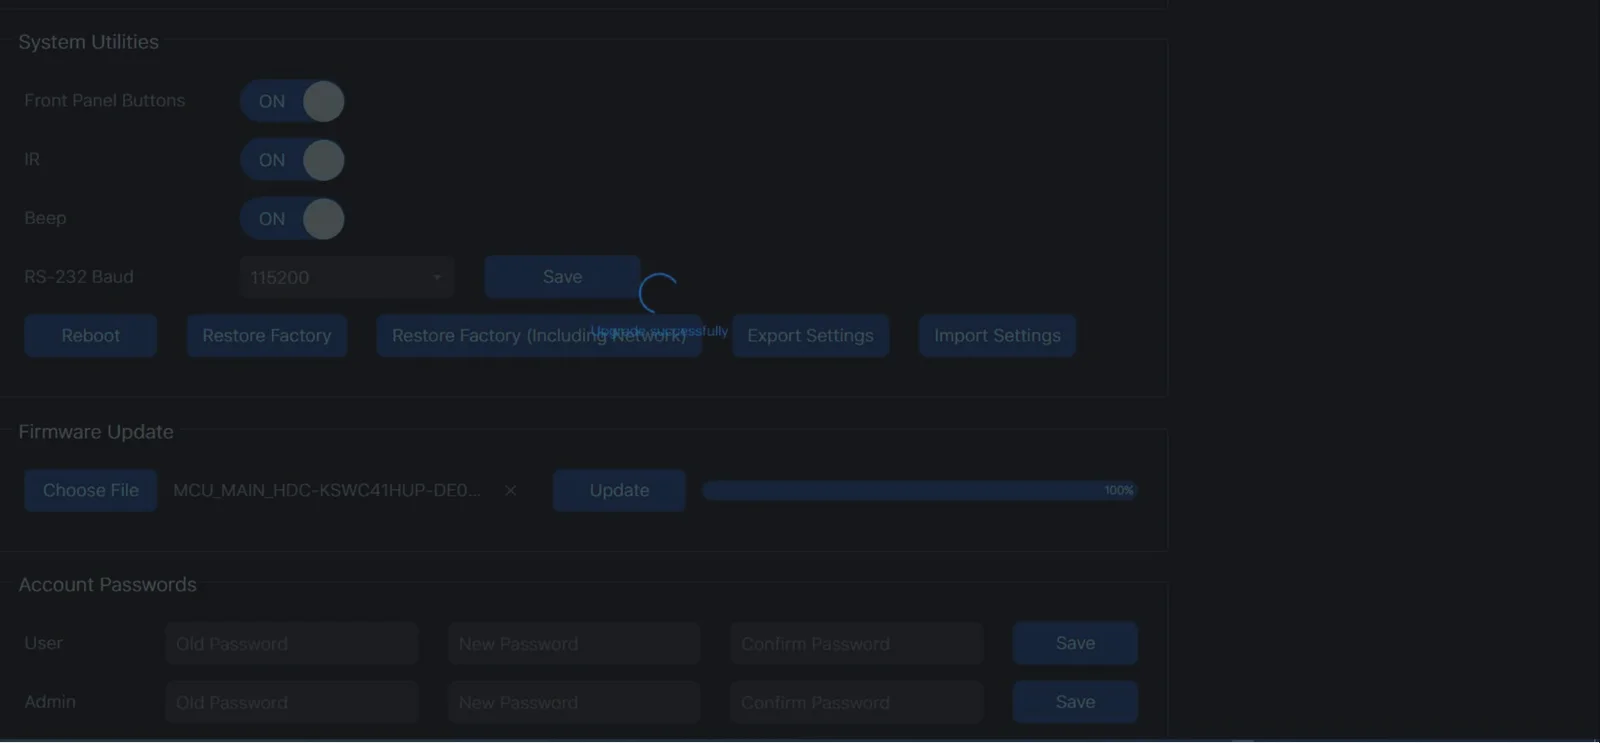
- Click "Choose File" to select the prepared upgrade file, and then click "Upgrade". When completed, the progress bar shows 100% and "Upgrade successfully" will pop up.
After-Sales Service
If there appear some problems when running the product, please check and deal with the problems referring to this user manual. Any transport costs are borne by the users during the warranty.
- Product Limited Warranty: This product will be free from defects in materials and workmanship for three years (The purchase invoice shall prevail). Proof of purchase in the form of a bill of sale or receipted invoice which is evidence that the unit is within the Warranty period must be presented to obtain warranty service.
- What the warranty does not cover (servicing available for a fee):
- Technical Support: For any questions or problems, contact your distributor or reseller and tell them the respective product name and version, the detailed failure situation as well as the formation of the cases.
- Warranty expiration.
- Factory applied serial number has been altered or removed from the product.
- Damage, deterioration or malfunction caused by:
- Normal wear and tear.
- Use of supplies or parts not meeting our specifications.
- No certificate or invoice as the proof of warranty.
- The product model showed on the warranty card does not match with the model of the product for repairing or had been altered.
- Damage caused by force majeure.
- Servicing not authorized by distributor.
- Any other causes which does not relate to a product defect.
- Delivery, installation or labor charges for installation or setup of the product.
Asking for Assistance
Technical Support
Technical Support Hours:
- 8:30 AM to 5:00 PM Monday thru Thursday
- 8:30 AM to 4:00 PM Friday
Write to:
PureLink GmbH
Von-Liebig-Straße 10
D - 48432 Rheine
- Phone: +49 5971 800299 - 0
- Fax: +49 5971 800299 – 99
- www.purelink.de
- info@purelink.de
Legal & Compliance
Product identification
Model: PT-SW-UH41-48G – manual version 1.0
Trademarks and disclaimer
Product model and logo are trademarks. All other company and product names mentioned are trademarks of their respective owners. All rights reserved. No part of this publication may be copied or reproduced without prior written permission. We reserve the right to make changes to the device, packaging or manual and accept no liability for misprints.
Disposal of electrical and electronic equipment
WEEE reg. no.: DE 93847290
The crossed-out wheelie bin symbol on the product, packaging or in this manual means that electrical and electronic equipment must not be disposed of with household waste at the end of its life. Hand in old devices free of charge at a public collection point or return them to a distributor obliged to take them back. Remove batteries and lamps that can be removed without destroying the device before handing it in, and delete any personal data stored on the device. Details are regulated by national law. By returning old devices you help protect the environment.
Batteries
Batteries must not be disposed of with household waste. Return used batteries free of charge to collection points or retailers.
Packaging
Dispose of packaging separately by material (paper/cardboard, plastics) via the local collection systems. Keep packaging material away from children – risk of suffocation. Packaging register LUCID: DE5958616449295.