
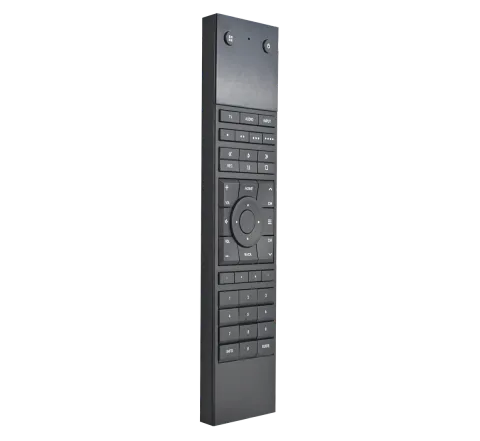
In the box
- x1 uControl Remote (Plastic or Aluminium)
- x1 25cm | 9.84 inches USB-C Charging Cable
- x1 1200mAh Battery (Installed)
Note: Use a standard 5V USB charger. Fast chargers (used for modern mobile phones) or USB from a laptop or PC will not work. Connect the uControl Remote to the Internet at least once before setup to intialise it. If the installation network lacks Internet access, connect the uControl Remote to any available WiFi with Internet (see steps on page 4-5), then reconnect again at the installation site to carry out the full uControl Remote configuration (see steps on page 6-7). After setup and configuration, an Internet connection is not needed for normal operation.
Helpful things to know
- Create MAC address reservations for your uControl Remote IP addresses.
- uControl Remote does not support fixed IP addressing. It is recommended that you create MAC address reservations from the router instead to manage your uControl Remote.
- Test that everything works from uControl App first.
- Test commands, Sequences and Functions using the uControl App before starting the uControl Remote setup and configuration process.
- Charge the uControl Remote after every use.
- It is recommended that you charge the uControl Remote after every use for optimal performance.
- Keep your customisation simple.
- Avoid hiding too many controls as long press events or putting all room/Zone controls on to the uControl Remote. Remember: its primary purpose is to be a great remote for TV and music. Try to keep your customisations simple and easy to use.
- Backup your configuration!
- Backup your configuration on your uOS controller. This setting can be found in the advanced page within uOS.
- Instant-On availability.
- When the uControl Remote is charging, it will not enter deep sleep mode, ensuring it remains available for immediate control. However, if the remote detects no activity—such as movement from the accelerometer or key presses—for an extended period, it will enter deep sleep mode. Waking from deep sleep typically takes 5 to 10 seconds, depending on your WiFi network. You can adjust the deep sleep settings through the HDA Key menu (see pages 8-9).
- The uControl Remote will update automatically if it is connected to the Internet.
- The uControl Remote will update automatically if it is connected to a network that can reach the Internet. Updating your controller hardware must be done manually.
Turning on & adding to WiFi
Turning on & adding to WiFi
Power ON the uControl Remote.
Start by peeling off the screen protector and turn on the uControl Remote by press and holding both the HDA and Power keys for 5 seconds until the device turns on. The uControl Remote will boot up and display “DISCOVERY MODE” showing an abbreviated WiFi network name (SSID). The last 4 characters of the SSID will always be unique.
Connect directly to uControl Remote.
On a PC, tablet, or smartphone, go to your WiFi settings and search for the uControl Remote’s WiFi network name ensuring that you connect to the correct SSID, look particularly for those 4 unique characters in your WiFi list.
Once connected to uControl Remote use password: hdanywhere
Charge the uControl Remote.
Ensure the uControl Remote is fully charged before setup. Place it on a charging pad or connect it to a power source using the provided USB-C cable and a standard 5V USB charger.
Note: if the uControl Remote is OFF then you will not see any indication that it is charging.
Access the uControl Remote’s Network Page.
Open a browser and go to:http://192.168.10.1
Follow the on-screen instructions to connect the uControl Remote to your local WiFi network.
Wait for connection.
The uControl Remote will attempt to connect to your WiFi. If the uControl Remote screen has turned off then press any button to wake the remote up. The screen will update you with its progress. If it fails, double-check your WiFi credentials and try again.
Note your new IP address.
Once the connection is successful, the uControl Remote will display a confirmation message along with its new IP address. Write this down—you’ll need it later for configuring (see pages 6-7).
Configuring for use
- Charge the uControl Remote. Ensure the uControl Remote is fully charged before setup. Place it on a charging pad or connect it to a power source using the provided USB-C cable and a standard 5V USB charger.
- Start the setup process. Access the IP address of your MHUB, uControl Zone, or Connect Processor to open the uOS interface. From the navigation menu, select the “Remotes” page followed by the “ADD NEW REMOTE” button to begin the setup process. Follow the on-screen instructions to complete the basic setup.
- Test with the App first. The uControl Remote should be the last thing that you set up in the uControl system. Before adding the uControl Remote to a Zone or Room, build and test all commands, Sequences and Functions for that Zone using the uControl App.
- Add customisations. After the basic setup, you’ll enter the uControl Remote advanced setup. Here, you can further customise the uControl Remote to match your specific control preferences.
- Transfer configuration to uControl Remote. Tap the Sync button to send your customisations to the uControl Remote. Transfer should take less than 2 minutes after which the uControl Remote will reboot. Important: Don’t forget to sync your data to save changes. If you exit without syncing, any customisations made after the basic setup will be lost.
- uControl Remote is ready to use. After rebooting, the uControl Remote will display its home screen, showing the active Zone and input controls. Your uControl Remote is now ready to use.
Device diagram & details
uControl Remote in detail
- Infrared (IR) window : IR Transmit & Learn LED window.
- HDA Key (System Keys) : Reveals uControl Remote system settings for network information, reset, power and software versions.
- Power Key : Supports short press and long press actions. Press this key to reveal a list of options to power ON devices in your Zone. Press and hold this key to reveal a list of options to power OFF devices in your Zone. If you have selected a Sequence to automate the ON or OFF actions from your controller then this will be presented at the top of each list.
- Microphone : Microphone input (for future use).
- OLED Screen : Displays active control options, the Zone the uControl Remote is assigned to, menus and feedback from the wider uControl system.
- Control Selector Keys : Select between “TV”, “Audio” or “Input” to map uControl Remote’s keys (#8) to another device for control. If multiple devices exist, a menu will appear.
- Sequence Keys : Assign uOS Sequence(s) or Functions to these keys to control AV, lighting, blinds, shades etc. These keys can be customised to support short press or long press actions which can be customised in uOS.
- Mappable Keys : Mapped keys from uControl Packs. All keys apart from Volume, Channel and Direction Pad can be customised with additional actions.
- Directional Pad (D-Pad) : Used to navigate menus triggered by the System Settings, Power, Input Selector, or Sequence keys. When no menu is active, the D-Pad defaults to controlling the current device. Once a menu is displayed, the D-Pad will control that menu until it is closed, after which it will return to device control, which is the default behaviour.
- USB-C charging port : Connect a USB-C cable to a standard 5V USB charger to charge the uControl Remote. This port is only used only for power.
- Charging Area : Marked in green, this area is where the charging coil of the uControl Remote is located. Place this area directly above your charging pad to commence wireless charging.
Specifications
| Dimensions (W/H/D) | 50.38 x 207.05 x 12.13 mm | 1.98 x 8.14 x 0.47 inches |
|---|---|
| Materials | ABS Plastic / ABS Plastic & Aluminium |
| Colour (Plastic) | Black |
| Colours (Aluminium) | Carbonite, Custom |
| Weight | 124g | 4.37 ounces |
| Package Weight | 300g | 10.58 ounces |
| Aerials | WiFi (2.4GHz WPA/WPA2/WEP) | BT Low Energy (5.1) |
| WiFi type | 802.11bgh (2.4) |
| IO & Sensors | Accelerometer, Microphone |
| IR Type(s) | Learn + Transmit |
| IR Frequency | 36KHz/38KHz/56KHz |
| IR Spread | Range: (13m | 42ft) Y Pitch: (+/- 30O) X Pitch: (+/- 20O) |
| Charging | USB-C or Wireless |
| Charge time | 90 minutes (80% under 60 minutes) |
| Battery | 1200mAh |
| Warranty | 2 Years |
Working with HDA hardware.
The following sections describe a common setup for using the uControl Remote with controllers like HDA’s MHUB system, uControl Zone Processors, or uControl Connect Processors.
Since control projects can vary, these diagrams provide a basic framework for deploying the uControl Remote in typical scenarios.
For maximum control flexibility, use MHUB.
Adding the uControl Remote to MHUB gives you more options, like mobile IR transmission, IR control for all sources, and CEC-based automations (which are often better than IP control, especially for displays).
MHUB Mini is ideal for home cinemas and media rooms.
With two outputs and a HDMI mirror for the AVR, the MHUB Mini (4x1+1) 40 is perfect for single-room setups where more than one display is needed.
Note: CEC control is only for displays.
uControl’s CEC functionality is for displays only and cannot be used with AVRs or video sources.
Note: IP control is recommended for better user experience and automation.
IP control has two main advantages over IR. First, when using MHUB, you can assign AVRs to a Zone, making it the primary volume controller that Zone. Secondly, IP control usually uses discrete commands, which can be added to custom actions on the uControl Remote. For example, when switching control from Sky to Apple TV, you can instruct the AVR to switch to the correct input.
Multiple uControl Remotes in multiple Zones.
MHUB is the recommended hardware choice when using multiple uControl Remotes with multiple displays and/or Zones.
You have the choice to emit IR commands from the Remote or from the display receiver IR emitter. Additionally, you also gain the option to use CEC for on/off behaviours.
If a Zone contains an audio output from MHUB or MZMA or an AVR, then you can transfer volume control to the uControl Remote.
Reset the uControl Remote.
To reset the uControl Remote, first ensure it has sufficient power and is turned off. You can turn it off by accessing the menu in the “HDA Key” (see page 11). Once the remote is off, press and hold the Red and Blue keys (refer to “Mappable Keys” on page 11) for 20 seconds to complete the reset process.
Media room or cinema with MHUB.
With superior EDID and multizone capabilities, it is recommended to install MHUB (4x1+1) 40 or “MHUB Mini” for cinema or media rooms.
Use the IR emitter connected to MHUB’s display receiver to control devices where uControl Remote’s on-board IR has no direct line-of-sight.
Note: Creating a Function with a relay to allow Sequences for Room Off or Room ON to control the state of the relay, allowing for screens to be dropped or raised, as an example.
- ETHERNET CABLE
- HDMI CABLE
- IR EMITTER
- HDBASET CABLE
Cinema room using a uControl Zone Processor.
It is recommended to use an IP Pack (if supported) to control the AVR so that the uControl Remote can switch inputs on the AVR when an input control is selected.
Use the optional CEC port on the Zone Processor to automate Room OFF or Room ON operations on the display (if supported).
Note: Choose to emit IR from the Zone Processor or the uControl Remote. Our recommendation is to transfer IR for the display to the Remote in this scenario.
- ETHERNET CABLE
- HDMI CABLE
- IR EMITTER
- HDBASET CABLE
Legal & Compliance
Product identification
Model: HDA-258942 – manual version 1.0
Warranty and liability
The manufacturer grants the full statutory warranty on all new devices. As the manufacturer has no influence on installation, the warranty only applies to the product itself. If you detect a fault or damage, please contact your dealer and provide your sales slip or invoice as proof of purchase.
The manufacturer is not liable for damage to persons or property caused by improper installation, operation or maintenance not described in this manual. Do not alter or modify the product or its accessories. Any use other than described in this manual is not permitted and voids warranty and guarantee.
Trademarks and disclaimer
Product model and logo are trademarks. All other company and product names mentioned are trademarks of their respective owners. All rights reserved. No part of this publication may be copied or reproduced without prior written permission. We reserve the right to make changes to the device, packaging or manual and accept no liability for misprints.
Disposal of electrical and electronic equipment
WEEE reg. no.: DE 93847290
The crossed-out wheelie bin symbol on the product, packaging or in this manual means that electrical and electronic equipment must not be disposed of with household waste at the end of its life. Hand in old devices free of charge at a public collection point or return them to a distributor obliged to take them back. Remove batteries and lamps that can be removed without destroying the device before handing it in, and delete any personal data stored on the device. Details are regulated by national law. By returning old devices you help protect the environment.
Batteries
Batteries must not be disposed of with household waste. Return used batteries free of charge to collection points or retailers.
Packaging
Dispose of packaging separately by material (paper/cardboard, plastics) via the local collection systems. Keep packaging material away from children – risk of suffocation. Packaging register LUCID: DE5958616449295.