
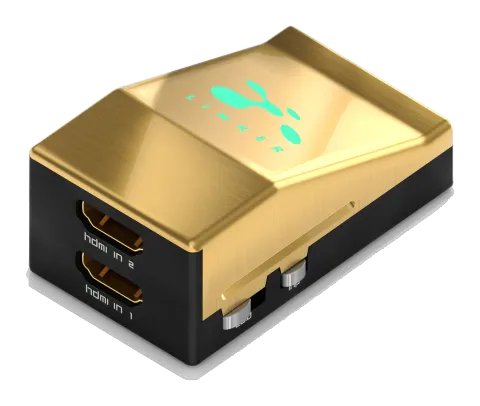
Overview
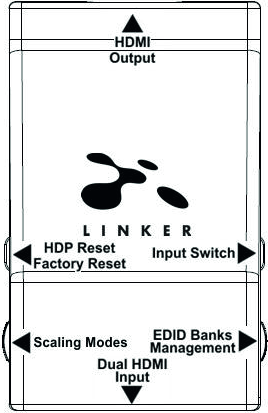
Disclaimer: 3rd party and/or custom firmware providing extra features are not covered in this manual.
The HDfury team would like to thank you personally for purchasing the 4K Linker!
HDfury Linker is a 4K60 4:4:4 600MHz 18Gbps HDMI2.0a Level A capable scaler built for system integrators and advanced users that will please everyone else as well.
By supporting the max bandwidth and data transfer rate of the HDMI2.0a standard and by offering new scaling modes, options and possibilities to convert and always fed optimum signal through all existing HDMI and HDCP revision, Linker is set to cross all HDMI boundaries.
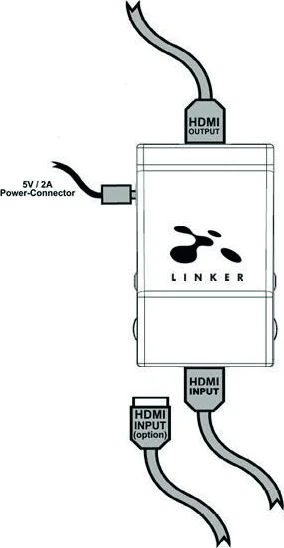
Connecting Cables
Disclaimer: 3rd party and/or custom firmware providing extra features are not covered in this manual.
- Connect a HDMI input cable to the HDMI input.
- Connect a HDMI output cable to the HDMI output.
- Connect the Linker power supply.
- Connect any additional HDMI input cable (optional).
As shipped, the Linker defaults to HDCP1.4 on the output port. Make sure that you are using 600MHz certified HDMI 4K cable if you plan to set up a 4K60 4:4:4 600MHz 18Gbps link in your setup.
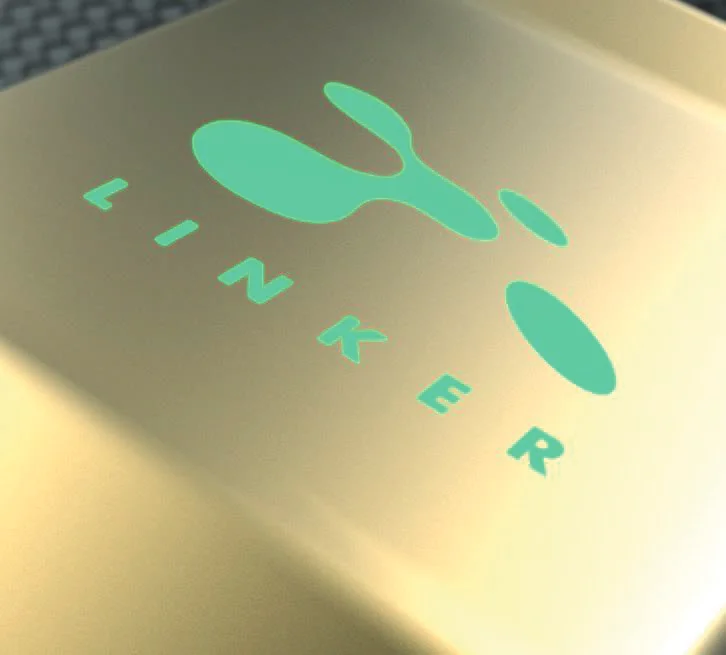
Power Status/LED
Disclaimer: 3rd party and/or custom firmware providing extra features are not covered in this manual.
The Linker logo will glow Green when in use. When the Linker first receives an HDMI signal the logo will quickly turn on, then off, and then on permanently to indicate that the HDCP handshake has been completed.
The status of the green logo may be used for troubleshooting:
- [Logo OFF]: Insufficient power or no incoming signals. Use the Linker power supply, make sure the source and sink devices are correctly connected and ON.
- [Logo BLINKING] (ON for split second, OFF for 5 seconds): The Linker is receiving power and is ready to accept an HDMI signal.
- [Logo ON]: The Linker is powered and receiving and decoding a HDMI signal.
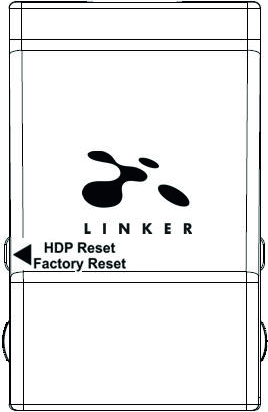
Reset HPD/Factory Default
Disclaimer: 3rd party and/or custom firmware providing extra features are not covered in this manual.
Reset HPD (Short Press) or Reset to factory default (Long Press)
The 4K Linker offers 2 functions per push button.
[Short Press] on Reset Button will generate Hot Plug Detection event. Soft reset.
[Long Press] (over 8s for security) will hard reset the Linker to factory default.
Note: You can also Reset the unit from the USB GUI for Windows PC or when you flash the Linker firmware.
EDID Mode Selection
Disclaimer: 3rd party and/or custom firmware providing extra features are not covered in this manual.
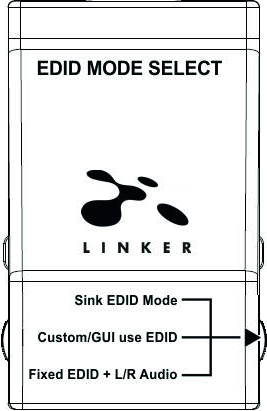
EDID slide switch has 3 positions.
Switch should be set to middle position to allow control via Windows PC USB GUI.
- [Sink EDID Mode]: Create EDID based on the capabilities of the connected sink.
- [Custom/GUI use EDID]: Pick and use EDID from a selection of available EDID tables (see p.11) or load any EDID bank of your choice. By default the selected EDID table is a 4K60 BT2020/HDR 600MHz with Full Audio capabilities. Leave the slide in this position to allow control via USB or to pick and use any of the 25 different EDID tables available (see p.11 for the full list).
- [Fixed EDID with L/R Audio]: This mode is a 1080p60 2channel stereo basic table. It can be used as a security EDID to ensure a picture in every setup/situation.
Note: You can also switch EDID mode and any others control from the USB GUI for Windows PC.
Input Switching
Disclaimer: 3rd party and/or custom firmware providing extra features are not covered in this manual.
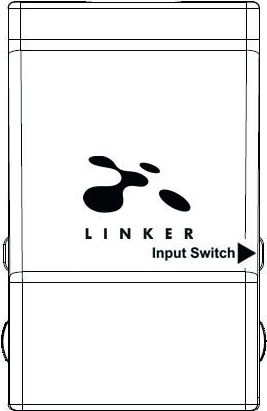
Input Switch Button allows you to switch between active inputs.
- [Short Press] will switch the active input channel.
- [Long Press] (over 2sec) is reserved for future use.
Scaling Mode Selection
Disclaimer: 3rd party and/or custom firmware providing extra features are not covered in this manual.
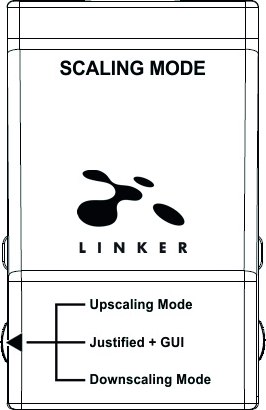
Scaling Mode slide switch has 3 positions.
The switch should be set to the middle position to allow control via USB.
- [Upscaling Mode]: In this mode an incoming FHD 1080p signal will be upscaled to DCI/UHD 4K/2160p up to 600MHz if the connected display is capable of receiving such signal.
- [Scaling Justified + GU]: When coupled with EDID in Automix mode, the Linker unit makes sure that the conversion will always output a working signal. It will ensure that if a display does not support 4K then an incoming FHD 1080p signal won’t be upscaled and an incoming UHD 4K signal will be downscaled. Such automation is cancelled when unit is running with EDID in Custom mode.
- [Downscaling Mode]: In this mode a 4K/2160p DCI/UHD signal will always be downscaled to FHD 1080p.
Note: Both inputs accept HDCP1.4/2.2. Output can work with HDCP1.4/2.2 devices.
Combo RST + INP to select Preset Mode
Disclaimer: 3rd party and/or custom firmware providing extra features are not covered in this manual.
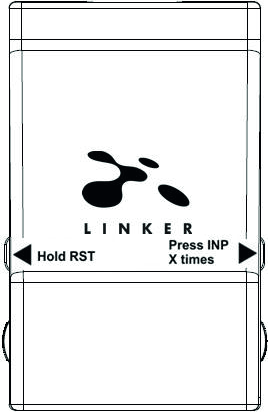
Combo Hold RST + Press INP to select Preset Mode
For users without access to GUI for Windows PC, we added a dual-button combo, when RESET is pressed down and INPUT is clicked the CS (Color Space) and DC (Deep Color) mode presets cycle between
- Normal operation, clear all 4k30/4k60 presets, clear all deepcolor/colorspace to defaults.
- Set 4k30/4k60 presets for a 4K30 deepcolor PJ > 300MHz (e.g Wireless UB/TW Espon) [4K30 all -> 4K30 all, 4k60 600MHz -> 4k60 420 300MHz]
- Set 4k30/4k60 presets for a 4K30 deepcolor PJ at 300MHz (e.g Wired UB/TW Epson) [4k30 8/10/12 -> 4k30 422 12 300, 4k60 600MHz -> 4k60 420 300MHz]
- Set 4k30/4k60 presets for a 4k60 420 300MHz TV [4k30 8/10/12 -> 4k30 8, 4k60 600 -> 4k60 420 300]
- Set 4k30/4k60 presets for a 4k30 8-bit 300MHz TV [4k30 8/10/12 -> 4k30 8, 4k60 all-> 1080p60 444 8/10/12]
- Set 4k30/4k60 presets for a 1080p60 TV [4k30 8/10/12 -> 1080p30 8/10/12, 4k60 all-> 1080p60 444 8/10/12]
- CS follow / DC follow
- CS 4:4:4 / DC follow
- CS 4:2:0 / DC follow
- CS 4:4:4 / DC 8 bit
- CS 4:2:0 / DC 8-bit
HOLD RST button + press INP button X number of times to select any of the above preset modes.
Ex: Hold RST and press 8 times INP button to select Color Space: 4:4:4 / Deep Color: follow
Note: More advanced options are available via the GUI for Windows PC. Follow means Follow Input. If any of the other quick presets is selected, the current/last mode in use is disabled automatically.
List of Custom EDID available
User can select an EDID from all below EDID tables or force the unit to use Sink EDID or Fixed EDID mode.
SINK MODE EDID
Use connected display EDID capabilities.
CUSTOM/GUI USE EDID
- Custom Uploaded/Default EDID
- 4k60-444 600MHz HDR BT.2020 All Sound
- 4k60-444 600MHz HDR BT.2020 Stereo
- 4k60-444 600MHz All Sound
- 4k60-444 600MHz Stereo
- 4k50-444 600MHz HDR BT.2020 All Sound
- 4k50-444 600MHz HDR BT.2020 Stereo
- 4k60-420 12-bit HDR BT.2020 All Sound
- 4k60-420 12-bit HDR BT.2020 Stereo
- 4k60-420 12-bit BT.2020 All Sound
- 4k60-420 12-bit BT.2020 Stereo
- 4k60-420 8-bit 300MHz All Sound
- 4k60-420 8-bit 300MHz Stereo
- 4k30-444 300MHz All Sound
- 4k30-444 300MHz Stereo
- 4k30-RGB 300MHz All Sound
- 4k30-RGB 300MHz Stereo
- 4k24-422 12-bit BT.2020 All Sound
- 4k24-422 12-bit BT.2020 Stereo
- 1080p-444 148MHz All Sound
- 1080p-444 148MHz HDR Stereo
- 1080p24-444 All Sound
- 1080p24-444 HDR Stereo
- 1080I-444 All Sound
- 1080I-444 Stereo
- 4k60-444 600MHz HDR BT.2020 5.1 Sound
- 4k60-420 12-bit BT.2020 5.1 Sound
- 4k60-420 8-bit 300MHz 5.1 Sound
FIXED EDID MODE
1080p-444 148MHz Stereo
Note: All options are available via USB GUI.
To upload a custom EDID or Sniff EDID from sink device, please refer to GUI section p.17
Backside Sticker
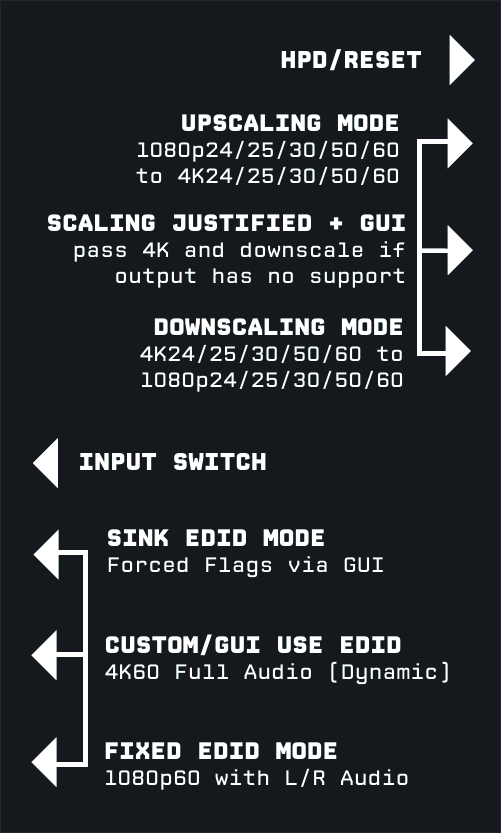
A sticker is available on the back of the unit to remind you the basic configuration options available from the physical button and slide switches.
Selecting the Windows PC driver for USB GUI and Firmware Update
Make sure to install the right Silabs driver for Windows PC based on your Windows OS version and USB port version.
| Driver | Supported OS | Notes |
|---|---|---|
| Silabs Driver 4.0.0 for XP/VISTA/WIN7/WIN8/WIN10 | USB2.0: WIN XP/VISTA/WIN7/WIN8/WIN10 USB3.0: WIN10/Partial support for others | ZIP - 9.18 Mo |
| Silabs Driver 3.9.2 for XP/VISTA/WIN7/WIN8 | USB2.0: WIN XP/VISTA/WIN7/WIN8 USB3.0: WIN XP/VISTA/WIN7/WIN8 | ZIP - 1.65 Mo |
Note: If you are using Windows 10, the Silabs Driver 4.0.0 is mandatory.
However, Silabs driver 4.0.0 only has partial support for USB3.0 on Win8 and previous Windows version, so you might prefer the 3.9.2 in such cases.
For installation simply download from the above link, unzip and then run the .EXE file.
- Silabs 3.9.2 driver: run the USBXpressInstaller.exe
- Silabs 4.0.0 driver: USBXpressInstaller_x86.exe for 32bit or USBXpressInstaller_x64.exe for 64bit
Once you have correctly selected, downloaded and installed the right driver, you can proceed with either updating Firmware (p.14) or using GUI utility (p.16)
Both Firmware update and GUI utility provide 2 directories labelled as per Driver version, make sure to use the right directory matching your driver version.
Ex: If you installed 3.9.2 driver, Use the 3.9.2 directory to run Firmware update or the 3.9.2 directory to run the GUI utility.
Note: You can install or remove any driver any time: Control Panel > Program > Remove Software.
Update the Linker Firmware with a Windows PC
Updating your Linker Firmware for Windows PC
The Linker Firmware Updater is compatible with all Windows from Win XP to Win 10. Make sure you have installed the right Silabs driver based on your Windows version and USB port as described in previous page.
You can download the latest Firmware version for your Linker device from the Download Tab on the Linker Product page: here. If you are unsure about your Firmware version currently in use, simply use the USB GUI for Windows PC to retrieve it.
Once downloaded and extracted, you should have a directory on your computer with the following files. You will have to run LINKER-MCU update to successfully upgrade your Linker unit.
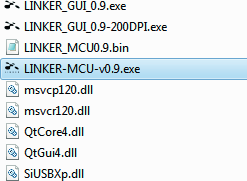
Note: Version number could be different depending on the FW revision you downloaded.
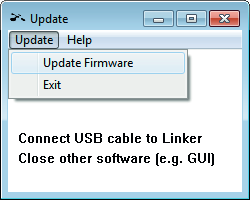
MCU Update Instructions
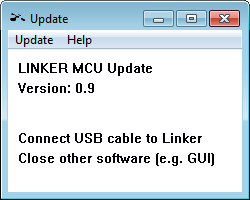
- Double-click LINKER-MCU executable (if needed, right-click and select Run as Administrator)
- The window will open.
- Click Update Firmware as shown on the below picture.
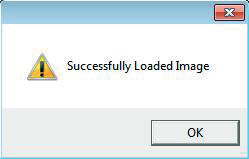
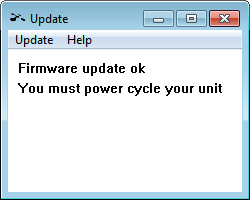
- Flashing time is about 5 seconds.
Linker USB GUI for Windows PC
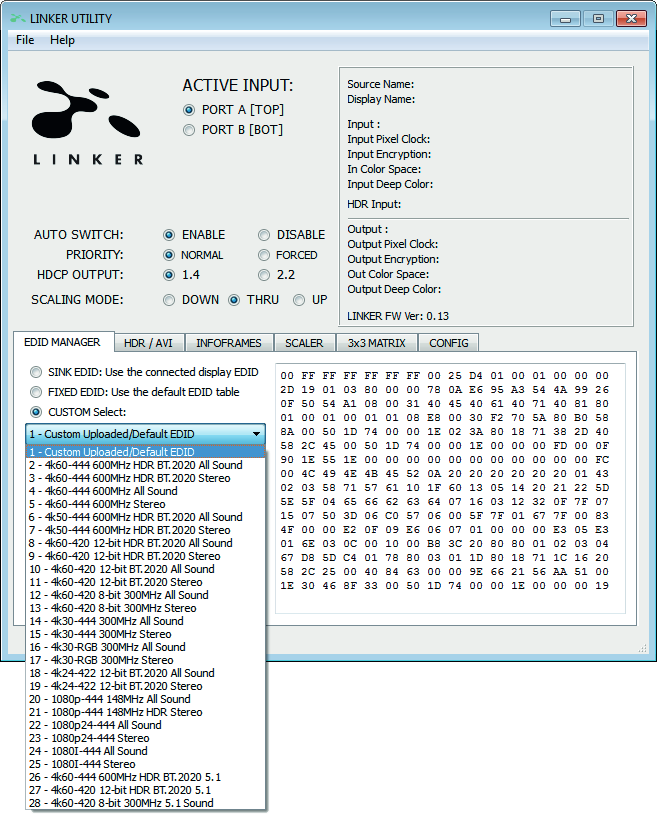
Linker USB GUI (Software for Windows PC)
The USB GUI is compatible with all Microsoft Windows version from Win XP to Win 10. Make sure you have installed the right Silabs driver based on your Windows version and USB port as described in p.13.
You can download the latest GUI version for your Linker device from the Download Tab on the Linker Product page: here. Always run latest FW when running latest GUI to benefit from all new features.
USB GUI Functions
- Display Information on Source device when available.
- Display Input signal resolution, refresh rate and bandwidth.
- Display Input signal Color Space and Deep Color.
- Display Input signal encryption.
- Display Information on Sink device when available.
- Display Output signal resolution, refresh rate and bandwidth.
- Display Output signal Color Space and Deep Color.
- Display Output signal encryption.
- Display the Firmware revision.
- Display Active input information.
- Switch Active Input
- Turn ON or OFF the Autoswitch feature.
- Set Input Priority for Autoswitch mode (Normal/Forced)
- Select HDCP output revision.
- Select from available 4K30 presets
- Select from available 4K60 presets
- Select preferred Scaling Modes
- Set preferred Scaling options (Downscale, Thru and Up)
- Defines Color Space and Deep Color for Downscale, Thru and Up.
- Set to ignore EDID limits or not.
- Force BT2020 ON/OFF/Follow
- Defines Custom Infoframes
- Enable or Disable 3x3 Matrix conversion mode.
- Edit Matrix Coeff values
- Select the default EDID table from a selection of multiple preloaded EDID banks.
- Select EDID Mode (Sink, Custom, Fixed)
- Sniff EDID from connected sink devices. (Read EDID from TOP and BOT output)
- Read, Write, Load, and Save any custom EDID bank.
- Send Live HDR and AVI InfoFrame Metadata.
- Autofill CRC for HDR infoframe
- Disable HDR by cancelling all incoming HDR metadata (JVC PJ mode)
- Display Captured HDR and AVI InfoFrame Metadata.
- Custom InfoFrame with SPD, Audio, HDMI VSIF and HDMI FORUM VSIF.
- Turn ON/OFF the LOGO LED. (GREEN)
- Perform Soft Reset
- Reset the unit to Factory Default.
- Reset EDID to Factory Default.
Note: When activated, the Autoswitch feature will force the Linker unit to automatically switch to the active signal if the selected signal is lost.
Note: When you select an EDID bank from the dropdown list of preloaded EDID banks, there is nothing else to do, once clicked, the EDID of your choice will be flashed to Linker and loaded and HPD events will reset the signal to present your selected EDID automatically.
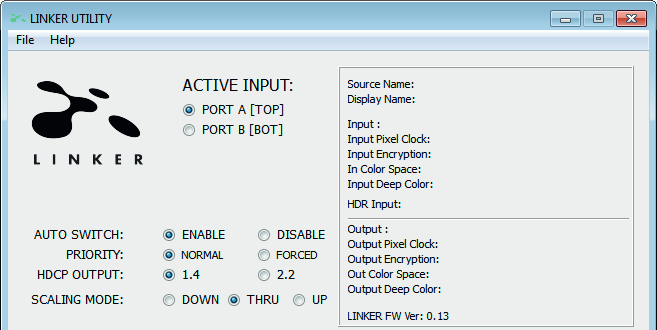
USB GUI Top Section
Active Input: Allow you to select the current active input port. Similarly to what you can do from the push button on the unit (see page 8)
Auto Switch: When activated, the Auto Switch feature will force the Linker unit to automatically switch to the active signal if the selected signal is lost.
Input Priority: When in FORCED input priority mode, as soon as a new active input is detected, Linker will switch to it.
HDCP Output: Allow you to select/force the HDCP revision of the Output Port.
Scaling Mode: Allow you to select HDMI resolution Downscale, Pass-Thru (default) or Upscale. Similarly to what you can do from the push button on the unit (see page 9)
The right boxed area will provide you with the following information:
- Source Name: When available it will display information about the source device in use.
- Display Name: When available it will display information about the display in use.
- Input: Display Input signal resolution and refresh rate.
- Input Pixel Clock: Display incoming signal bandwidth
- Input Encryption: HDCP encryption information at Input.
- In Color Space: Display Color Space of Incoming signal.
- Input Deep Color: Display Deep Color of Incoming signal.
- HDR Input: Display HDR signal information
- Output: Display Output signal resolution and refresh rate.
- Output Pixel Clock: Display Output signal bandwidth
- Output Encryption: HDCP encryption information at Output.
- Out Color Space: Display Color Space of Outgoing signal.
- Output Deep Color: Display Deep Color of Outgoing signal.
- LINKER FW Ver: on the last line indicates the current FW version of your Linker unit.
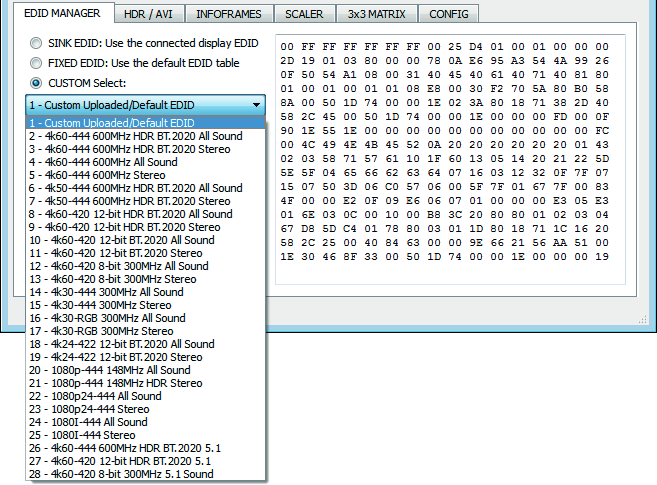
EDID Manager Section
SINK EDID Mode: Create EDID based on the capabilities of the connected sink.
FIXED EDID with L/R Audio: This mode is a 1080p60 2channel stereo basic table. It can be used as a security EDID to ensure a picture in every setup/situation.
CUSTOM/GUI use EDID: Pick and use EDID from a selection of available EDID tables or load any EDID bank of your choice. By default the selected EDID table is a 4K60 4:4:4 BT2020/HDR 600MHz with Full Audio capabilities. Leave the slide in this position to allow control via USB or to pick and use any of the 25 different EDID tables available (see p.11 for the full list). When you select an EDID bank from the dropdown list of preloaded EDID banks, there is nothing else to do, once you click one, the EDID of your choice will be loaded to Linker and HPD events will reset the signal to present your selected EDID automatically.
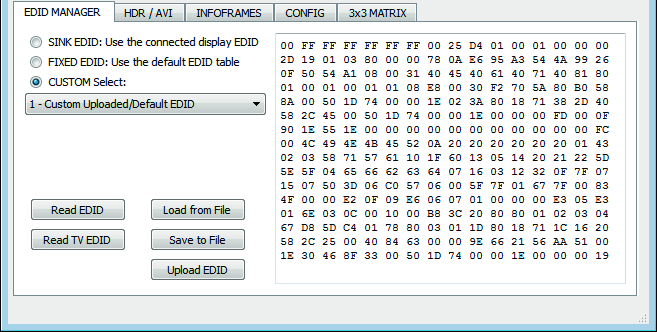
Read, Load, Save and Upload EDID
Read EDID: This option could be useful if for example you want to double check the build capabilities of a SINK EDID in your setup using external software such as AWEE (AW EDID Editor from Analog Way). In such case, you would simply use the Read Linker EDID button and then the Save to File button in order to be able to open the EDID file with an external EDID editor software.
Read TV EDID: Allow you to sniff the EDID from the sink device connected to the output port of your Linker unit. You could then use it as the Custom EDID by using the Upload EDID button or export it as a file using the Save to File button in order to be able to open the EDID file with an external EDID editor software.
Load from File: Allow you to open and load any EDID file of your choice. You could then use it as the Custom EDID by using the Upload EDID button.
Save to File: Allow you to save the current EDID into a file for backup or for editing using external software such as AWEE (AW EDID Editor from Analog Way).
Upload EDID: This button will write the current manually uploaded or sniffed EDID file into Linker custom bank 1.
HDR/AVI Section of the USB GUI
[CUSTOM HDR INJECTION]: Enter the Infoframe of your choice in this text field in HEX format. If you are not sure about how to format your InfoFrame, we recommend you to visit our Infoframe Injection thread in our support forum. (Advanced Users only)
[Disable HDR]: Once activated this option will allow Linker to intercept and cancel all incoming HDR metadata. This mode was introduced to allow JVC PJ owners to apply their own Gamma curves for HDR content and allow their PJ DI to work when content is HDR.
[Autofill CRC]: If you are unsure about how to calculate CRC Checksum for your Custom HDR string, you can have it automatically calculated and added by using this checkbox option.
[Enable Custom HDR]: Upon clicking Enable Custom HDR, the IF that is defined in the Custom HDR Injection text box gets used. This way you can define what the InfoFrame actually is. This is stored also in Linker and is persistent over hotplugs and power cycles.
[Send HDR]: once activated it will turn ON the HDR mode of any HDR display.
[CUSTOM AVI]: Enter the AVI Infoframe of your choice in this text field in HEX format. If you are not sure about how to format your AVI Infoframe, we recommend you to visit our Infoframe Injection thread in our support forum. (Advanced Users only)
[Disable AVI]: When checked, Disable AVI will prevent AVI InfoFrame from source to reach the connected sink at Linker output and also stop sending Custom AVI if set previously. This feature can be useful for some DVI display or some monitor that do not work well when receiving an AVI InfoFrame.
[Enable Custom AVI]: Upon clicking Enable Custom AVI, the IF that is defined in the Custom AVI text box gets used. This way you can define what the InfoFrame actually is. This is stored also in Linker and is
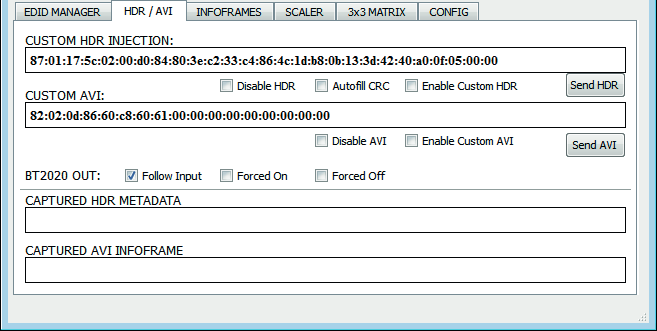
persistent over hotplugs and power cycles. This way customer can for example activate BT2020 mode in the TV even though content doesn't sent the correct InfoFrame. The AVI mod is really meant for advanced users only because incorrect values can blank the screen and since the settings are saved even power up won't help until reset.
[Send AVI]: By clicking this option, the AVI InfoFrame that you entered in the CUSTOM AVI text field will be injected LIVE from the Linker unit to the HDMI signal toward output port.
[BT2020 OUT]: Here you can force BT2020 to be always present at output (Forced ON) or always removed from output (Forced OFF) or simply to follow input (default). This feature, when forced OFF, should help to solve issue with device that does not support BT2020 such as some Ambient Light system or even the Denon 5200 AVR.
[CAPTURED HDR METADATA]: If the source is sending HDR infoFrame metadata then the information is captured, extracted and displayed in this text box on GUI.
[CAPTURED AVI METADATA]: If the source is sending AVI infoFrame metadata then the information is captured, extracted and displayed in this text box on GUI.
Note: There are two ways to reset the strings. Either hold the RESET button for +8 seconds on Linker or go to the GUI "config" page and apply reset. After GUI reset close and reopen GUI. Then the fields are populated with reset values.
HDRfury/IFX: We have created a set of DLL/API package for Linker so anyone can interface their Windows software with Linker capabilities and build evaluation, testing, measurement, calibration and content creation workflows system. IFX is an acronym for InfoFrame Xecutor and InforFrame Xtractor and it is exclusively licensed to AVTOP. An AVTOP-Software is available and allows you to control HDR and metadata parameters dynamically and connect the device to interesting applications such as calibration systems. The unique AVTOP HTTP control software interfaces to the LINKER and unveil its full capabilities, including easy control of Mastering Display Settings, AVI Infoframe and others values such as MaxCLL and MaxFALL.
Please contact us or our partner AVTOP in order to license our APP/DLL package or to buy their software package. You can find their available HDR solutions listed: here.
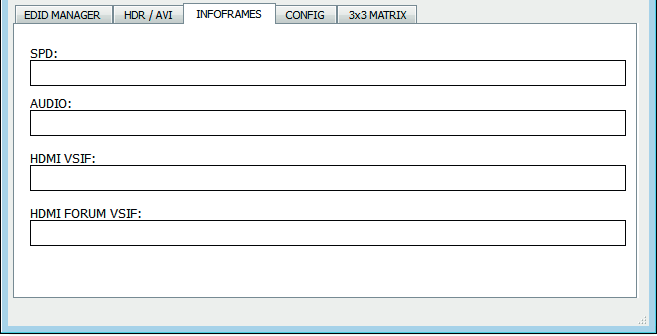
INFOFRAMES Section of the USB GUI
If the incoming stream contains InfoFrames information, this page will retrieve and display them.
- [SPD]: Display Source Product InfoFrame.
- [AUDIO]: Current Audio Format information, if PCM this usually gives the sample rate and number of speakers, if bitstream then usually this infoframe just inform the default which is “refer stream header”
- [HDMI VSIF]: Display Vendor Specific InfoFrame.
- [HDMI FORUM VSIF]: HDMI2.0 version of HDMI VSIF
CONFIG Section of the USB GUI
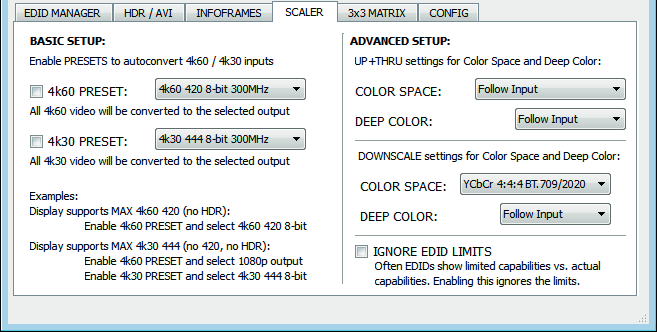
[4k60 PRESET]: This forces any 4k60 input to come out as 4k60 420 8bit 300MHz or 1080p60 444 8/10/12-bit. A neat profile for people who only have a 300MHz display with 4K60 420 8bit support. If EDID allows the player to send HDMI 2.0 formats, such as all HDR modes, they will be accepted by the display due to Linker scaling/chroma changes. More dedicated mode might be added later.
[4k30 PRESET]: This forces any 4k24/25/30 to come out as 4k24/25/30 444 8bit 300MHz, 4k24/25/30 420 8/10/12bit, 1080p30 444 8/10/12bit or 4k24/25/30 422 12b 300MHz. A neat profile if you have a 300MHz display. If EDID allows the player to send HDMI 2.0 formats, such as all HDR modes, they will be accepted by the display due to Linker scaling/chroma changes. More dedicated mode might be added later.
[UP+THRU]: Define the type of Color Space and Deep Color you want at the output when the unit is in Upscaling and Pass-Thru Mode.
Available Color Space options: Follow Input (default), RGB 0-255, RGB 16-235, YCC4:4:4 BT.709/2020, YCC4:2:2 BT.709/2020, YCC4:2:0 BT.709/2020, xvYCC4:4:4 BT.709
Available Deep Color options: Follow Input (default), 8-bit/24-bit, 10-bit/30-bit, 12-bit/36-bit, 16-bit/48-bit
[DOWNSCALE]: Define the type of Color Space and Deep color you want at the output when the unit is in Downscale Mode.
Available Color Space options: Follow Input (default), RGB 0-255, YCC4:4:4 BT.709/2020
Available Deep Color options: Follow Input (default), 8-bit/24-bit, 10-bit/30-bit, 12-bit/36-bit, 16-bit/48-bit
[IGNORE EDID LIMITS]: By default, Linker will perform needed changes to ensure any signal set is matching and respecting the connected device specifications mentioned in its EDID. By clicking/activating this option, Linker will ignore the connected device specifications.
3x3 MATRIX Section of the USB GUI
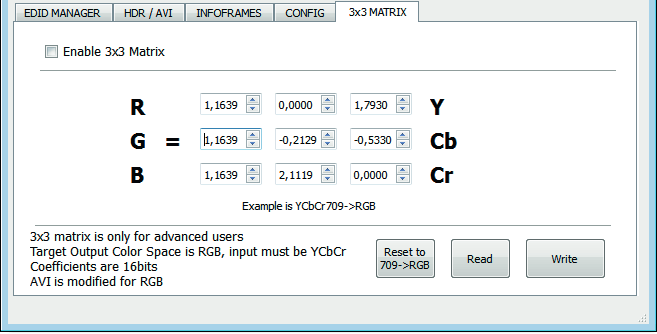
- [Enable 3x3 Matrix]: Enable/Disable the 3x3 Matrix conversion.
- [Reset to 709->RGB]: Reset to default values.
- [Read]: Read Stored values from Flash.
- [Write]: Write Current values to Flash.
Note: 3x3 Matrix is still in experimental mode, we are waiting inputs from colorists to expand its capabilities.
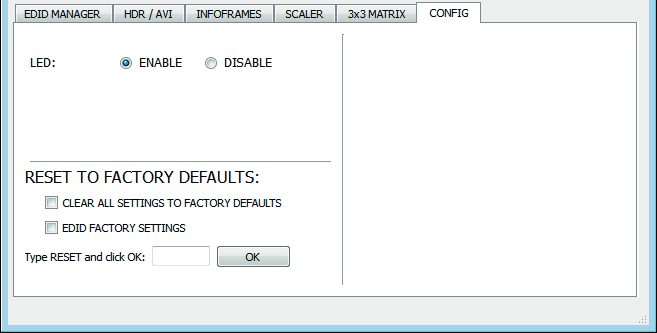
[LED]: ENABLE/DISABLE the main LOGO LED.
[CLEAR ALL SETTINGS TO FACTORY DEFAULTS]: Similar as [LP] Long Press on the RESET button (see page 6). Click the available check box to clear all settings to factory defaults and type RESET in the test field. Finally click the OK button and unit will be reset to factory defaults.
[EDID FACTORY RESET]: Click the available check box to clear all EDID settings to factory defaults and type RESET in the test field. Finally click the OK button and unit EDID will be reset to factory defaults.
Frequently Asked Questions (FAQ)
My display is supposed to accept 4K60 4:4:4 signals but it does not work?
For most UHD TV set we tried, there are always extra configuration options to activate in order to achieve a 4K60 4:4:4 600MHz link. For example, on Samsung: in order to enable the 444 colorspace for 4k in Samsung TVs you must go to "settings" and "hdmi" and "UHD color" and enable it. Then also you must assign the HDMI port1 as "PC" in the tools menu. Only after these two steps will 600MHz be accepted. Similar activation tricks are required on most UHD TVs. Additionally, most UHD TVs only have specific ports that are 600MHz capable.
I have a PC mode on my TV (or a PC monitor) what resolutions are supported for graphics mode?
All PC graphics mode within the 600MHz bandwidth are supported, including ultra-high resolution such as WQSXGA, QUXGA, QFHD, WQUXGA, 4K, however HDCP conversion is only possible in SD/HD/FHD and UHD modes.
What output resolution does the Linker support in HDTV mode?
All known SD, HD, Full HD and UHD formats are supported including: 480i50, 480i60, 480p50, 480p60, 576p50, 576p60, 720p50, 720p60, 720p100, 720p120, 1080i25, 1080i30, 1080p24, 1080p25, 1080p30, 1080p48, 1080p50, 1080p60, 1080p72, 1080p75, 1080p96, 1440p50, 1440p60, 2160p24, 2160p25, 2160p30, 2160p50, 2160p60, 4K DCI (these are examples only, anything within the 600MHz bandwidth is supported.)
What version of HDMI does the Linker work with? Do I need HDMI 1.3/1.4a/2.0a? Does it matter?
It does not matter. HDfury Linker works with any version of HDMI from 1.0 and up.
Do I need to set anything special in my HDMI source device to set the resolution correctly?
No. The HDfury Linker will be detected as 2160p60 4:4:4 capable device by your source and it will always accept and process the highest quality stream from your source devices. There is no need to set the HDMI source to any specific resolution.
Is there any latency (delay) introduced to the signal?
Virtually none. The latency added is in the order of a few pixel clocks only. Nothing noticeable at all.
What is the USB port for?
To provide power from the supplied USB power unit and for firmware upgrades when new (additional) functions and enhancements are offered.
What about long HDMI cable runs? Can I expect issues?
For 600MHz users must use "high speed" cables, or 600MHz/18Gbps certified. For 4K30, 1080p or less almost all cables are ok. HDfury Linker acts as a HDMI repeater device. So having a HDfury Linker in the path will amplify and recover the signal. You should not need any passive (or active) HDMI amplifiers, especially if you put the HDfury Linker in the middle of your cable run. If you previously had to use an amplifier, the HDfury Linker can most likely take its place. The HDfury Linker has been used with 50 foot (and longer) HDMI cables without issues.
How are the new lossless audio formats via HDMI input handled? E.g. DTS-HD/MA and DD/E-AC3: Are they stripped down to DTS core or Dolby Digital respectively to fit the requirements of the S/PDIF standard?
Lossless audio is transmitted through HDMI output only. HDfury Linker does not compress or otherwise downconvert the incoming audio.
Do I need to use the USB power supply?
Yes. Due to the advanced features, the Linker draws more power than previous HDfury models. The Linker power supply must be used at all times.
Is the Linker power supply the same as that used by the HDfury1, HDfury2, and GammaX?
No. The power supply for the HDfury1, HDfury2 and GammaX kits are 0.5A max current. The HDfury3 is 1A max current. The Linker power supply can supply up to 2.0A. Do not use an HDfury1, HDfury2, HDfury3 or GammaX power supplies with the Linker.
What sort of power supply does the Linker use?
Linker power supply adheres to these requirements:
- Provides REGULATED (+/- 5%) 5VDC power with 2.0A min DC current
- Delivers the power through a mini usb connector.
Caution: Trying to use an AC/DC adaptor that doesn't adhere to these three requirements may destroy the Linker. Do not use the power supply from the HDfury1, HDfury2, HDfury3 or GammaX with the Linker.
I tried to update my unit, it failed and Linker is shown as USBBOOT under Windows?
Some users are reporting Linker as USBBOOT USBXPRESS under windows after firmware update attempt. USBBOOT means Linker is in the bootloader state, waiting for the actual FW.
It means that the update of MCU FW failed or was not even launched properly or cut in between. That leaves the device in bootloader ready to accept the FW update again. Make sure the PC Windows GUI is closed (not running), unplug/replug Linker and launch the FW update again.
Note: Make sure you are using the right Silabs driver for your Windows version and USB port version in use as per explanations on p.15
Highlight Features
Ultra Scaling up to 4K60 4:4:4 600MHz
HDfury Linker offers impressive scaling modes to ensure that any HDMI/HDCP revision sink device get fed at its max capabilities ALWAYS and GUARANTEED.
Featuring Upscale, Downscale, Passthru and Bypass mode as well as Chroma Conversion and Color Depth modification on the fly at 8, 10, 12 and 16bit for FHD, UHD and DCI 4096x2160p.
Here is, among plenty others, some of the available scaling modes…
HDCP/HDMI2.x HDR/BT2020 sources input To High-End Advanced HDCP/HDMI 1.x Displays
| Source | Output |
|---|---|
| 4K24/25/30 RGB/YCC 4:4:4 12b 450MHz | 1080p24/25/30 RGB/YCC 4:4:4 12b 111MHz |
| 4K50/60 YCC 4:2:0 10b 371MHz | 1080p50/60 RGB/YCC 4:4:4 10b 185MHz |
| 4K24/25/30 RGB/YCC 4:4:4 12b 450MHz | 4K24/25/30 YCC 4:2:0 12b 222MHz |
HDCP/HDMI2.x HDR/BT2020 sources input To basic HDCP/HDMI 1.x Equipment like AV receiver
| Source | Output |
|---|---|
| 4K50/60 YCC 4:2:0 10b 371MHz | 1080p50/60 RGB/YCC 4:4:4 8b 148MHz |
| 4K24/25/30 YCC RGB/YCC 4:4:4 12b 450MHz | 1080p24/25/30 RGB/YCC 4:4:4 8b 74.25MHz |
| 4K50/60 RGB/YCC 4:4:4/4:2:2 8b 600MHz | 1080p50/60 RGB/YCC 4:4:4 8b 148MHz |
HDCP/HDM1.x Capable Sources input To Advanced HDCP/HDMI 2.x Capable Sink
| Source | Output |
|---|---|
| 4K24/25/30 RGB/YCC 4:4:4 8b 300MHz | 4K24/25/30 RGB/YCC 4:4:4 16b 600MHz* |
| 1080p24/25/30 RGB/YCC 4:4:4 16b 148MHz | 4K24/25/30 RGB/YCC 4:4:4 16b 600MHz* |
Note: * Tested ok on LG OLED 2016
This is only a small excerpt, endless scaling possibilities are available, Ultra Scaling modes list is now so big that we had to publish it separately: here
Dedicated HDCP Doctor
Providing a total of 4 HDCP 1.4 and 2.2 engines for decryption/encryption, HDfury Linker offers a workaround for HDCP issue including HDCP 2.2 > HDCP 1.4 and HDCP 1.4 > HDCP 2.2 both ways conversion within the same unit.
Each RX block decrypts the input first whether its 1.x or 2.x. Then output port can individually encrypts it to 1.4 or 2.2 or not encrypt it at all if it was not encrypted initially.
Unlike HDfury Integral that can convert any signals within the 600MHz bandwidth of HDMI2.0a, thus including 1080i, 3D signals, PC signals and all SD/HD/FHD/UHD standard formats, HDfury Linker only support HDCP conversion for SD/HD/FHD/UHD signals up to 600MHz.
1080i, 3D signals, PC signals (except a few manually added) cannot be HDCP converted with the HDfury Linker, they go through in Bypass mode (untouched/untouchable).
Specifications
Disclaimer: 3rd party and/or custom firmware providing extra features are not covered in this manual.
Display HDCP 2.2 Content with Non-HDCP2.2 Compliant Devices
HDCP 2.2 is the new copy-protection scheme for 4K UHD content. Not only it is not backward compatible but many recent 4K devices don’t even support it. Source devices, including media servers and head-ends like Netflix, will encode their 4K content with this new scheme. TVs must be HDCP 2.2-enabled to play it, and everything in the video chain including switches and receivers must be compliant as well, or the display will go dark and/or display a HDCP error message. Bad news for consumers who have purchased expensive, high-bandwidth, processor-rich switchers, receivers and displays to accommodate 4K. While the newer products may support the bandwidth needs of 4K, they won’t play copy-protected works until HDfury Linker is an active part of the setup.
2×1 Switcher up to 4K60 4:4:4 600MHz 18Gbps
Switching between 2 inputs up to 4K60 4:4:4 600MHz signal and scaling through all HDMI levels and revision is now a reality, thanx to USB or push button, you can easily switch between 2 inputs that will be scaled to one output. HDCP conversion can be configured and applied on the fly in order to always output the type of HDCP signal encryption that your display or sink device is expecting.
HDR and Infoframe Metadata Live Injector and Extractor with Sound
The HDfury Linker is capable of injecting and extracting live Infoframe and HDR metadata at any resolution and in real time while keeping HDMI sound. A further software solution for a complete real time handling of infoframe and HDR metadata will be available for the Linker: here from our exclusive licensed partner AV TOP.
Advanced EDID Management
Advanced EDID Management available from the HDfury Linker with either: A Selected EDID bank, a Custom uploaded EDID, a Sink mode EDID or a Fixed basic EDID. Sniff EDID from connected sink devices, Save, Edit, Load any custom EDID table at anytime. Select and pick any EDID of your choice from a list of 25 EDID tables, it loads and reset HPD to present your chosen one automatically. Sink EDID mode feature will create a custom EDID by mixing sink EDID connected with some EDID flags such as: YCbCr/BT2020/HDR/3D*
Control and Update
USB GUI Utility via Windows PC and various physical buttons for configurations are available. External Wi-Fi/Bluetooth dongle for iOS/Android control might be available in the future.
Rec.709<>BT2020 via 3×3 Matrix and RGB Coeff
There is chance the 4K Linker will be able to convert 709<>BT2020, both ways, in the near future but it’s not yet a guaranteed feature. Work in progress.
* Not yet available.
Main Specifications
- 2x Input / 1x Output Switcher (HDMI2.0a/HDMI1.4/DVI1.0 compatible)
- 4K60 4:4:4 600MHz 18Gbps Pass through
- 4K24/25/30/50/60 1080p24/25/30/50/60 Upscale/Downscale with or without colordepth maintained and with or without chroma conversion.
- Video Bandwidth - 18 GBP/sec.
- Supports BT.2020.
- HDR10/Dolby Vision Support.
- 4K 10, 12, 16 Bit Support
- 16 Bit Per Pixel Deep Color Depth Available (48 Bit)
HDCP Doctor (HDCP Workaround solution to any HDCP error)
- HDCP 2.2 > HDCP 1.4 conversion
- HDCP 1.4 > HDCP 2.2 conversion
- HDCP x.x > HDCP x.x conversion
- Dual HDMI2.0a & HDMI 1.4 combined
- Dual HDCP 1.4 & HDCP 2.2 combined
Advanced EDID management via USB (IR or Bluetooth APP support might come as external accessory)
- Improved EDID Management solution with either a Selected EDID bank, Custom uploaded EDID, Self generated SINK EDID or a Fixed basic EDID.
- Sniff EDID from connected sink devices, Save, Edit, Load any custom EDID table at any time.
- Select and pick any EDID of your choice from a preloaded list of EDID tables, it loads and reset HPD to present your chosen one automatically.
- SINK EDID MODE feature can create a custom EDID by mixing sink EDID with forced flags such as: Stereo/5.1/Full/YCbCr/BT2020/HDR/3D.
HDR & AVI InfoFrame Live Injector and Extractor with Sound. Watch the video!
- HDMI Booster/Extender: Capable of extending 1080p resolution up to 15m. in and 15m. out (30m. total for 1080p), UHD resolution up to 10m.
- HDMI Doctor: Solves most HDMI integration issues such as HDCP, EDID, HPD, and audio breakout.
- HDMI Equalevel: Precise signal equalization towards both input and output signals perfectly delivers the best possible picture quality.
- Hot-Plug control: Force the input device to always see an active connection.
- Licensing: Fully licensed and compatible with all HDMI and HDCP technologies.
- Deep Color Support
- xvYCC Color Support
- Flexible/Portable/Plug’n Play
- 3D Ready: Capability to pass 3D stereoscopic signal formats.
Just like any recent HDfury hardware, it comes with USB upgradable firmware that allow you to unleash furious features.
Supported Audio/Video Signals
- Supported Format: SD/HD/FullHD/UHD/4K30/4K60, basically INPUT/OUTPUT any video format up to 4K60 4:4:4 600Mhz 18Gbps
- Supported resolution examples: 480p/720p/1080i/1080p24/1080p25/1080p30/1080p50/1080p60/1440p50/1440p60/2160p24/2160p25/2160p30/2160p50/2160p60 and DCI
- Support all UHD/BR standard resolution: 4K60 4:2:0 10bit BT2020 HDR, 4K60 4:2:0 12bit, 4K30 4:4:4 12bit, 4K30 4:4:4 16b ..
- Support all VESA mode video format (PC Resolutions) up to ultra high resolution such as WQSXGA, QUXGA, QFHD, WQUXGA, 4K
- Support any Audio format such as PCM at up to 192kHz, compressed audio (IEC61937), DSD, DST,DTS,DTS-HD, Dolby True HD, DTS-MA and HBR.
Technical Specifications
| Parameter | Specification |
|---|---|
| Audio | PCM at up to 192kHz, compressed audio (IEC61937), DSD, DST, DTS, DTS-HD, Dolby True HD, DTS-MA and HBR. |
| DDC Signal | 5V p-p (TTL) |
| Power Supply | External 5 Volt 2 Amp USB (same as most smartphone/tablet PSU) |
| Power Consumption | <2Watts |
| Current Absorption | around 400mA |
| Size | 65 * 49 * 39 (mm) |
| Product Dimensions | 3.6” x 2.5” x 1”, Weight: 4 oz |
| Shipping Dimensions | 6.3” x 4.2” x 3.3”, Weight: 16 oz |
| Enclosure | Black/Gold with Green Led |
| Regulation | CE, FCC, RoHS |
Certifications



- Linker CE EMC Certification – Linker CE LVD Certification
- Linker RoHS Certification
- Linker FCC Certification
Note: 3rd party and/or custom firmware providing extra features are not covered in this manual.
Legal & Compliance
Product identification
Model: HDF0095-1 – manual version 1.0
Warranty and liability
The manufacturer grants the full statutory warranty on all new devices. As the manufacturer has no influence on installation, the warranty only applies to the product itself. If you detect a fault or damage, please contact your dealer and provide your sales slip or invoice as proof of purchase.
The manufacturer is not liable for damage to persons or property caused by improper installation, operation or maintenance not described in this manual. Do not alter or modify the product or its accessories. Any use other than described in this manual is not permitted and voids warranty and guarantee.
Trademarks and disclaimer
Product model and logo are trademarks. All other company and product names mentioned are trademarks of their respective owners. All rights reserved. No part of this publication may be copied or reproduced without prior written permission. We reserve the right to make changes to the device, packaging or manual and accept no liability for misprints.
Disposal of electrical and electronic equipment
WEEE reg. no.: DE 93847290
The crossed-out wheelie bin symbol on the product, packaging or in this manual means that electrical and electronic equipment must not be disposed of with household waste at the end of its life. Hand in old devices free of charge at a public collection point or return them to a distributor obliged to take them back. Remove batteries and lamps that can be removed without destroying the device before handing it in, and delete any personal data stored on the device. Details are regulated by national law. By returning old devices you help protect the environment.
Packaging
Dispose of packaging separately by material (paper/cardboard, plastics) via the local collection systems. Keep packaging material away from children – risk of suffocation. Packaging register LUCID: DE5958616449295.