
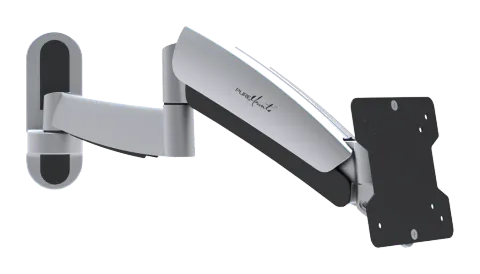
Slim Full Motion LED/LCD TV Wall Mount
INSTALLATION INSTRUCTIONS
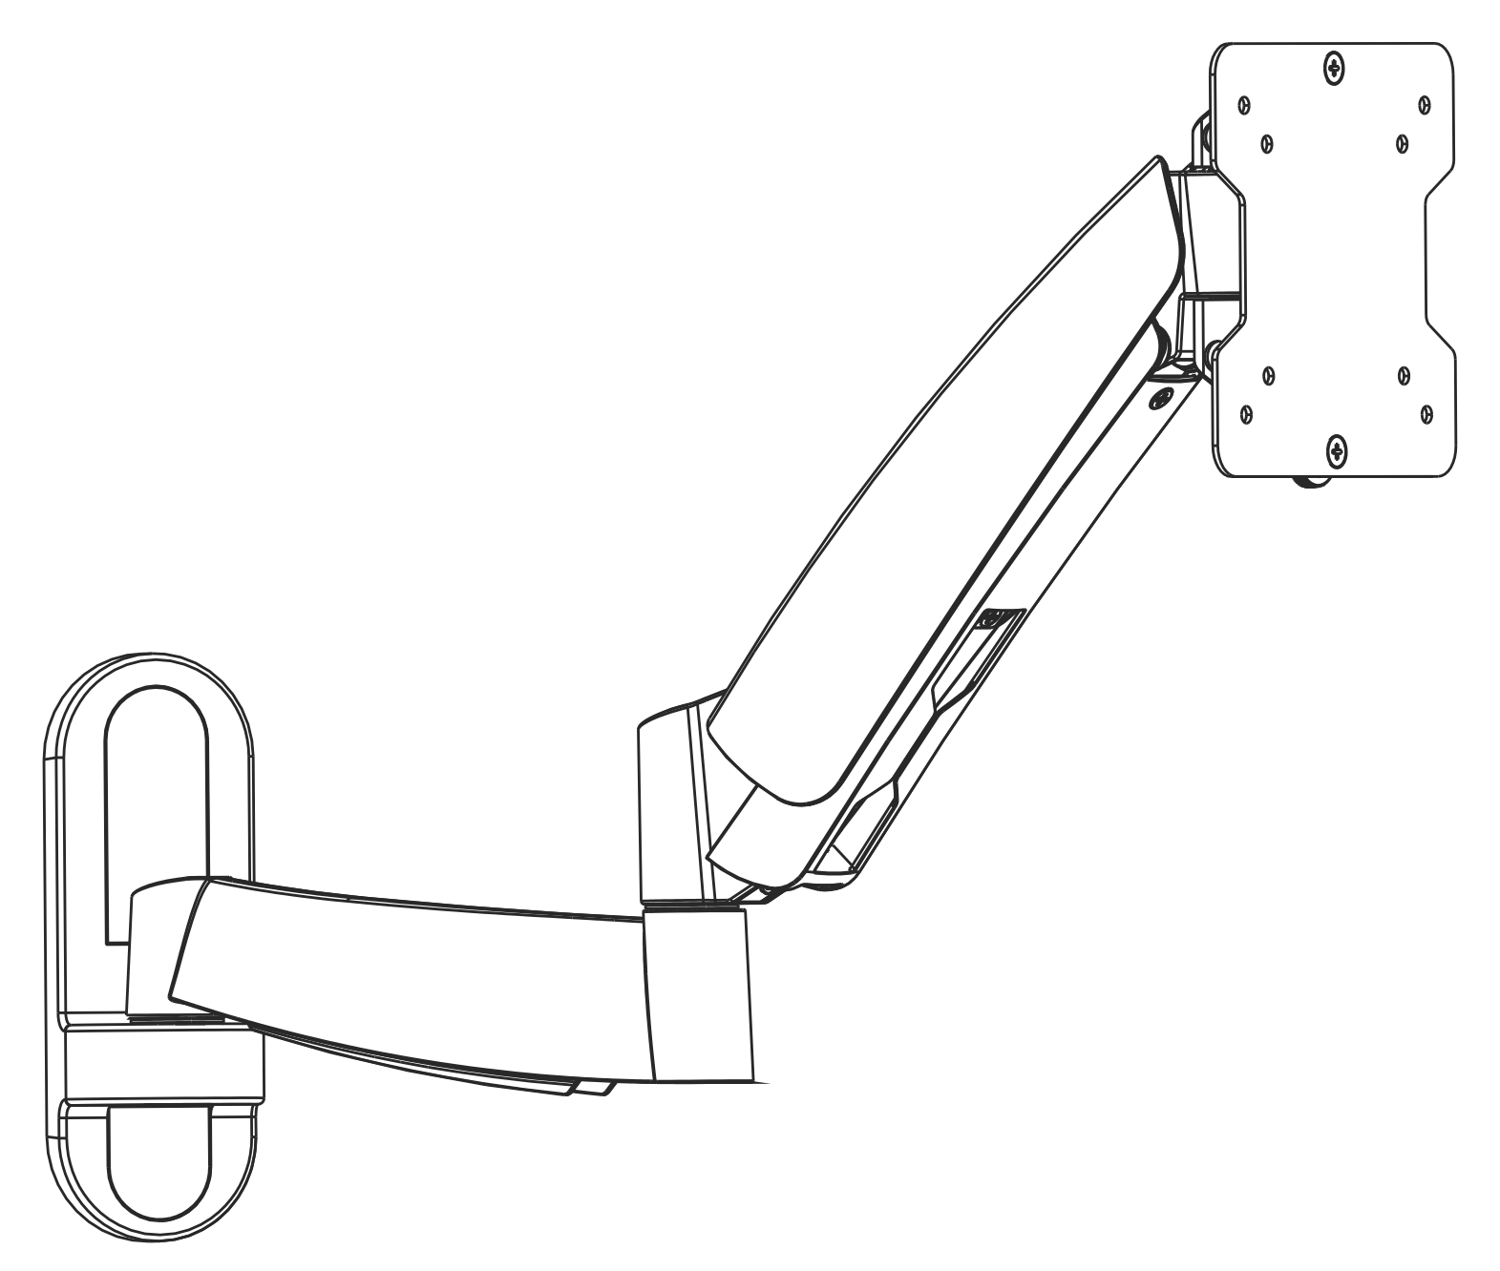
SLIM FULL MOTION LED/LCD TV WALL MOUNT
Caution: DO NOT EXCEED MAXIMUM LISTED WEIGHT CAPACITY. SERIOUS INJURY OR PROPERTY DAMAGE MAY OCCUR!
PM-MOVE-23B
23" MAX
75x75
100x100 2.5~15kg (5.5~33lbs)
2.5~15kg (5.5~33lbs)
ISSUED: OCT. 2012
- Check that the bracket is secure and safe to use at regular intervals (at least every three months).
- Please contact your dealer if you have any questions.
Warning and Component Checklist
Note: Read the entire instruction manual before you start installation and assembly.
WARNING
- Do not begin the installation until you have read and understood the instructions and warnings contained in this installation sheet. If you have any question regarding any of the instruction or warning, please contact your local distributor.
- This mounting bracket was designed to be installed and utilized ONLY as specified in this manual. Improper installation of this product may cause damage or serious injury.
- This product should only be installed by someone of good mechanical ability, with basic building experience and fully understanding of this manual.
- Make sure that the supporting surface will safely support the combined load of the equipment and all attached hardware and components.
- If mounting to wood wall studs, make sure that mounting screws are anchored into the center of the studs. The use of a stud finder is highly recommended.
- Always use assistant or mechanical lifting equipment to safely lift and position equipment.
- Tighten screws firmly, but do not over tighten. Over tightening can damage the items, greatly reducing their holding power.
- This product is intended for indoor use only. Using this product outdoors could lead to product failure and personal injury.
Component Checklist
IMPORTANT: Ensure that you have received all parts according to the component checklist prior to installing. If any parts are missing or faulty, telephone your local distributor for a replacement.
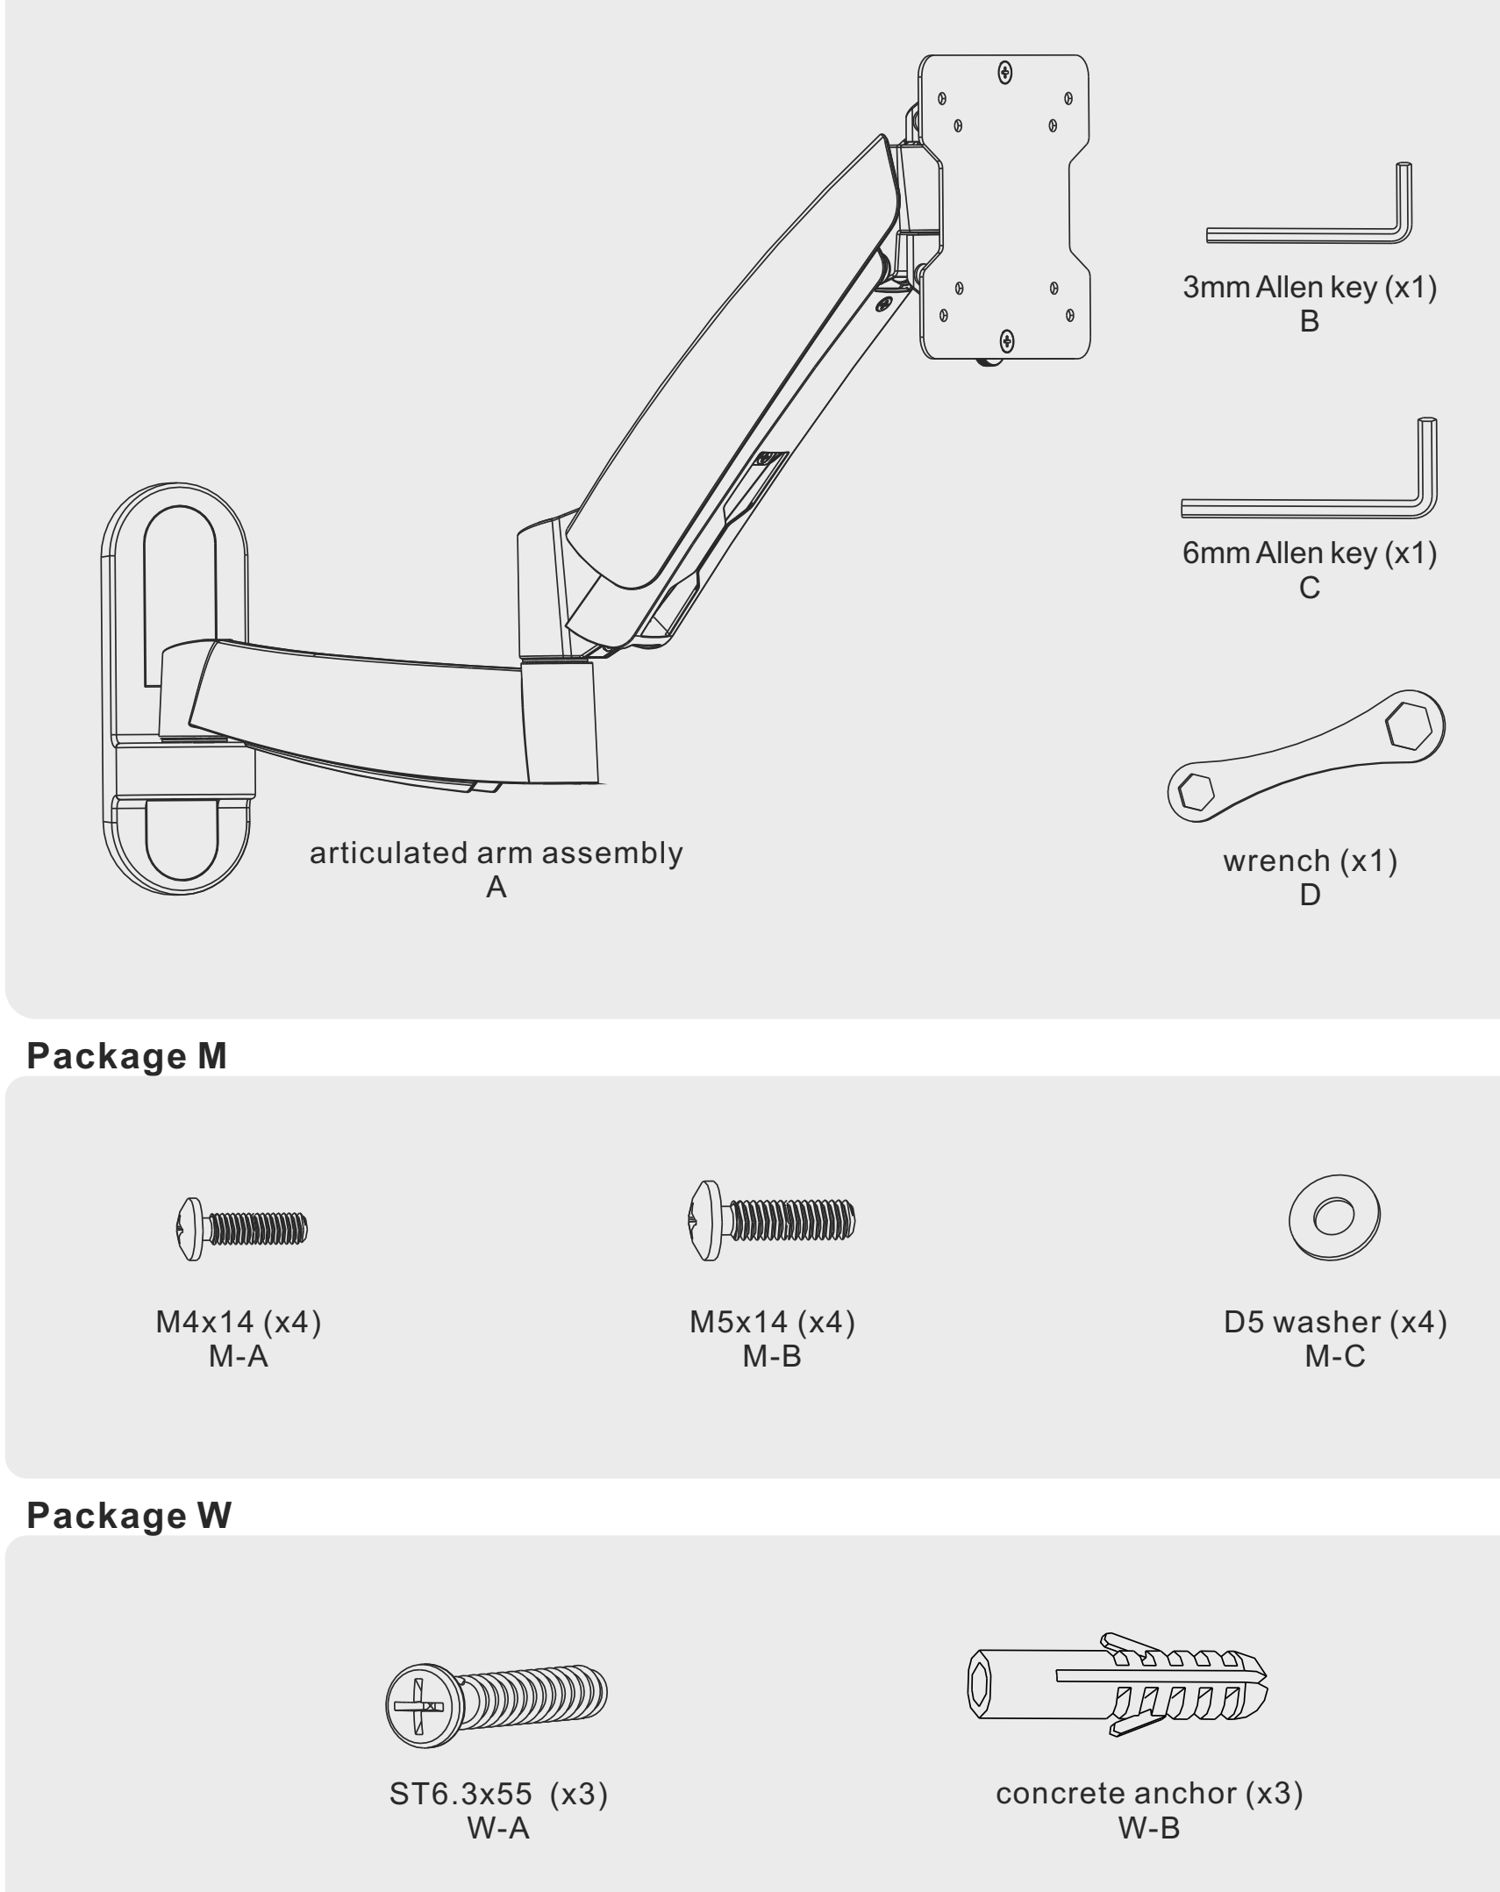
Installation Steps 1–3a
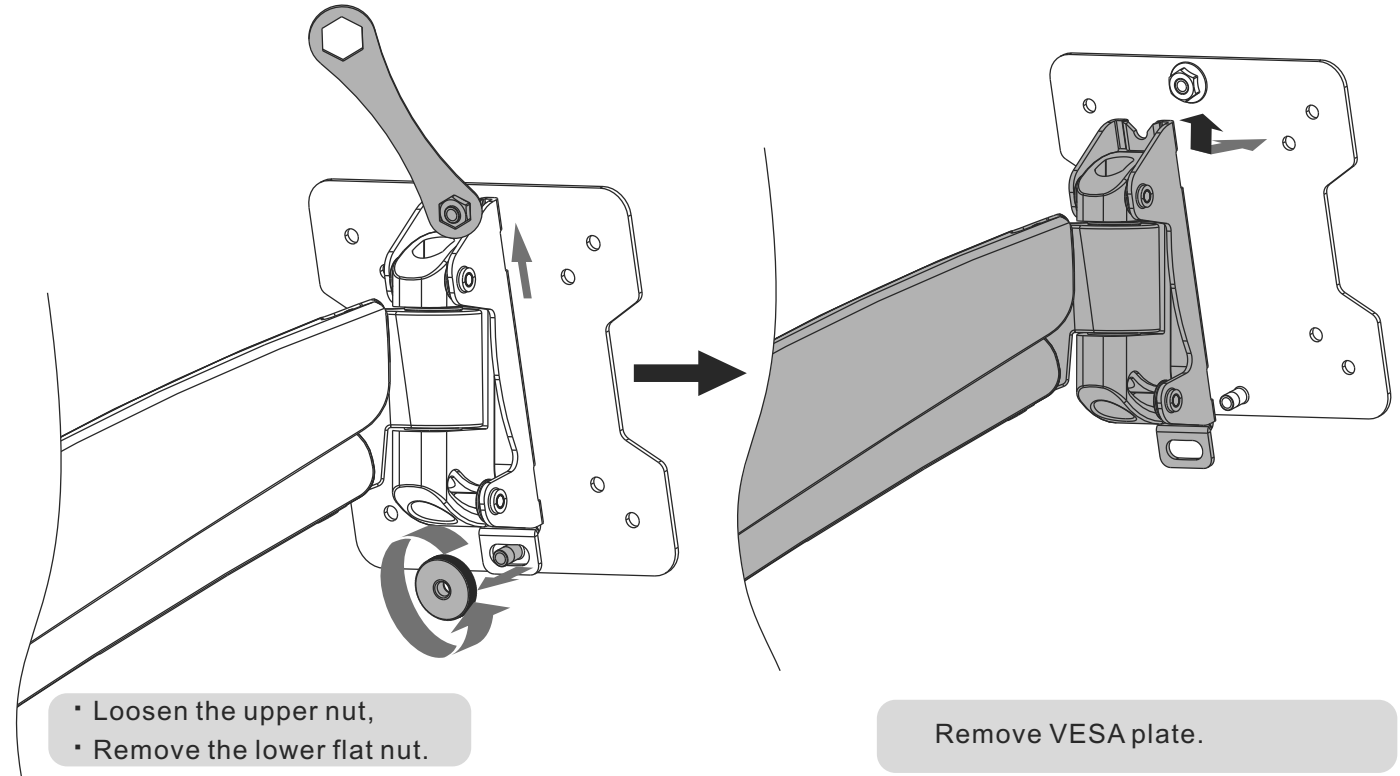
1. Separate VESA Plate from Wall Mount
- Remove the lower flat nut.
- Loosen the upper nut, remove VESA plate.
2. Remove the Decorative Covers
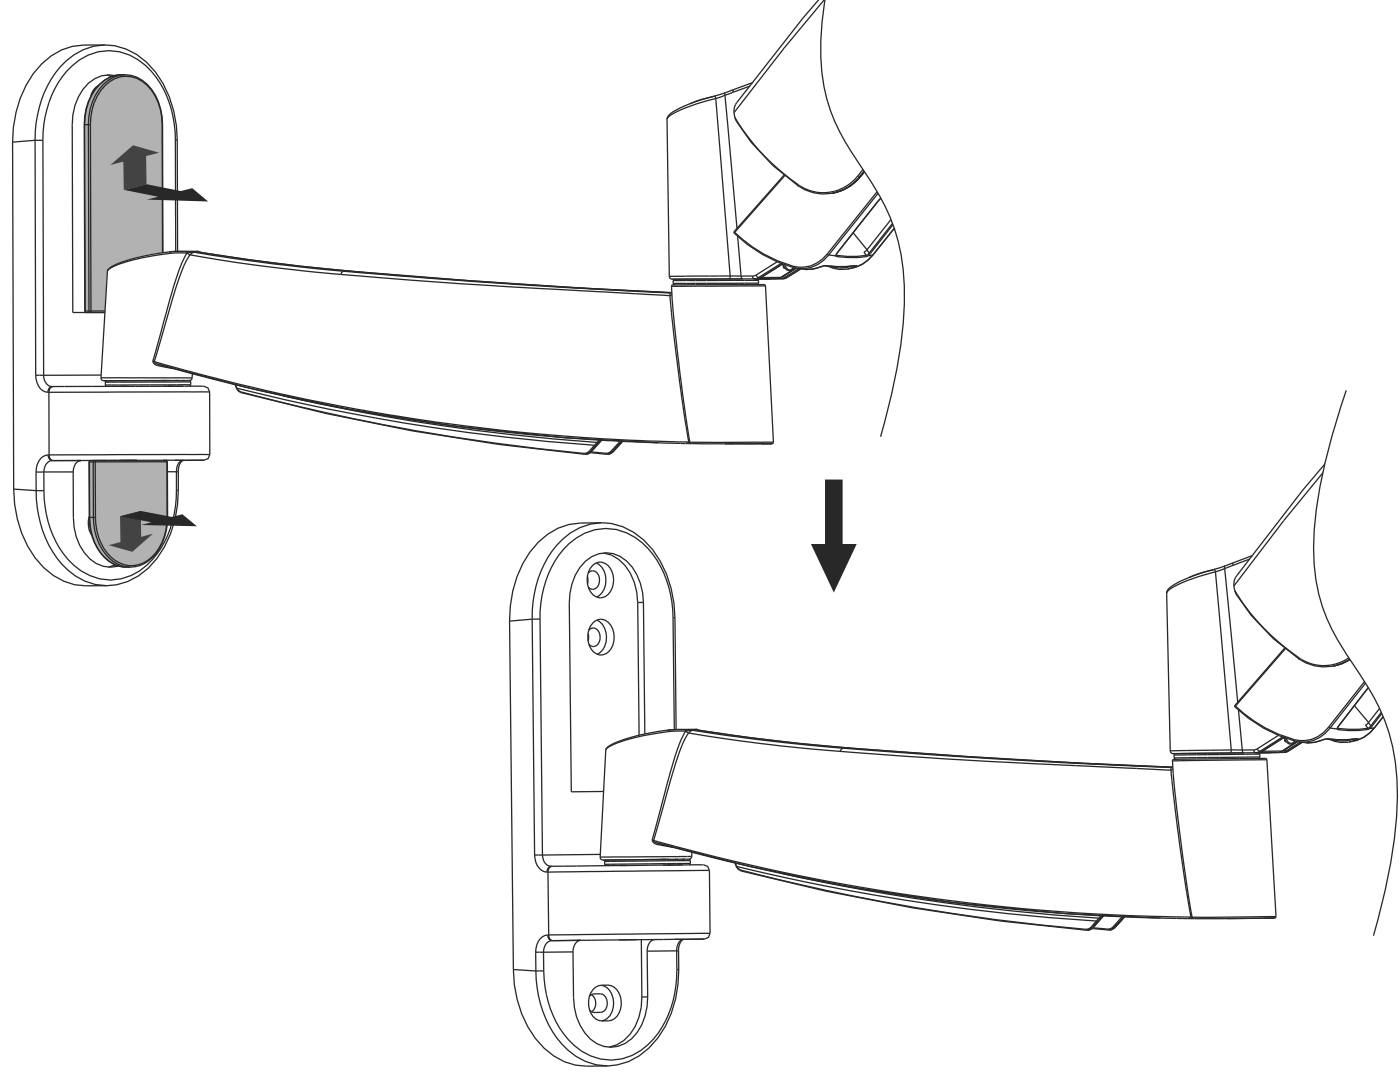
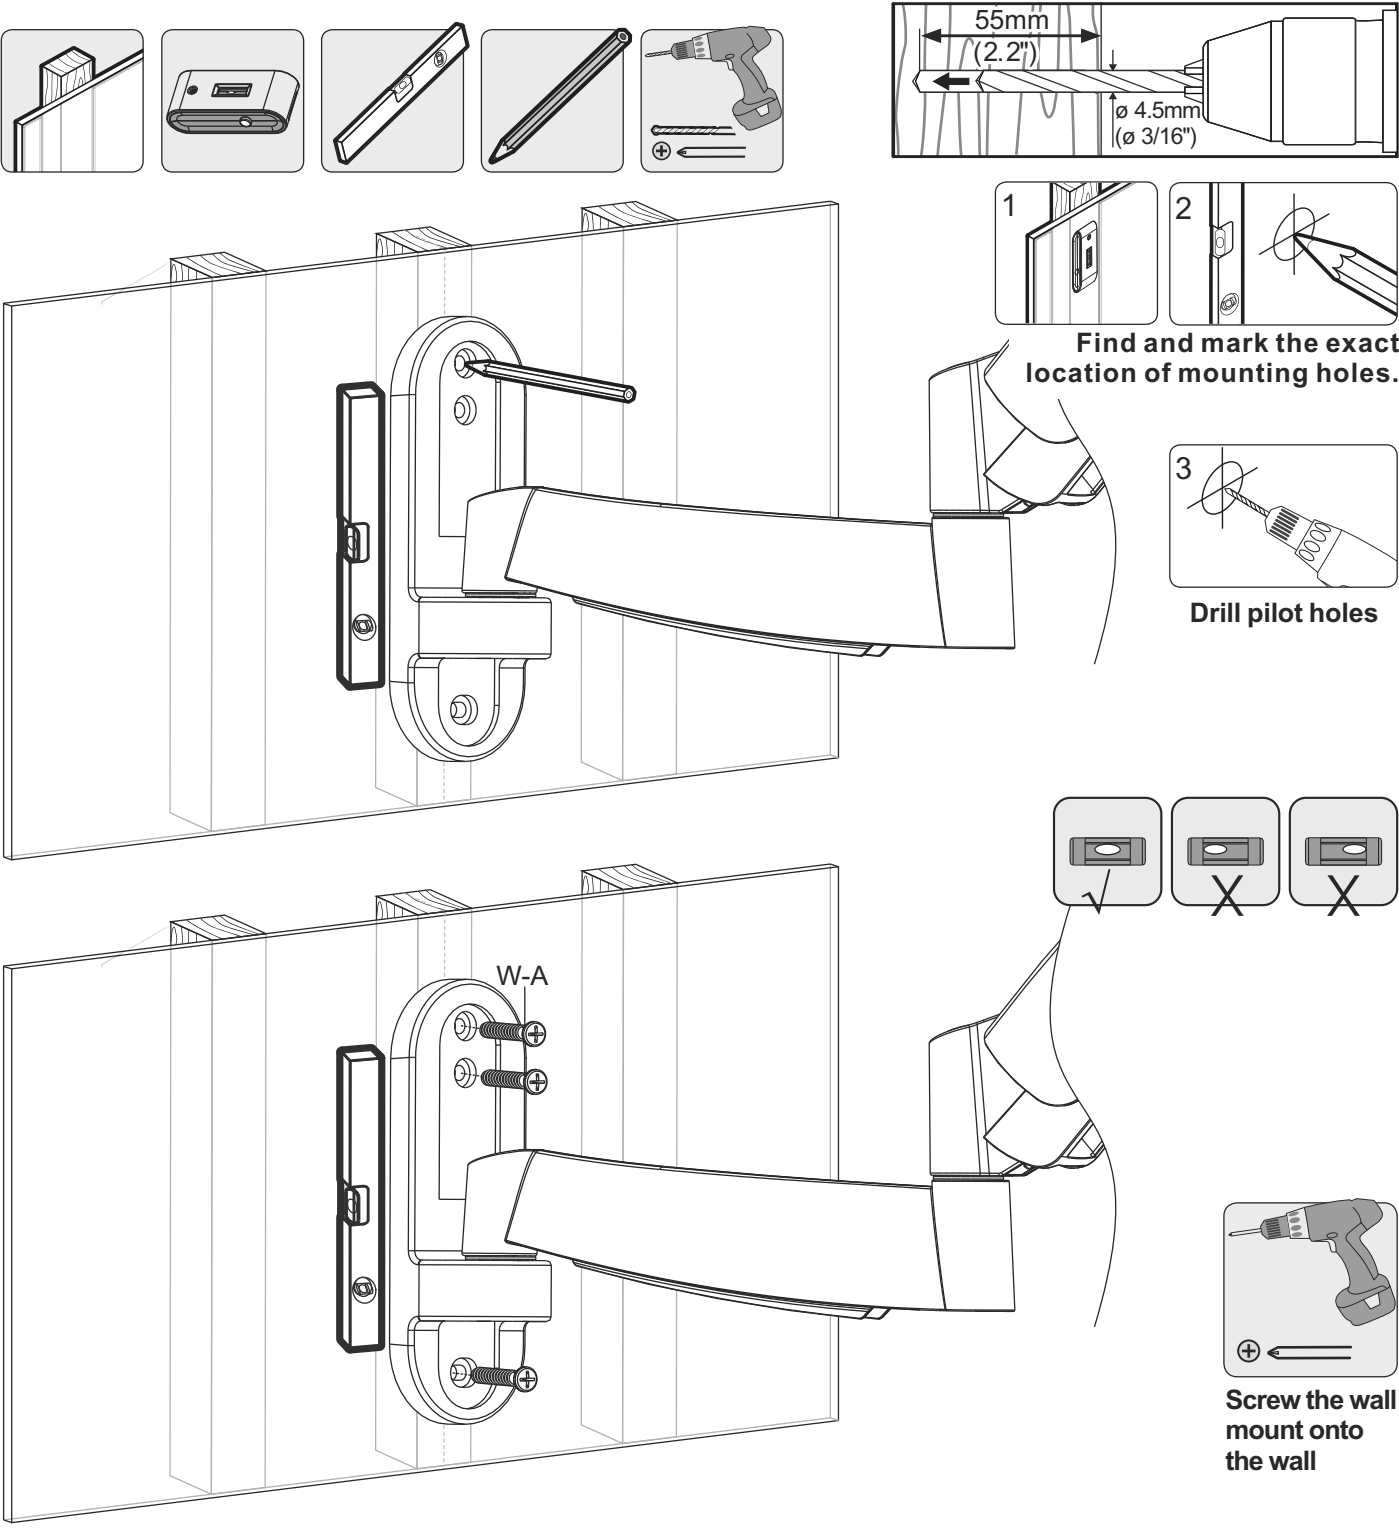
3a. Mount on Wood Stud Wall
- Drill pilot holes
- Find and mark the exact location of mounting holes.
- Screw the wall mount onto the wall
WARNING
- Make sure that mounting screws are anchored into the center of the studs. The use of a stud finder is highly recommended.
- Installers are responsible to provide hardware for other types of mounting situations.
- Installers must verify that the supporting surface will safely support the combined load of the equipment and all attached hardware and components.
Installation Steps 3b–4
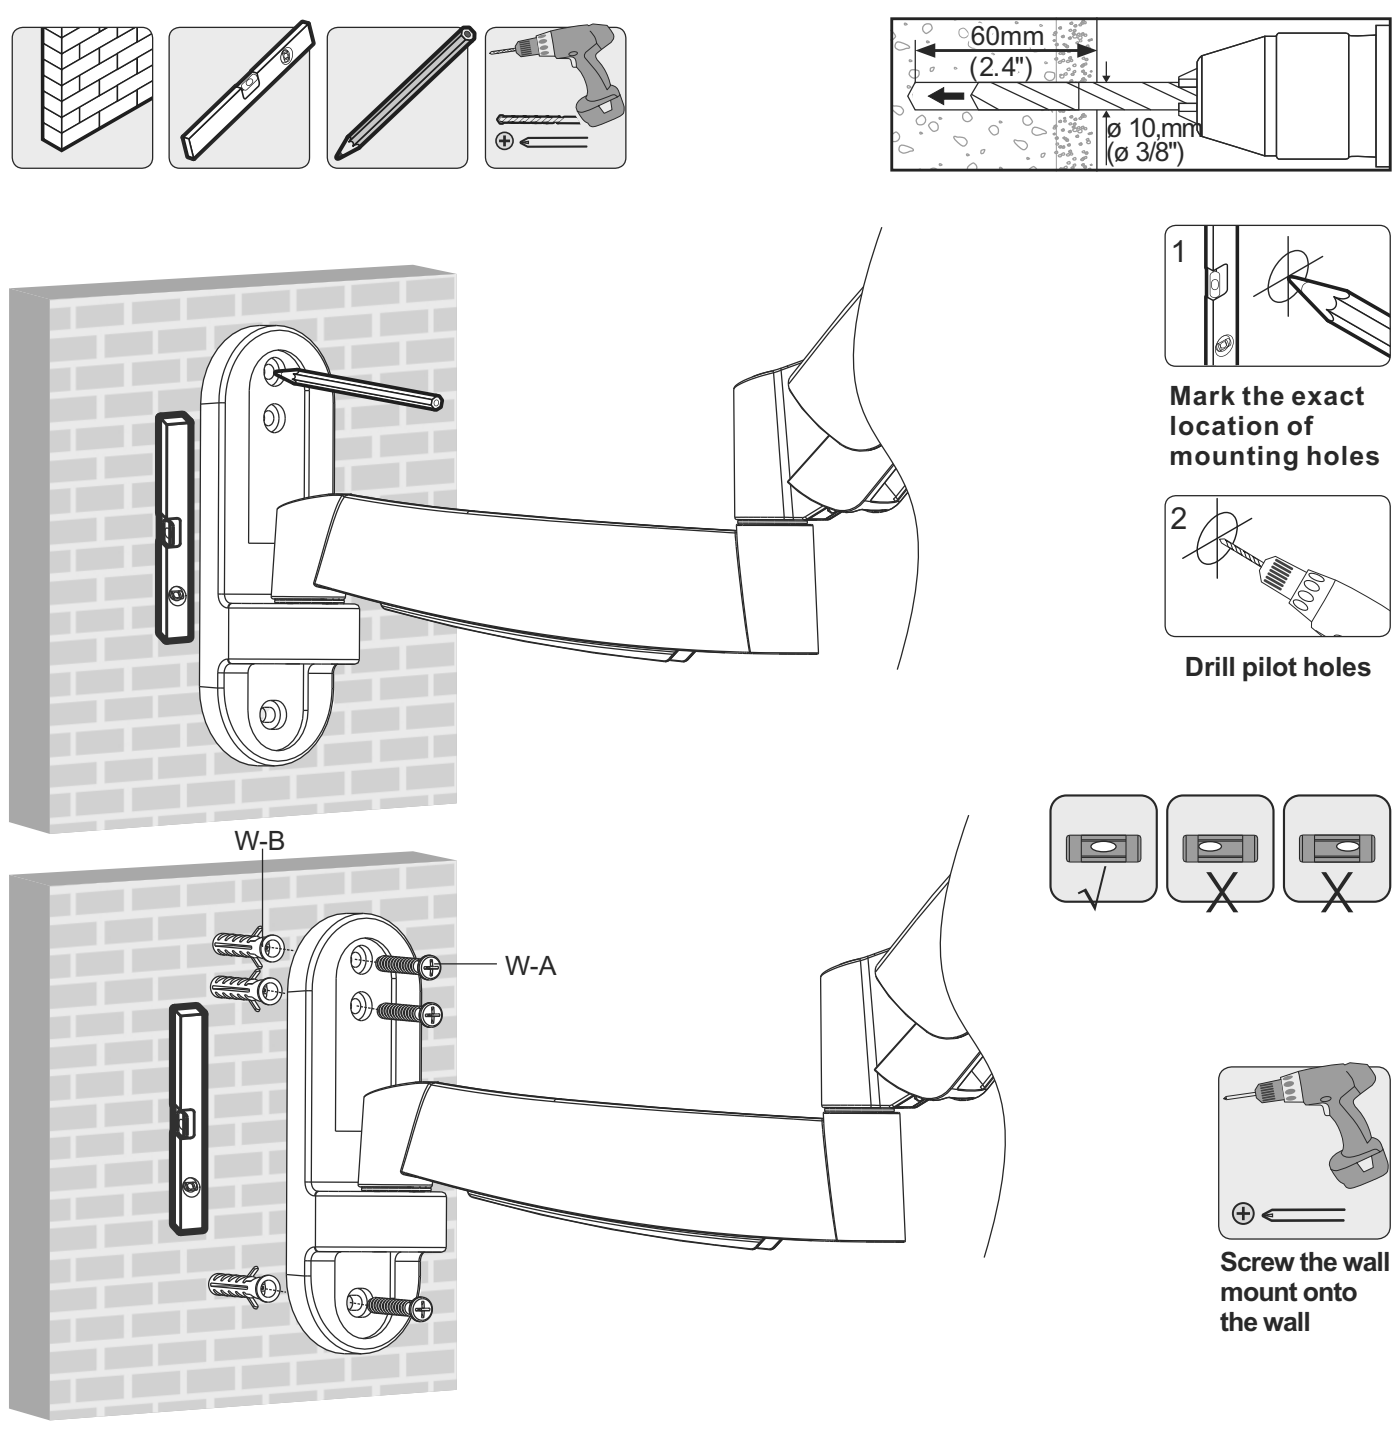
3b. Mount on Solid Brick and Concrete Block
- Drill pilot holes
- Mark the exact location of mounting holes
- Screw the wall mount onto the wall
WARNING
- When installing wall mounts on cinder block, verify the actual concrete thickness is at least 1-3/8" (35mm) for using the concrete anchors. Do not drill into mortar joints! Be sure to mount in a solid part of the block, generally 1" (25mm) minimum from the side of the block.
- It is suggested electric drill on slow setting be used to drill the hole instead of a hammer drill to avoid breaking out the back of the hole when entering a void or cavity.
- Installers must verify that the supporting surface will safely support the combined load of the equipment and all attached hardware and components.
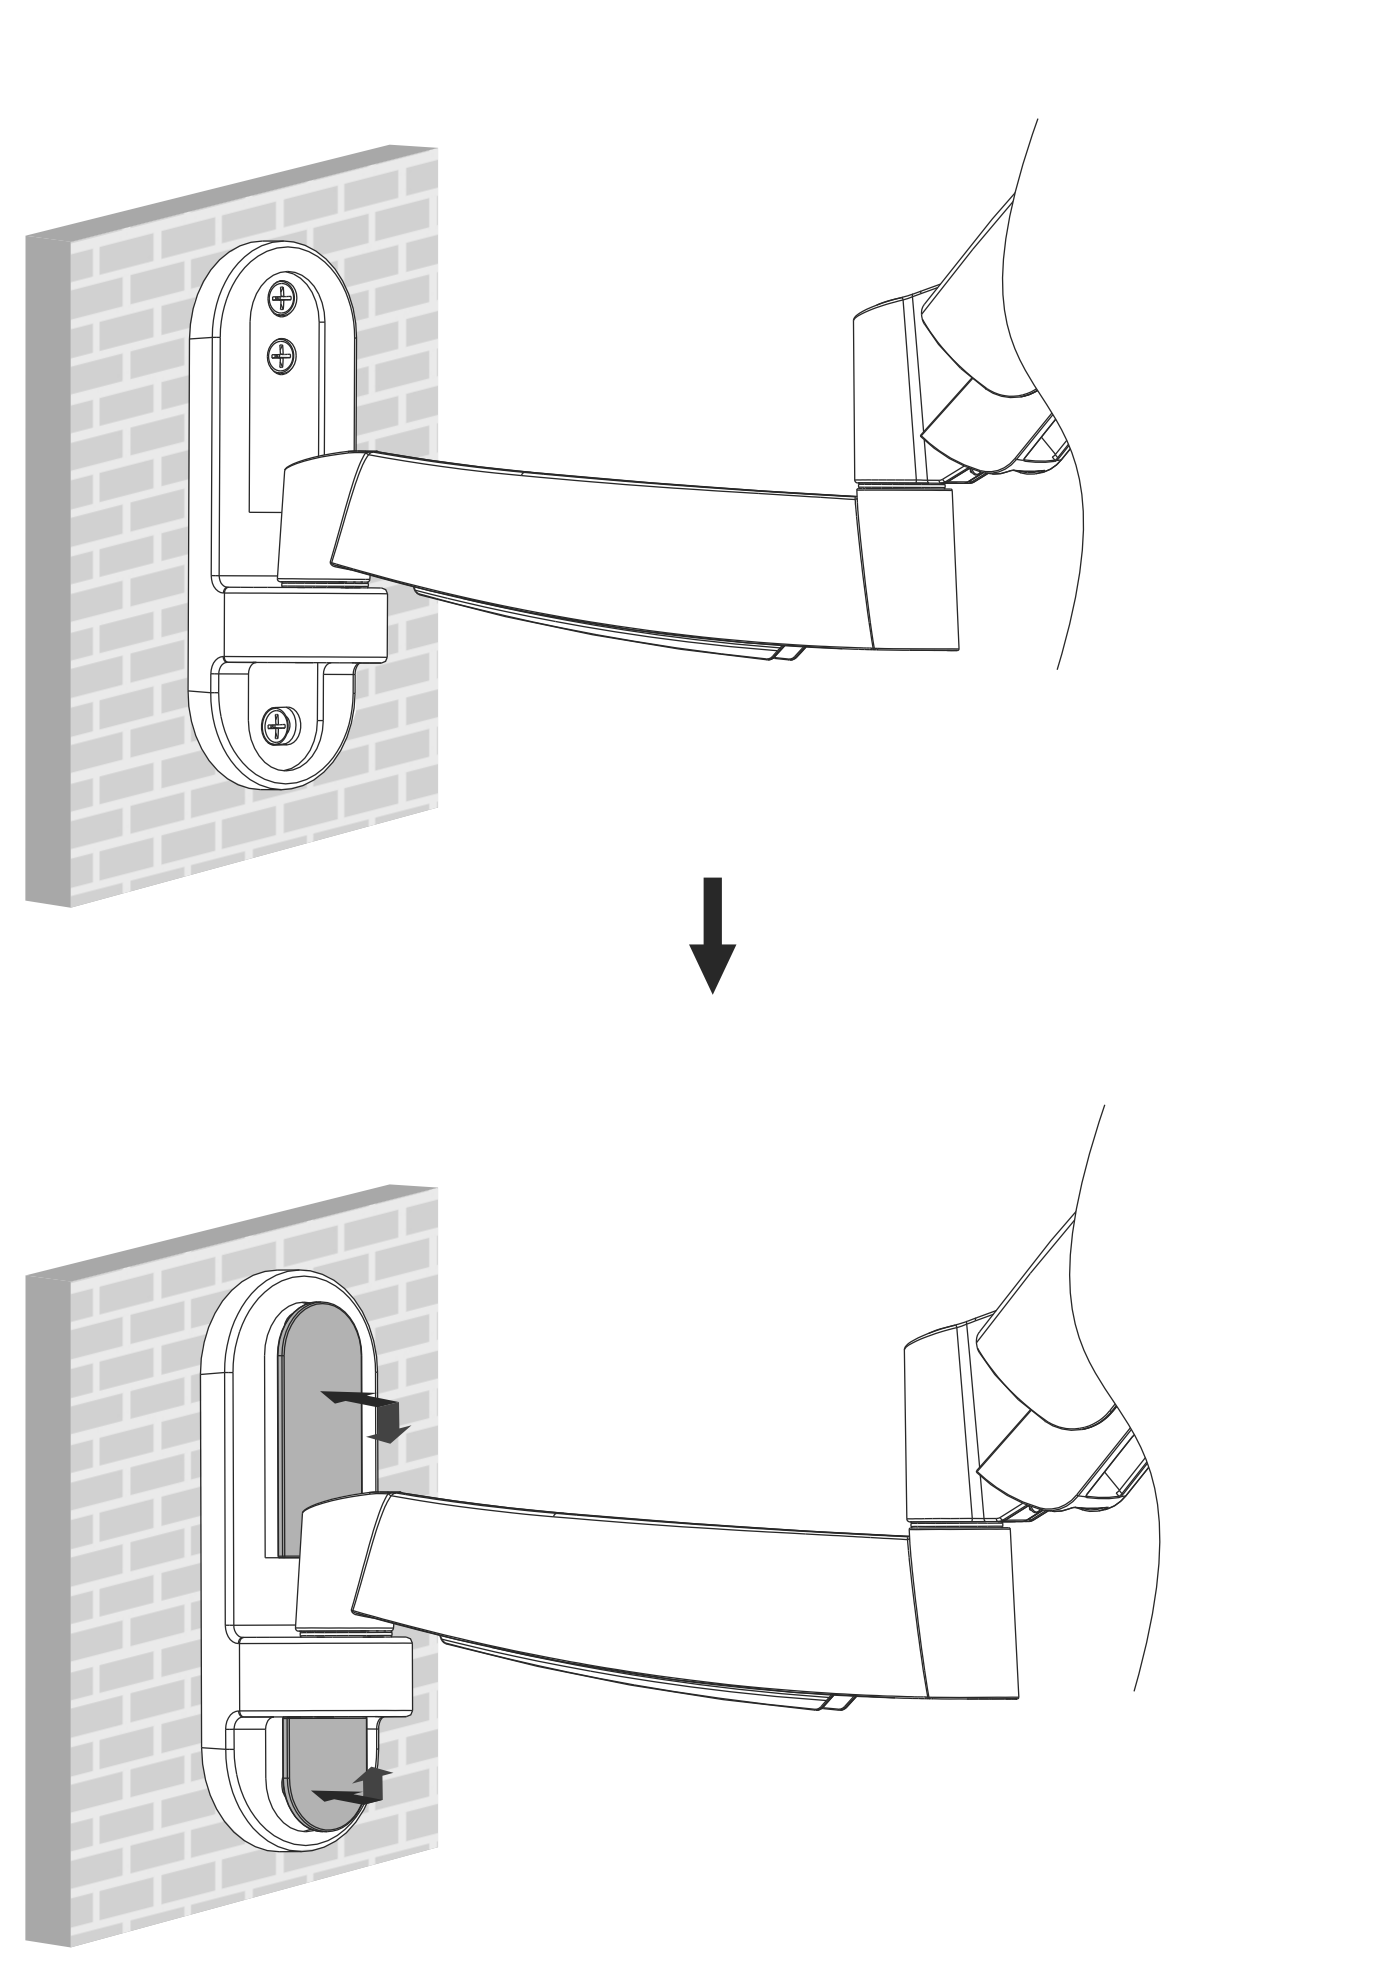
4. Install Decorative Covers
Installation Steps 5–6
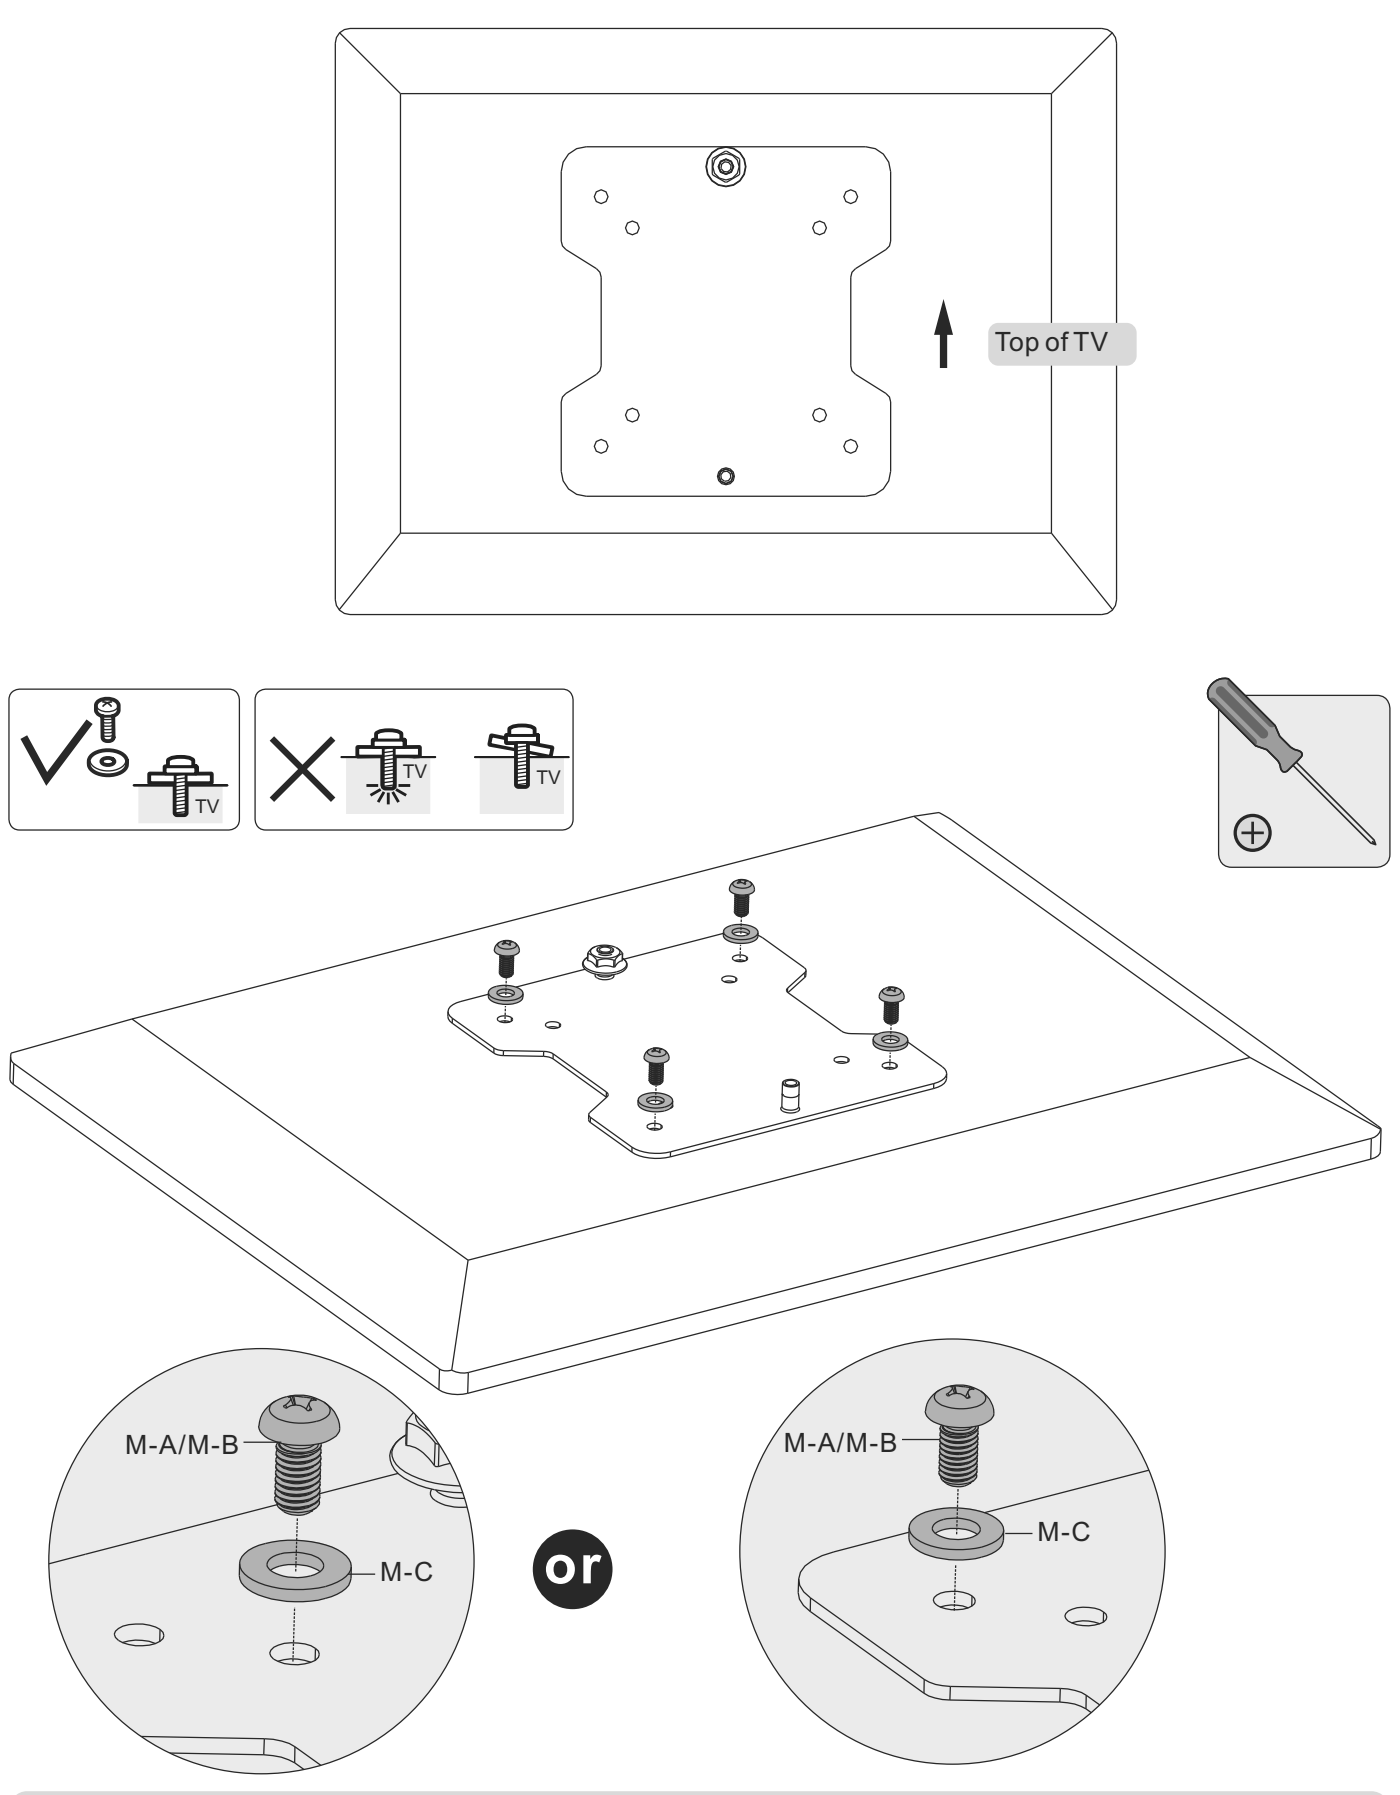
5. Install VESA Plate
- Tighten all screws but do not over tighten.
- Screw the VESA plate onto the TV.
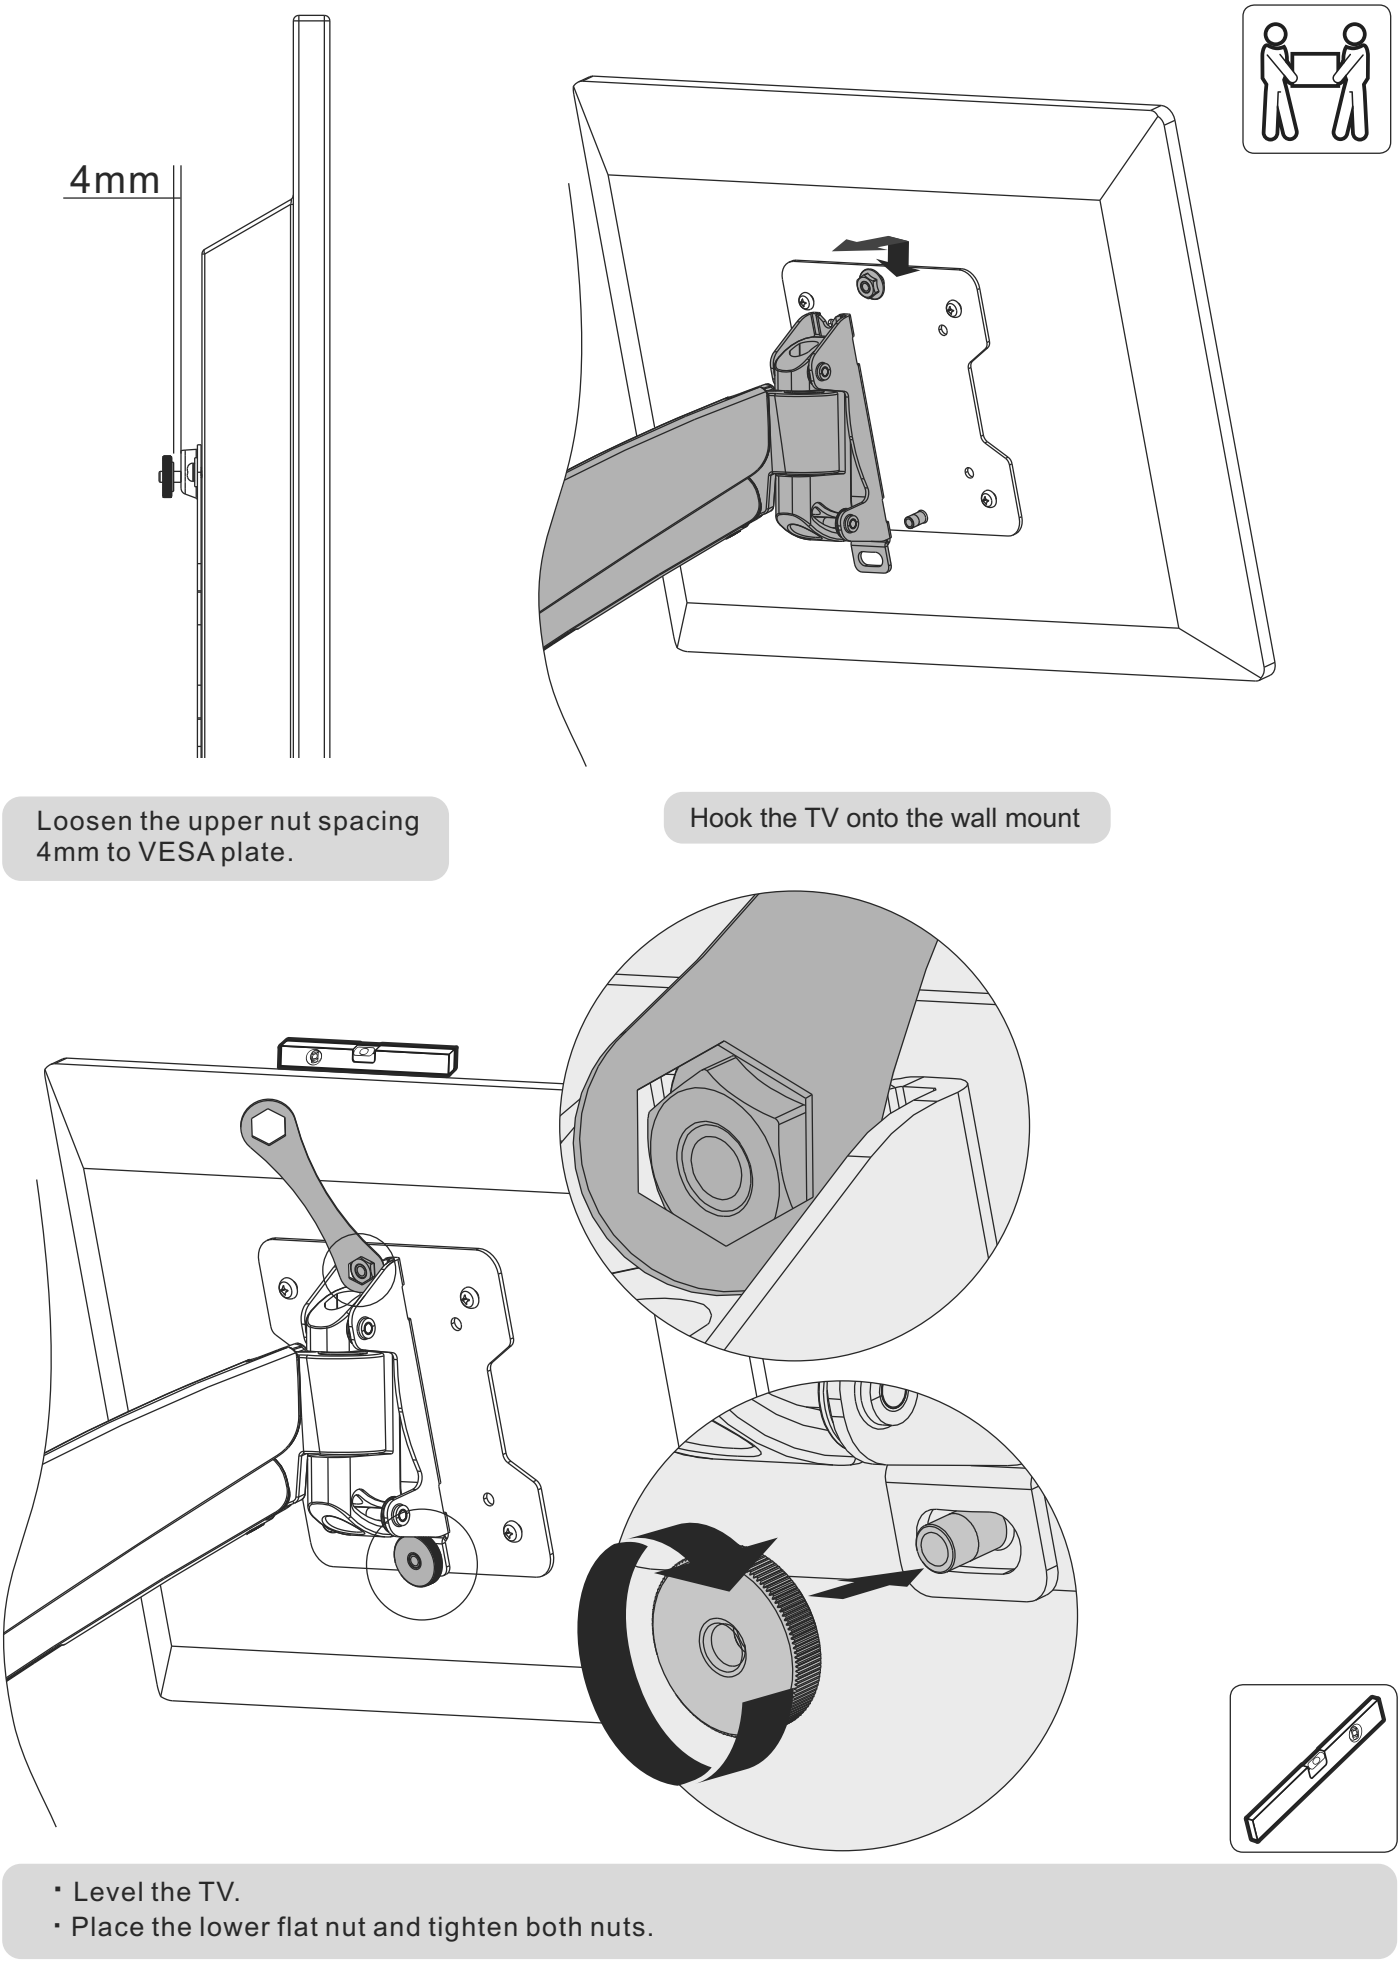
6. Hook the TV onto the Wall Mount
- Level the TV.
- Place the lower flat nut and tighten both nuts.
- Loosen the upper nut spacing 4mm to VESA plate.
- Hook the TV onto the wall mount
Installation Steps 7–9
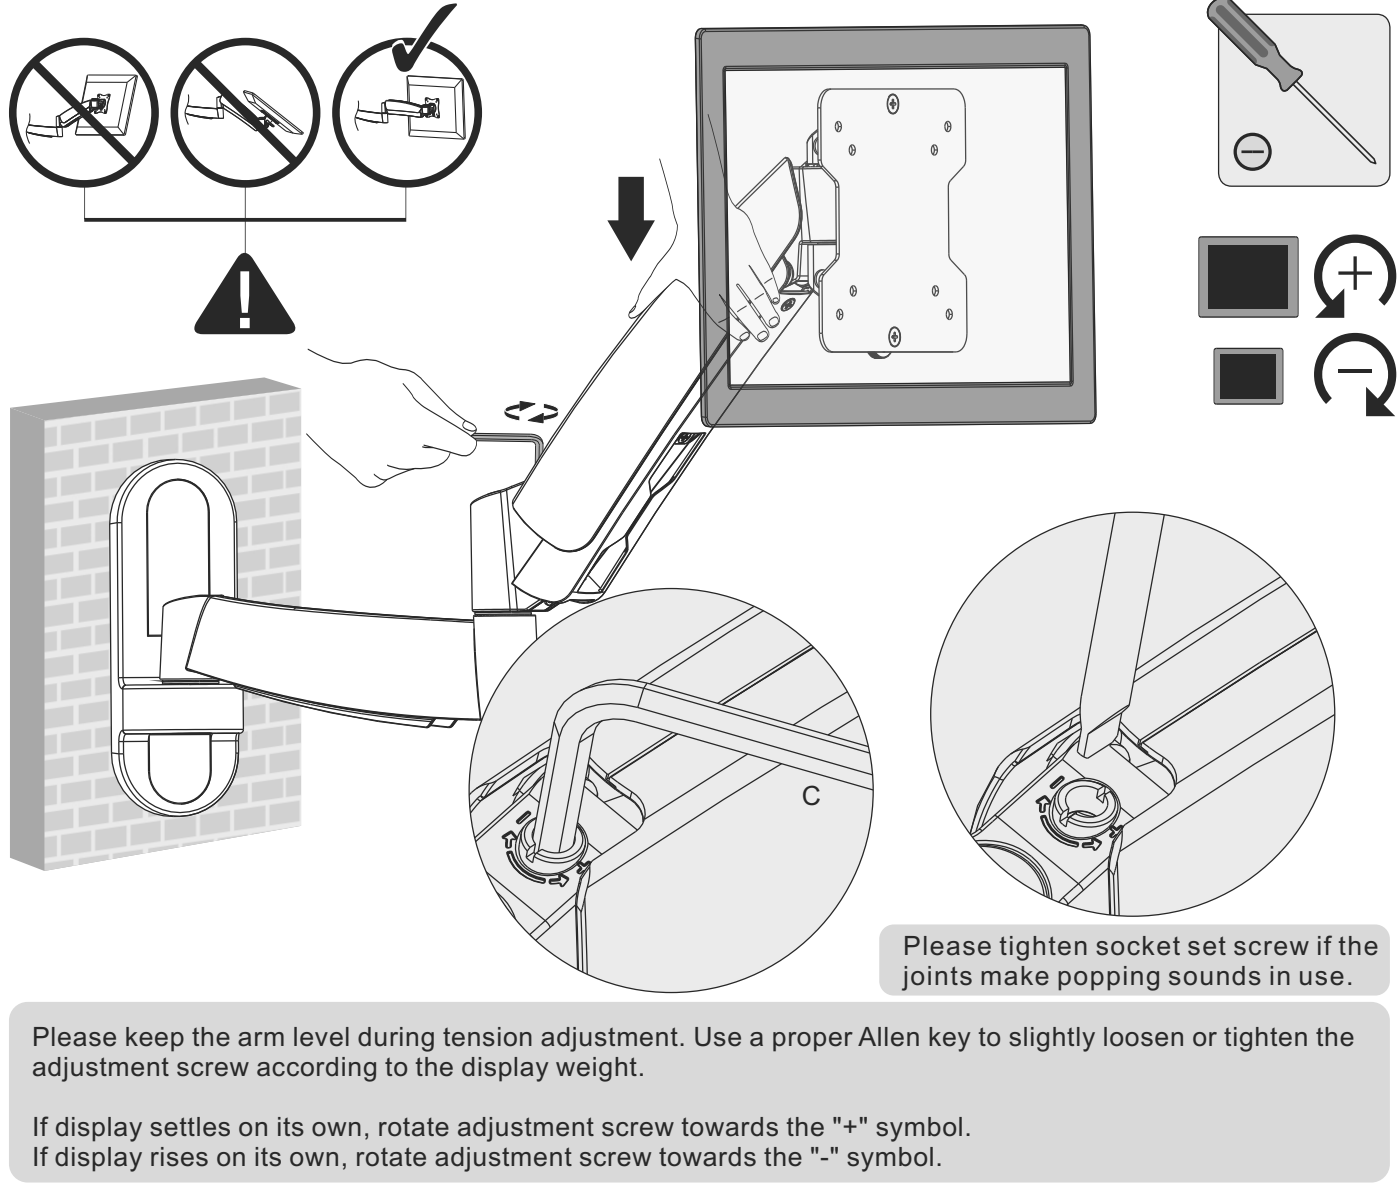
7. Tension Adjust
Note: Please keep the arm level during tension adjustment. Use a proper Allen key to slightly loosen or tighten the adjustment screw according to the display weight.
- If display settles on its own, rotate adjustment screw towards the "+" symbol.
- If display rises on its own, rotate adjustment screw towards the "-" symbol.
Please tighten socket set screw if the joints make popping sounds in use.
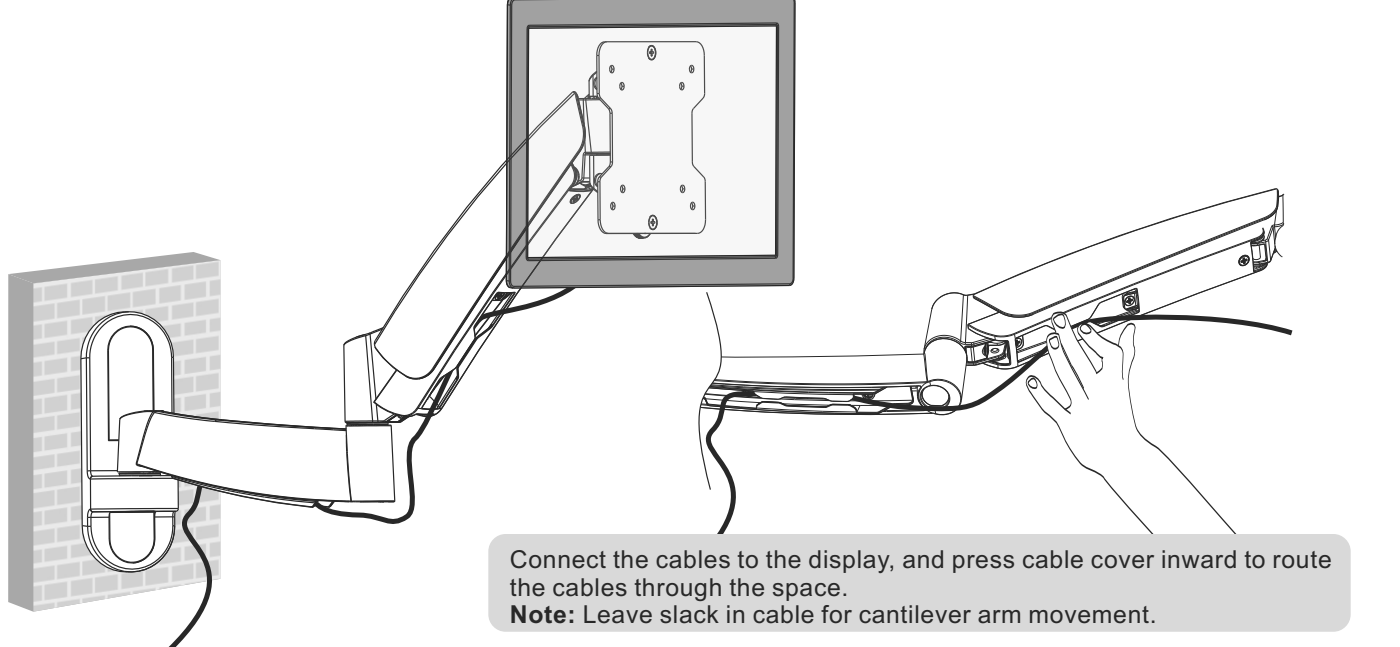
8. Cable Management
Connect the cables to the display, and press cable cover inward to route the cables through the space.
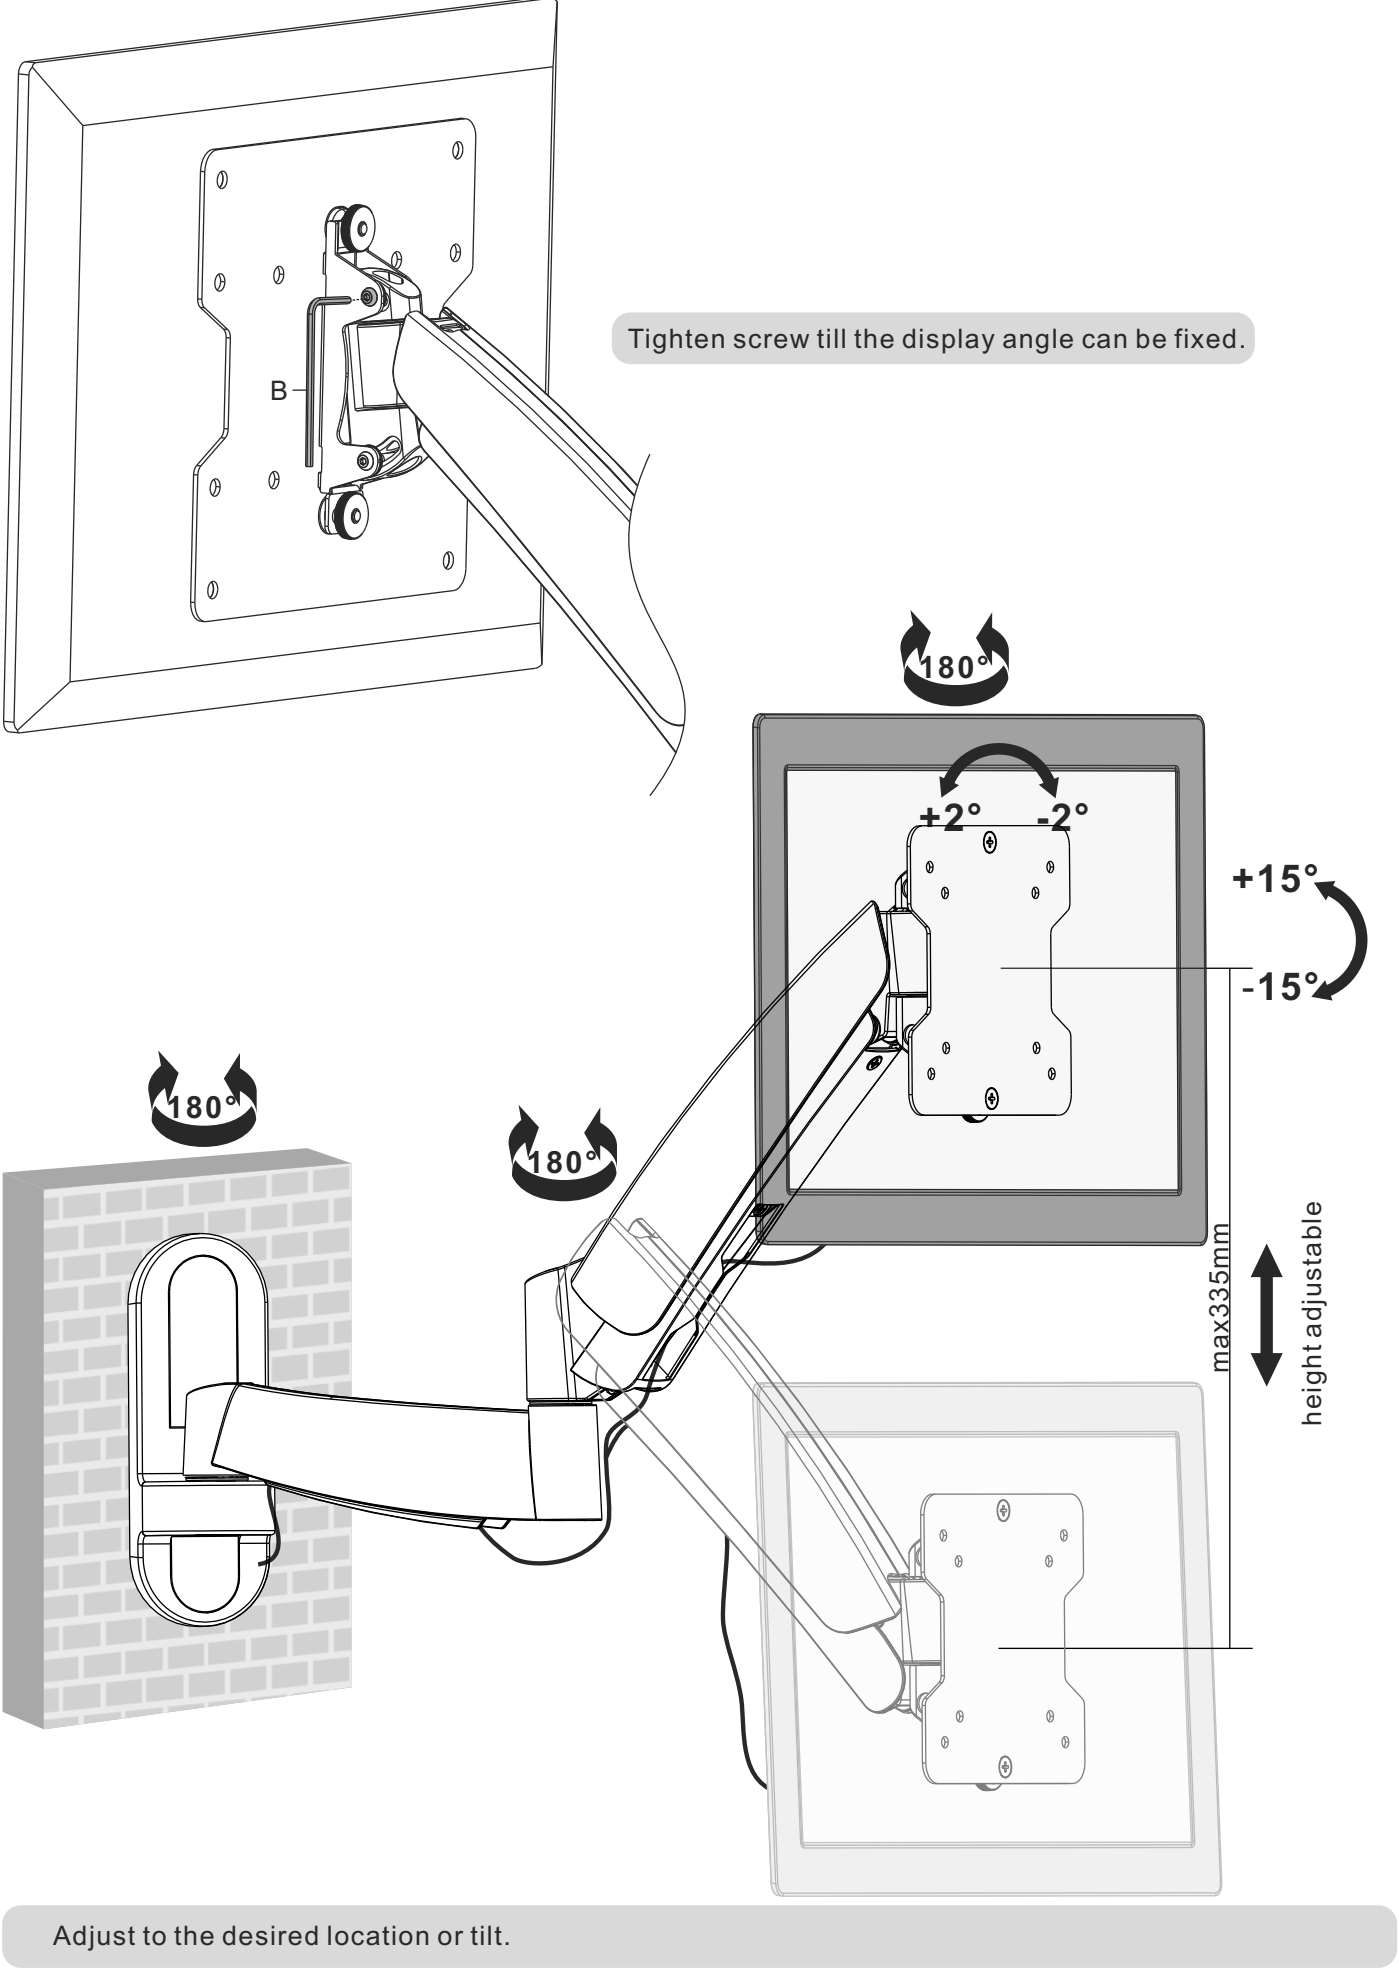
Note: Leave slack in cable for cantilever arm movement. Adjust to the desired location or tilt.
9. Adjustment
- Tighten screw till the display angle can be fixed.
- height adjustable max335mm
- +15°
- -15°
- 180°
- 180°
- 180°
- +2° -2°
Legal & Compliance
Product identification
Model: PM-MOVE-23B – manual version 1.0
Warranty and liability
The manufacturer grants the full statutory warranty on all new devices. As the manufacturer has no influence on installation, the warranty only applies to the product itself. If you detect a fault or damage, please contact your dealer and provide your sales slip or invoice as proof of purchase.
The manufacturer is not liable for damage to persons or property caused by improper installation, operation or maintenance not described in this manual. Do not alter or modify the product or its accessories. Any use other than described in this manual is not permitted and voids warranty and guarantee.
Trademarks and disclaimer
Product model and logo are trademarks. All other company and product names mentioned are trademarks of their respective owners. All rights reserved. No part of this publication may be copied or reproduced without prior written permission. We reserve the right to make changes to the device, packaging or manual and accept no liability for misprints.
Packaging
Dispose of packaging separately by material (paper/cardboard, plastics) via the local collection systems. Keep packaging material away from children – risk of suffocation. Packaging register LUCID: DE5958616449295.