
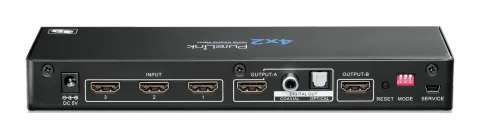
Introduction
Thanks for your purchase of the HDMI™ Matrix Switcher. Your satisfaction is very important to us. The HDMI™ matrix switcher is designed to make the use of your home entertainment equipments more comfortable.
PS420/4K/3D Matrix Switcher is an ideal product for Home Theater application, Family Room or Entertainment (Game) Room application, HTiB (or Sound bar) application, Sports Bar application, or share HD sources to 2 different rooms.
The feature designed SPDIF digital audio output (Coaxial & Optical) makes users easily share the digital audio of the 4 source devices by connecting one coaxial or optical audio cable to an audio system which does not support HDMI connection.
Moreover, the new added feature of supporting 4K/3D video format also helps you enjoy the true 4K/3D content more easily.
With the splitter and matrix function, users can share the same source device to 2 HDTVs (or projectors); also each HDTV (or projector) can be set to use one of the input source devices independently.
PS420/4K/3D is designed with 8 detection modes selection function. By setting to different detection modes, users can define the output video and audio format.
Features and Contents
Package Content
- HDMI™ 4K/3D video format supported
- Support 4K, 1080p/12-Bit Deep Color HDTV
- Support Pixel Clock Rate up to 340 MHz
- 4 inputs and 2 outputs HDMI full matrix selection
- Each output can select different source from one of the 4 inputs (matrix mode)
- Both outputs can select from the same input source (splitter mode)
- 8 detection modes selection
- Output-A support a digital S/PDIF audio output (coaxial & optical)
- Compatible HDCP 2.0
- DTS® HD, Dolby® TrueHD lossless compressed digital audio compliant
- Gold plated HDMI connectors
- IR remote control
- Stylish metal housing design, free of interference
- DC 5V/2A power adaptor
- Remote control unit
- HDMI 4-IN / 2-OUT Matrix switcher
- User’s Manual
• User’s Manual
Connection Illustration
Entertainment Application
(Family room or Gaming room)
HTiB or Sound Bar Application
(Toslink or Coaxial to HTiB or Sound Bar)
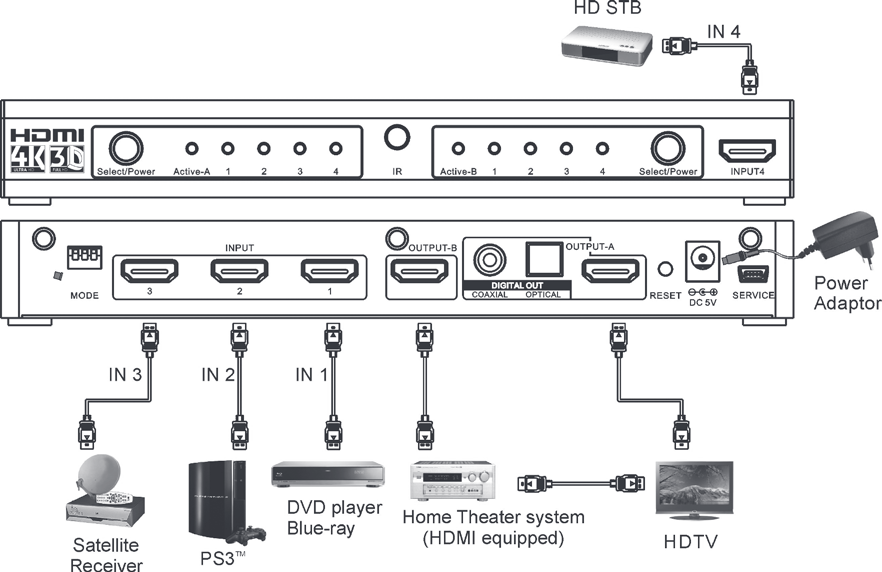
Connection Illustration
Home Theater Application
- HDMI connection to a Home Theater receiver
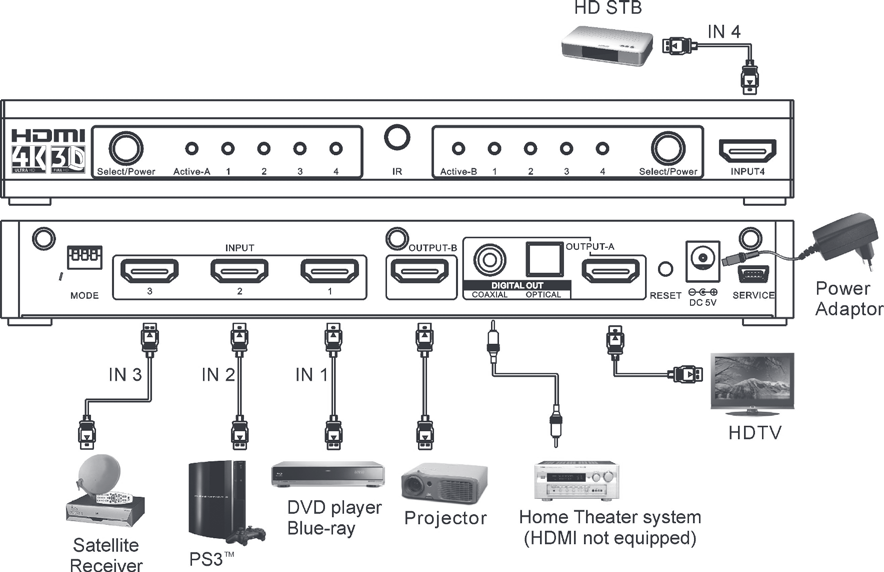
- Toslink or Coaxial digital audio to Amplifier
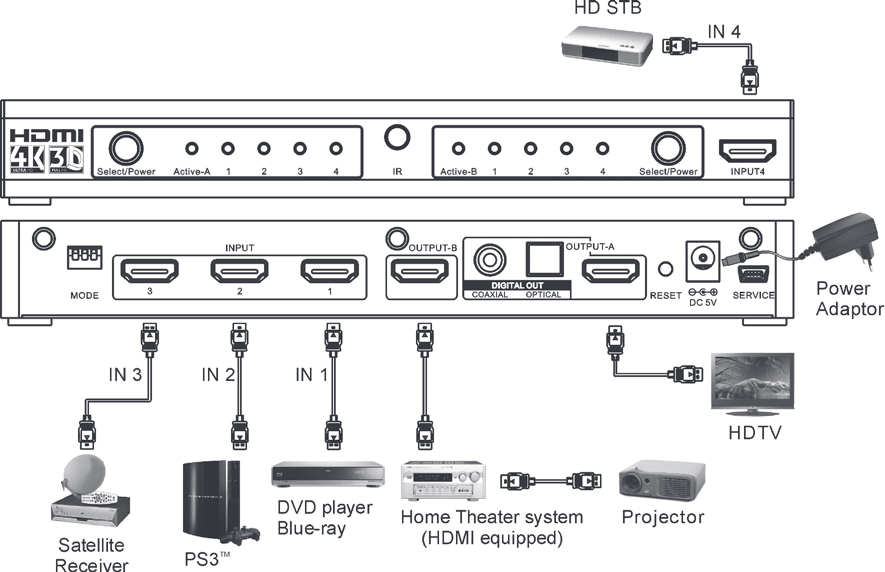
• Output-A supports an unmodified SPDIF (coaxial/optical) digital audio
Note: If you want to select or distribute 4K/3D source to either one or two of the displays, please make sure all of the sink devices support the same HDMI 4K/3D video format as the source. The 4K/3D image cannot be delivered to TVs which do not support 4K/3D video format.
Note: Output-A supports an unmodified SPDIF (coaxial/optical) digital audio output. Users can use it to connect to a Home Theater system which supports a coaxial/optical digital audio input.
• The output of the SPDIF (coaxial/optical) digital audio format is based
Note: The output of the SPDIF (coaxial/optical) digital audio format is based on the HDMI Output-A. If the sink devices (HDTV or Projector), which connected to Output A and Output B, can only support stereo audio, the coaxial/optical digital audio may also send out PCM stereo audio.
Note: For audio output format adjustment: (Please refer to the source device manual.)
- Check the supported audio format of the feature film. (Stereo, DTS® 5.1, and Dolby® Digital 5.1...etc)
- Set the audio output format of source device. Ex. uncompressed PCM or Bit Stream (Dolby® Digital 5.1, DTS® 5.1 ...etc.)
- Select the output of audio format and language from the main feature menu.
Note: For HD quality audio (Dolby® TrueHD, DTS-HD Master Audio™), or other audio formats that need high bandwidth for audio transmission, please use HDMI connection for the HD audio transmission.
Caution: If the output audio format is not supported by the sink device (HDTV, Home Theater receiver, Sound Bar Speaker), you may hear noise form the speakers or you will not hear any sound from the speakers.
Note: If you want to use a Home Theater System or other speaker system for audio output, it is recommended to mute the audio speaker of the HDTV.
Tip: It is recommended all the connected sink devices (HDTV, Projector, Home Theater Receiver…etc.) and source devices (Blue-ray Player, PS3…etc.) support the same highest resolution, color deep and audio format.
Connection
- Connect the DC 5V power adaptor to the HDMI Matrix Switcher
- Connect the HDMI cables from the HD sources (PS3, DVD player, Blue-ray Player…etc) to the input ports of the HDMI Matrix Switcher.
- Connect the HDMI cables from your HD display (HDTV or projector) to the output port (Port A or Port B) of the HDMI Matrix Switcher. *Output Port A supports additional SPDIF digital audio output. If your Home Theater (or Sound System) doesn’t support HDMI input, you can use a coaxial/optical audio cable to connect the digital audio to your Home Theater (or Sound System).
- After you finish the connection, the Active-A (or Active-B) indication LED (red), and input indication LED (green) will be lighted on.
Operation
Matrix-Mode: Individual Selection for each output port

A. If source devices do not support the function of Auto Detection & Auto Adjustment, please set the output audio and video signal of the source device first, and make sure the setting can be supported by the sink devices. For example, if user set the source to send out a 1080p video signal, but the sink device can only support up to 720p or 1080i, you will not have picture the sink device.
B. If source devices support the function of Auto Detection & Auto Adjustment, the source device will auto adjust the output audio and video signal to the optimal standard based on the following 8 different modes. Users can also set the audio/video output signal by themselves. Please make sure the setting can be supported by the sink devices.
Splitter-Mode: Sharing same HD source to both outputs
Detection Mode Mode Action Recommended Application
| Mode | Mode Action | Recommended Application |
|---|---|---|
| Mode 1 Video & Audio H.C.F. (Highest Common Factor) *Preset Mode | Select the output audio and video signal to the highest format which can be supported by both of the sink devices. (For example, when the sink devices of Output A and Output B support different video and audio formats, the highest format of Output A is 1080p/12-bit & 2 channels, the other sink device of Output B supports the highest format to 1080i/8-bit & 2 channels, under Mode 1, it will automatically detect and choose 1080i/8-bit & 2 channels as the output standard.) | TV wall application, sports bar application, or other application that different standard (Resolution, Color Deep) HDTVs are connected together. |
| Mode 2 Video Maximum & Audio ggT | Video: Select the output video signal to the highest video format which supported by Output A or Output B sink devices. (For example, the highest video format of Output A is 1080p/12-bit, the other sink device of Output B supports the highest format to 1080i/8-bit, under this Mode, the source device will automatically detect and choose 1080p/12-bit as the output standard.) [Notice 1] Audio: Select the output audio signal to the highest audio format that supported by both of the sink devices. | Home Theater application; Two rooms application; When the source needs to be shown with the best resolution, and the audio standard that supported by both of two sink devices will be the primary option for audio output signal. |
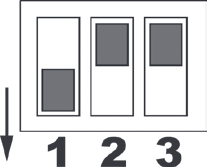
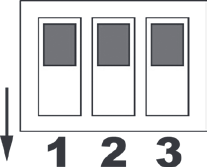
Detection Mode Mode Action Recommended Application
| Mode | Mode Action | Recommended Application |
|---|---|---|
| Mode 3 Video H.C.F. & Audio Maximum | Video: Select the output video signal to the highest format that supported by both of the sink devices (Output A & Output B). Audio: Select the output audio signal to the highest audio format which supported by one of the connected devices. (For example, the highest audio format of Output A is Dolby 5.1, the other sink device of Output B supports the highest format to 2 CH, under this Mode, and it will detect and choose Dolby 5.1 as the output standard.) [Notice 2] | Home Theater application; Two rooms application; When the source needs to be presented with the best sound quality, and the highest video format that supported by both of two sink devices will be the primary option for video output signal. |
| Mode 4 Video & Audio Maximum | Select the output video and audio signal to the highest format that supported by Output A or Output B sink devices. [Notice 3] | Home Theater application; Two rooms application; When the source needs to be displayed with the best resolution and sound, the highest format will be chosen for the video & audio output signal. |
| Mode 5 Video H.C.F. & Audio Specified (AAC, Dolby 5.1, DTS 5.1, and 2 CH) | Video: Select the output video signal to the highest format that supported by both of the sink devices (Output A & Output B). Audio: Set the output audio signal as one of the following 4 standards: AAC, Dolby 5.1, DTS 5.1 or 2 CH. If the audio format of coaxial/optical cable connected source device is AAC, the output audio standard will be AAC as well. [Notice 4] | Home Theater application; Traditional audio amplifier may only support Toslink or coaxial for audio input connection, please use the Toslink or Coaxial connector for audio output connection. Under this mode, the better sound quality of amplifier can be designated as the output audio standard. |
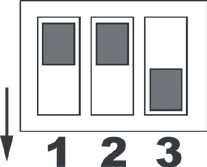
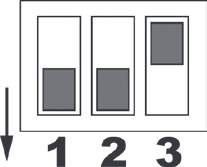
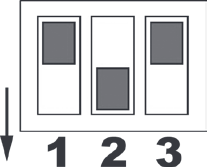
Mode 6 – Video Maximum & Audio Specified (AAC, Dolby 5.1, DTS 5.1, and 2 CH)
Video: Select the output video signal to the highest video format which is supported by Output A or Output B sink devices. [Notice 3]
Audio: Set the output audio signal as one of the following 4 standards: AAC, Dolby 5.1, DTS 5.1 or 2 CH. If the audio format of coaxial/optical cable connected source device is AAC, the output audio standard will be AAC as well. [Notice 4]
Home Theater application; Traditional audio amplifier always used Toslink or coaxial cable instead of HDMI cable for connection, under this mode, the better sound quality of amplifier can be designated as the output audio standard.
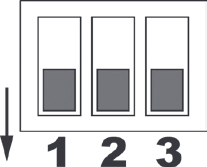
Mode 7 – Reserved
The mode will remain the same functions as Mode 1.
The applications of this mode are same as Mode 1.
Mode 8 – Priority of Output A
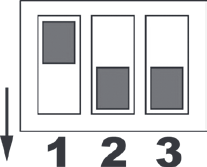
The highest format of Output A connected device will be chosen for the primary output video and audio signal standard. [Notice 5]
Home Theater application, or user assigns a primary sink device by connect it to port 1.
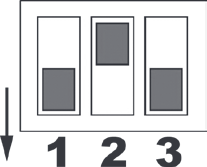
- Frame Packing
- Side-by-Side (Halb)
- Top-and-Bottom
- 4K2K 1920x1080p @23.98/24Hz
- 1920x1080i @59.94/60Hz
- 1920x1080p @23.98/24Hz
- 4096x2160 @23.98/24Hz
- 1280x720p @59.94/60Hz
- 1920x1080i @50Hz
- 1280x720p @59.94/60Hz
- 3840x2160 @23.98/24Hz
- 1280x720p @50Hz
- 1280x720p @50Hz
HDMI 4K/3D video format
IR Remote Operation
Note: 1. If one of the sink devices does not support the highest video format of the other one, the device with lower video format will show no image.
2. If one of the sink devices does not support the highest audio format of the other one, the device with lower audio format will become soundless.
3. If one of the sink devices does not support the highest format of the other one, the device with lower format will either have no picture or no sound presented.
4. Please make sure the setting of the source device can be supported by the amplifier.
5. If the other sink device of Output B does not support the output standard of Output A, the sink device of Output B will be displayed either without picture or without sound.
Two sets of power and selection keys are available for Output A and Output B.
The power and selection of Output A and Output B can be controlled individually.
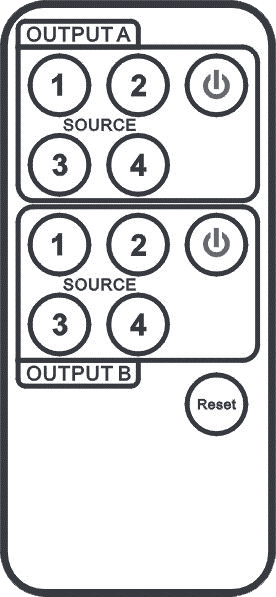
Output A:
- Use the power key of Output A on the IR remote controller to turn on the signal transmission of Output A. The power indication LED (Active-A) of Output A on the front panel will be lighted on. Press the power key of Output A one more time to turn the Output A to standby.
- Use number keys to switch between sources.
Output B:
- Use the power key of Output B on the IR remote controller to turn on the signal transmission of Output B. The power indication LED (Active-B) of Output B on the front panel will be lighted on. Press the power key of Output B one more time to turn the Output B to standby.
- Use number keys to switch between sources.
Reset:
Use the Reset key on the IR remote controller to reset the HDMI Matrix Switcher to the initial status.
Manual Operation
Output A and Output B have individual source selection and power control key.
Output A:
- The “Select/Power” key is a multi-function key.
- Power Control: Press the “Select/Power” key for 2 seconds to turn off the power (Standby); press the “Select/Power” key once to turn on the switcher.
- Source Selection: If you want to change the input channel manually, you can press the “Select/Power” key once. A LED will be lighted up for the channel indication.
Output B:
- The “Select/Power” key is a multi-function key.
- Power Control: Press the button for 2 seconds to turn off the power (Standby); press the “Select/Power” key once to turn on the switcher.
- Source Selection: If you want to change the input channel manually, you can press the “Select/Power” key once. A LED will be lighted up for the channel indication.
Reset:
Use the Reset key on the back of the Matrix Switcher to reset the HDMI Matrix Switcher to the initial status.
The procedure is a cyclic function. When you selected the channel, there will be a LED on to present the channel. If you select channel 1, the CH1 LED will light on.

Trouble Shooting
- When there is no picture presented, please:
- Make sure the direct connection from the source device to the display device without the HDMI Switcher is working.
- Check all connectors connect well or not.
- Check the connecting cable is damaged or not.
- Check the power of HDMI matrix switcher (or reset the matrix switcher).
- When there is only picture displayed and without sound:
- Check the cable connection to see if it fits properly.
- Check your cable to see if it supports video transmission only (DVI) or it is damaged.
- HDCP may not match very well at first connection; please reset your HDMI matrix switcher.
- Do you connect any output to your video recorder? HDCP will lock up audio part.
- When use a coaxial/optical audio cable to connect the matrix switcher to a Home Theater System, no sound is delivered by the Home Theater System.
- Please check the connection.
- The coaxial/optical audio cable needs to be connected to the coaxial/optical audio input port of the Home Theater System.
- The audio input selection of the Home Theater System needs to be selected to a corresponding coaxial/optical audio input.
- Please make sure the output audio format can be supported by the Home Theater System. If the audio format is in Dolby® or DTS® format, the Home Theater needs to support Dolby® or DTS® decoding.
- When use a coaxial/optical audio cable to connect the matrix switcher to a Home Theater System, the coaxial/optical audio output only delivers stereo audio signal to the Home Theater System.
- Because the HDTV (or Projector) which connected to the Output-A can only support stereo audio signal, the coaxial/optical audio output will send out the audio signal based on the Output A.
- Please refer to the page 3 for audio output format adjustment.
- When resolution could not show in 1080p.
- Make sure your sources and displays are fully supporting 1080p.
- Make sure your HDMI cables are capable of transmitting 1080p video signal.
- When 4K/3D content could not be shown on your display.
- Please make sure your sources and displays are 4K/3D supported devices and also support the same 4K/3D format.
- Please check the play mode of Blue-ray player has been set 4K/3D mode or AUTO mode for video output.
- Please make sure the video content is 4K/3D content.
• The coaxial/optical audio cable needs to be connected to the coaxial/optical
The coaxial/optical audio cable needs to be connected to the coaxial/optical audio input port of the Home Theater System. The audio input selection of the Home Theater System needs to be selected to a corresponding coaxial/optical audio input.
Trouble Shooting
- If the presented picture is not a proper 4K/3D image, please check whether the 4K/3D format of your sources (Blue-ray player, PS3, etc.) and displays (TV or projector) are set correctly.
- If the presented picture is symmetric, which showed with up and down or right and left symmetric image, please check whether the TV or projector supports 4K/3D display function and make sure the function is enabled. If the TV or projector does not support 4K/3D video format, please turn off the 4K/3D play mode of sources.
Notice
- Manufacturer reserves the right to make changes in the hardware, packaging and any accompanying documentation without prior written notice.
• HDMI, the HDMI Logo and High-Definition Multimedia Interface are trademarks
- HDMI, the HDMI Logo and High-Definition Multimedia Interface are trademarks or registered trademarks of HDMI Licensing LLC in the United States and other countries.
- PS420/4K/3D incorporates HDMI™ technology.
- Trademarks and brand names are the properties of their respective owners.
- PS3 is a trademark of Sony Computer Entertainment Inc.
- Dolby is a registered trademark of Dolby Laboratories.
- DTS is a registered trademark & the DTS logos and Symbol are trademarks of DTS, Inc.
PureLink GmbH
Von-Liebig-Straße 10
D - 48432 Rheine
Germany
Telefon: 0049 (0)5971-800 299 -0
Fax: 0049 (0)5971-800 299 -99
E-mail: info@purelink.de
Internet: www.purelink.de
© 2014 PureLink GmbH. All rights reserved.
All trade names are registered trademarks of respective manufactures listed.
HDMI is a trademark of HDMI Licensing LLC.
Legal & Compliance
Product identification
Model: PS420 – manual version 1.0
Warranty and liability
The manufacturer grants the full statutory warranty on all new devices. As the manufacturer has no influence on installation, the warranty only applies to the product itself. If you detect a fault or damage, please contact your dealer and provide your sales slip or invoice as proof of purchase.
The manufacturer is not liable for damage to persons or property caused by improper installation, operation or maintenance not described in this manual. Do not alter or modify the product or its accessories. Any use other than described in this manual is not permitted and voids warranty and guarantee.
Disposal of electrical and electronic equipment
WEEE reg. no.: DE 93847290
The crossed-out wheelie bin symbol on the product, packaging or in this manual means that electrical and electronic equipment must not be disposed of with household waste at the end of its life. Hand in old devices free of charge at a public collection point or return them to a distributor obliged to take them back. Remove batteries and lamps that can be removed without destroying the device before handing it in, and delete any personal data stored on the device. Details are regulated by national law. By returning old devices you help protect the environment.
Batteries
Batteries must not be disposed of with household waste. Return used batteries free of charge to collection points or retailers.
Packaging
Dispose of packaging separately by material (paper/cardboard, plastics) via the local collection systems. Keep packaging material away from children – risk of suffocation. Packaging register LUCID: DE5958616449295.