
AbandonnéAlternative possible : PT-PSW-21HC-KVM
PT-PSW-21C
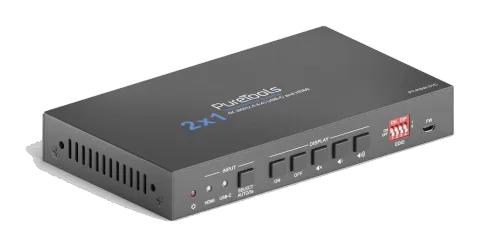
Commutateur de présentation multiformat 2x1 4K 18Gbps avec KVM
Le Switcher KVM PureTools 2x1 (HDMI, USB-C) permet de commuter entre 1 signal HDMI et 1 signal USB-C vers une seule sortie HDMI, prenant en charge une bande passante de 18Gbps pour des résolutions jusqu'à 4K UltraHD …
ManuelCommandes (TCP/IP)FAQFiche techniqueAlternative disponibleFirmwareCEInterfaces de contrôle disponibles. Développez un type actif pour afficher le tableau complet des commandes.
Aucune commande correspondante.
Commandes RS23235 commandesActif
ConnexionRS232 Communication Protocol Baud rate: 9600 Data bit: 8 Stop bit: 1 Parity bit: none All commands must end with “<CR><LF>”. In the commands, “[”and “]” are symbols for easy reading and do not need to be typed in actual operation.↓ CSV
Source : manuel, chapitre RS232 Command, page 22
| Commande | Description | Réponse | |
|---|---|---|---|
| #GET_FIRMWARE_VERSION | Obtenir la version du firmware. | @V1.0.0 | |
| #FACTORY_RESET | Réinitialisation d’usine. | @FACTORY_RESET | |
| #REBOOT | System reboot | @REBOOT | |
| #HELP | Get the command details. Example: #HELP SET_AV Feedback: @SELECT VIDEO AND AUDIO INPUT PORT | ||
| #SET_AV PARAM1 PARAM1=H,C H - HDMI C - TYPE-C | |||
| #SET_AV H | Switch to HDMI input. | @AV H | |
| #SET_AV C | Switch to USB-C input. | @AV C | |
| #GET_AV | Obtenir la source d’entrée actuelle. | @AV H @AV C | |
| #SET_AUTO_SWITCH 1 | Activer le mode de commutation automatique. | @AUTO_SWITCH 1 | |
| #SET_AUTO_SWITCH 0 | Disable auto switching mode. | @AUTO_SWITCH 0 | |
| #GET_AUTO_SWITCH | Obtenir l'état du commutateur automatique. | @AUTO_SWITCH 1 @AUTO_SWITCH 0 | |
| #UPLOAD_USER_EDID [X] X =1~5, represents the EDID, its DIP switch status shows as below: | X DIP Switch Status 1 1011 2 1100 3 1101 4 1110 5 1111 Operation: Prepare the EDID file (.bin). Set the 4-pin DIP switch status, for example: “1011”. Send the command “#UPLOAD_USER_EDID 1.”, and the feedback is “@USER_EDID 1 READY PLEASE SEND EDID DATA IN 10S”. Send the EDID file (.bin). If successfully upload, the feedback is: “OK”. | ||
| #SET_SYNCACT_CEC 1 | Enable the function of automatically sending CEC commands. When detecting video input signal or not detecting any video signal, the switcher will automatically send the corresponding CEC command to control the display device. | @SYNCACT_CEC 1 | |
| #SET_SYNCACT_CEC 0 | Disable the function of automatically sending CEC commands. | @SYNCACT_CEC 0 | |
| #GET_SYNCACT_CEC | Obtenir l'état de configuration de la fonction d’envoi automatique des commandes CEC. | @SYNCACT_CEC 1 | |
| #SET_SYNCACT_RS232 1 | Enable the function of automatically sending RS232 commands. When detecting video input signal or not detecting any video signal, the switcher will automatically send the corresponding RS232 command to control the display device. | @SYNCACT_RS232 1 | |
| #SET_SYNCACT_RS232 0 | Disable the function of automatically sending RS232 commands. | @SYNCACT_RS232 0 | |
| #GET_SYNCACT_RS232 | Obtenir l'état de configuration de la fonction d’envoi automatique des commandes RS232. | @SYNCACT_RS232 1 | |
| #SET_DTIME [PARAM1]:[PARAM2] | When not detecting video input signal, set the auto power-off time of display device to [PARAM1]: [PARAM2]. The default time is 15 minutes. [PARAM1]=0~30 minutes. [PARAM2]=0~1800 seconds. | #SET_DTIME 1:30 @DTIME 1:30 | |
| #GET_DTIME | Get the auto power-off time of display device. | @DTIME 30:0 | |
| #SET_AUDIO_MUTE | Mute/unmute the display audio through CEC and RS232 channels. | @AUDIO_MUTE_UNMUTE | |
| #SET_VOL + | Increase the display audio through CEC and RS232 channels. | @VOL - | |
| #SET_VOL - | Decrease the display audio through CEC and RS232 channels. | @VOL + | |
| #SET_DISPLAY 1 | Allumer l'affichage. | @DISPLAY 0 | |
| #SET_DISPLAY 0 | Éteindre l’affichage. | @DISPLAY 1 | |
| #SET_RS232_BAUD 0 | Set the RS232 baud rate to 115200. | @RS232_BAUD 0 | |
| #SET_RS232_BAUD 1 | Set the RS232 baud rate to 57600. | @RS232_BAUD 1 | |
| #SET_RS232_BAUD 2 | Set the RS232 baud rate to 38400. | @RS232_BAUD 2 | |
| #SET_RS232_BAUD 3 | Set the RS232 baud rate to 19200. | @RS232_BAUD 3 | |
| #SET_RS232_BAUD 4 | Set the RS232 baud rate to 9600. | @RS232_BAUD 4 | |
| #SET_RS232_BAUD 5 | Set the RS232 baud rate to 4800. | @RS232_BAUD 5 | |
| #SET_RS232_BAUD 6 | Set the RS232 baud rate to 2400. | @RS232_BAUD 6 | |
| #GET_RS232_BAUD | Obtenir le débit en bauds RS232. | @RS232_BAUD 0 @RS232_BAUD 1 @RS232_BAUD 2 @RS232_BAUD 3 @RS232_BAUD 4 @RS232_BAUD 5 @RS232_BAUD 6 | |
| #SET_ON_[PARAM1]_[PARAM2]:XXXX | Set the ASCII RS232 command XXXX to be sent to control the third-party device when the DISPLAY ON button is pressed. [PARAM1] = 00~06 (Baud Rate) 00 - 115200 01 - 57600 02 - 38400 03 - 19200 04 - 9600 05 - 4800 06 - 2400 [PARAM2] = 00~99. The delay time of sending command. XXXX: Any ASCII code (up to 48 bytes). | #SET_ON_05_30:1234567 @BAUDRATE: 4800 @DELAY TIME: 30 s @DISPLAY ON TO SEND:1234567 | |
| #SET_H_ON_[PARAM1]_[PARAM2]:XX XX | Set the HEX RS232 command XX XX to be sent to control the third-party device when the DISPLAY ON button is pressed. [PARAM1] = 00~06 (Baud Rate) 00 - 115200 01 - 57600 02 - 38400 03 - 19200 04 - 9600 05 - 4800 06 - 2400 [PARAM2] = 00~99. The delay time of sending command. | #SET_H_ON_05_30:31 32 33 34 35 @BAUDRATE: 4800 @DELAY TIME: 30 s @DISPLAY ON HEX TO SEND:31 32 33 34 35 |